Knowing how to add transitions to a video comes down to four actions in any timeline editor: place two visual clips directly next to each other on the same video track with no gap, drag or select a transition at their shared cut point, set its duration so both clips have enough unused source frames (handles) to overlap, and preview the join with audio on. This guide gives the exact documented menu paths for video transitions in Premiere Pro, how to add transitions in Canva video, CapCut, DaVinci Resolve, Apple iMovie and ChatCut, along with how to pick a transition that fits the scene and fix transitions that refuse to attach.
Choose a transition that serves the scene
Before opening an effects panel, decide whether the cut between Shot A and Shot B actually needs a visible effect. In most spoken explanations, tutorials, and interviews, a plain straight cut (where the last frame of Shot A switches directly to the first frame of Shot B) keeps the viewer focused on the subject. Adding a spin, zoom, or flash between two ordinary sentences calls attention to the edit point instead of the story.
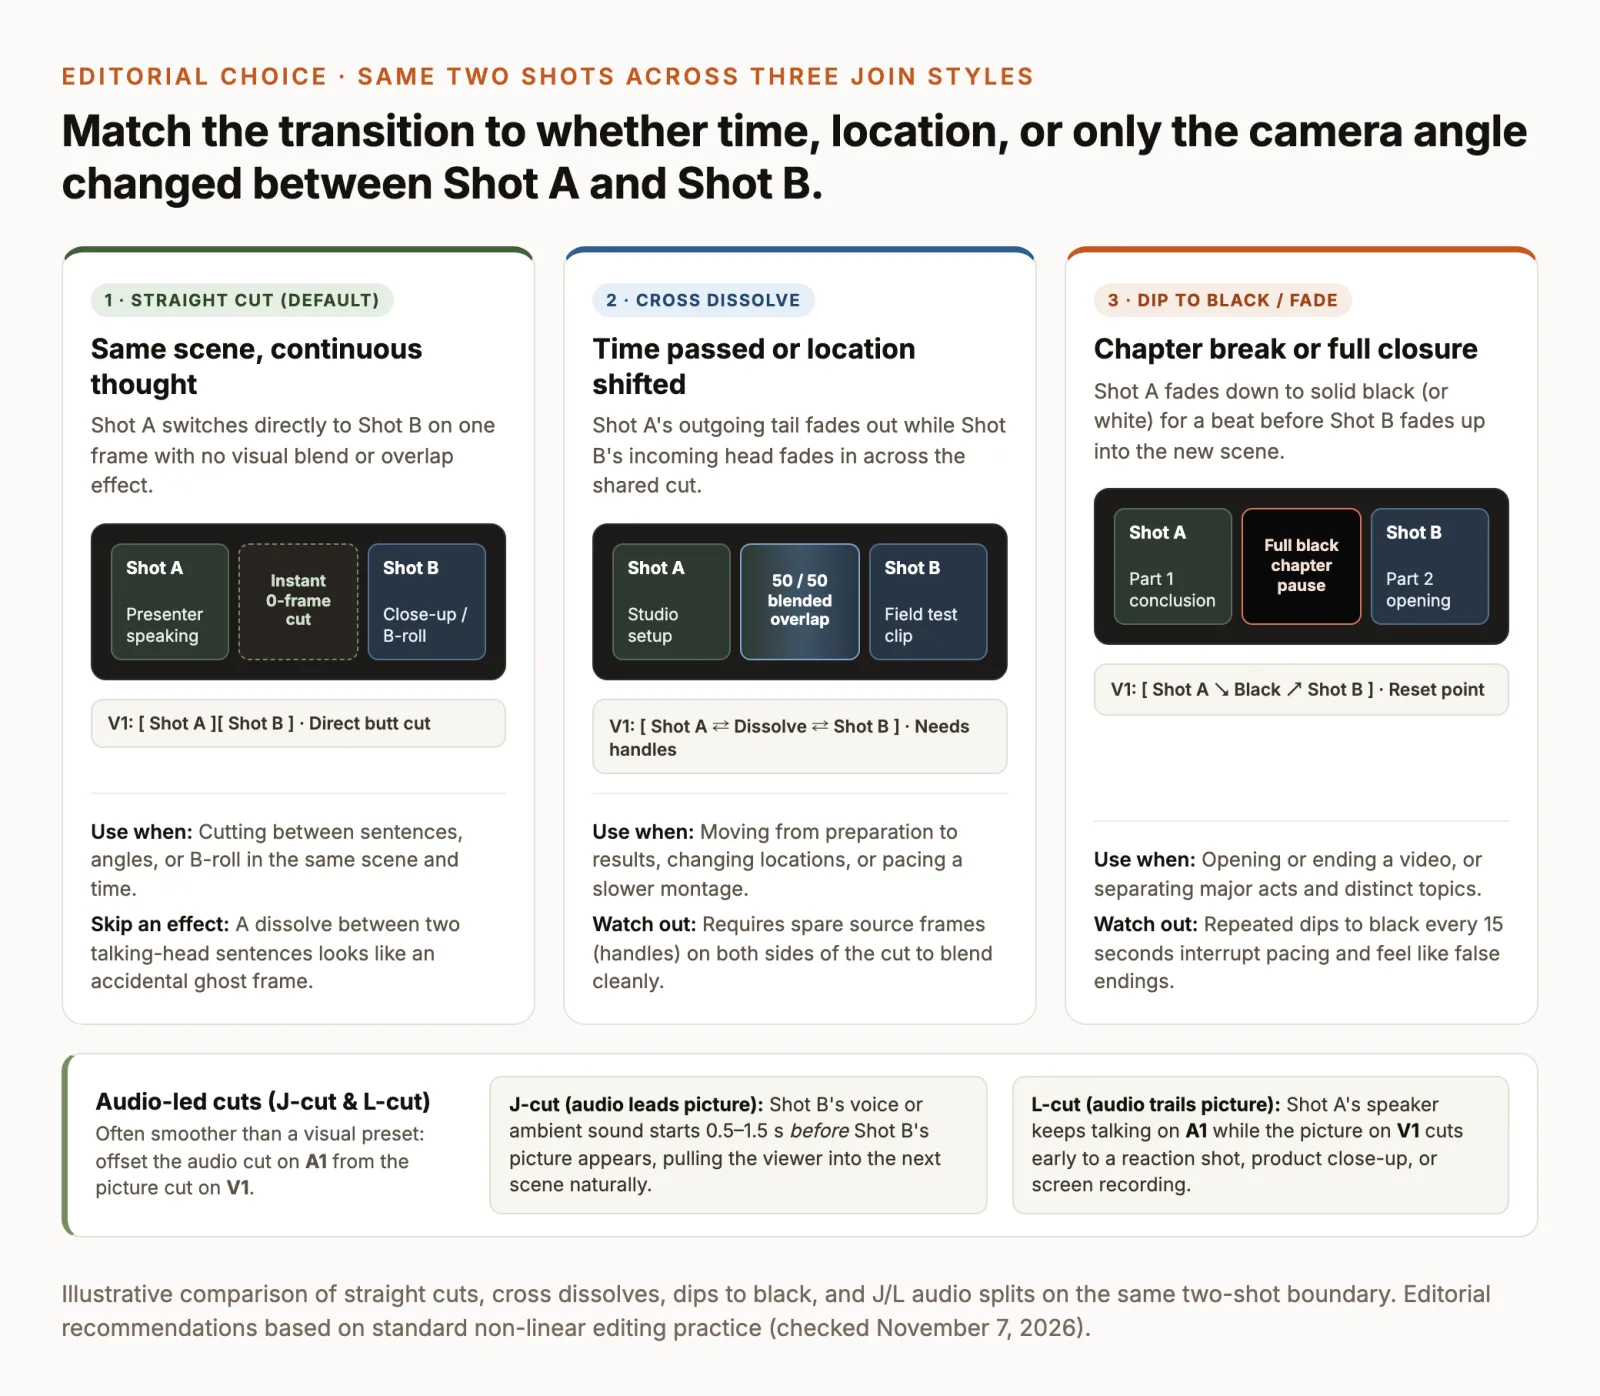
A transition earns its place when something changes between the two clips: time passes, the location shifts, a chapter closes, or a musical montage changes energy. Keep three categories separate when planning your edit, because they are built differently on a timeline:
- Straight cuts and audio-led cuts (no preset required). A straight cut joins two clips at a single frame. Offset the audio cut on
A1from the picture cut onV1to create a J-cut (the next clip’s audio starts0.5–1.5 secondsbefore its picture appears) or an L-cut (the current speaker’s voice continues while the picture cuts early to B-roll or a reaction shot). - Drag-and-drop timeline transitions. Presets such as Cross Dissolve, Dip to Black, Wipe, and Slide blend or replace pixels across the cut point. Because they combine frames from the end of Clip A and the start of Clip B, both clips must sit on the same track and contain spare trimmed frames beyond the cut.
- In-camera movement and match cuts. Whip pans, object passes that wipe the lens, and match cuts on similar shapes or actions are filmed during production. Dragging a blur or zoom preset onto a static cut can imitate the motion, but it works cleanly only when the camera or subject is already moving in the same direction at the end of Shot A and the start of Shot B.
Use the table below as an editorial starting point rather than a rigid rulebook:
| Transition type | Recommended scene fit | When to skip it |
|---|---|---|
| Straight cut | Continuous speech, camera-angle switches, and B-roll cutaways in the same scene | Big time jumps where an abrupt cut looks like an editing mistake |
| Cross dissolve | Time passing, location changes, or slower reflective montages | Between two talking-head sentences on the same background |
| Dip to black / fade | Opening a video, ending a sequence, or separating major chapters | Between rapid points in a short tutorial (feels like false endings) |
| Matched movement | Fast montages where Shot A exits in the same direction Shot B enters | Static tripod shots with mismatched framing or lighting |
| Short wipe or zoom | Intentional visual accent between numbered list items or fast social hooks | Every cut in a row, which quickly fatigues the viewer |
| Optical-flow morph | Subtle jump cuts on a locked-off single-speaker shot (Morph Cut / Smooth Cut) | Shots with waving hands, moving backgrounds, or large head turns |
How to add transitions to a video
We reviewed official documentation for six widely used editors on November 7, 2026. We did not run comparative export-speed tests across these apps; menu paths below reflect each vendor’s documented workflow.
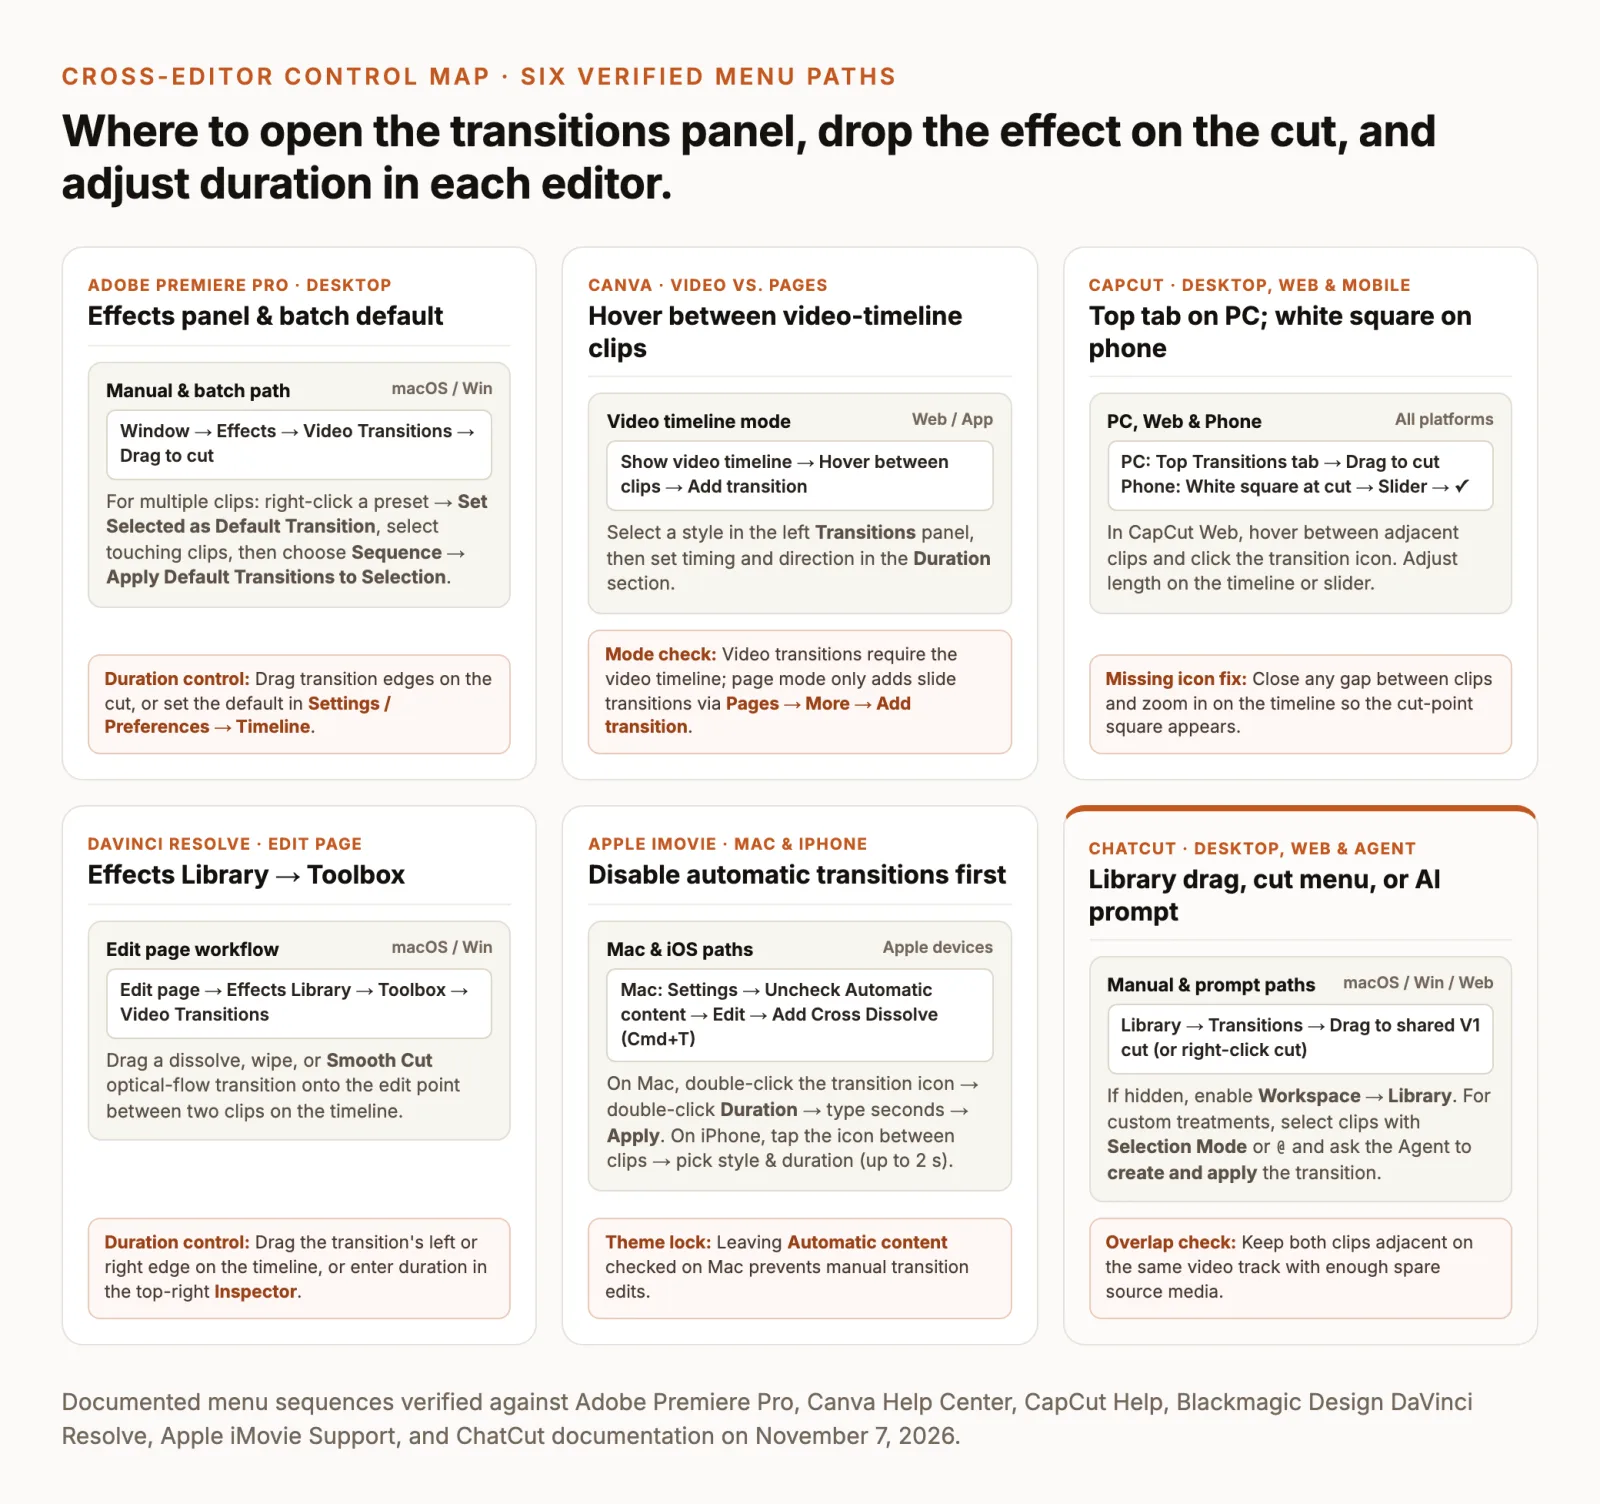
Jump directly to your editor:
| Editor | Supported platform | Transition entry point |
|---|---|---|
| Adobe Premiere Pro | macOS, Windows | Window → Effects → Video Transitions |
| Canva Video | Web, macOS, Windows, iOS, Android | Show video timeline → hover between clips → Add transition |
| CapCut | Windows, macOS, Web, iPhone, Android | Top Transitions tab on PC; white square at cut on phone |
| DaVinci Resolve | macOS, Windows, Linux | Edit page → Effects Library → Toolbox → Video Transitions |
| Apple iMovie | macOS, iPhone, iPad | Edit → Add Cross Dissolve (Cmd+T) on Mac; cut icon on iPhone |
| ChatCut | macOS, Windows, Web | Library → Transitions, cut context menu, or AI Agent prompt |
Apply video transitions in Premiere Pro
To apply video transitions in Premiere Pro, place two clips side by side on the same video track (V1) with no empty space between them and make sure both clips have trimmed handle frames past the cut. Because Adobe’s help pages blocked automated verification during this check, check the official page for adding transitions in Premiere Pro and the official guide to setting and applying default transitions:
- Open the Effects panel. Choose Window → Effects in the top menu bar so the Effects panel is visible, then expand the Video Transitions folder (for example, Dissolve → Cross Dissolve or Dip to Black). If you are upgrading to Premiere Pro 26.0 and a familiar preset has moved or been retired, check the official page for effects and transitions library changes in Premiere Pro 26.0.
- Drag the transition onto the cut. Drag your chosen transition from Video Transitions and drop it directly on the edit point between the two adjacent clips on your timeline. By default, Premiere centers the transition across the cut if both clips have unused handle media.
- Adjust duration on the timeline. Zoom into the cut point and drag either edge of the transition block inward or outward to shorten or lengthen the effect, or select the transition and adjust its duration and alignment in Effect Controls.
- Apply a default transition to one or many cuts. Right-click any transition in Effects → Video Transitions and choose Set Selected as Default Transition. To batch-apply that default across a sequence, select two or more touching clips on the timeline and choose Sequence → Apply Default Transitions to Selection (or press
Cmd+Don macOS /Ctrl+Don Windows for the default video transition). Premiere applies the default only where two selected clips touch, not to unselected neighboring cuts. - Change the default transition duration. Before batch-applying transitions, open Premiere Pro → Settings → Timeline on macOS or Edit → Preferences → Timeline on Windows and set Video Transition Default Duration in frames or seconds.
- Preview the edit. Press
Spacebarto play across the cut and confirm no frozen duplicate frames appear.
How to add transitions in Canva video
When learning how to add transitions in Canva video, the most common obstacle is editor mode: Canva offers a multi-clip video timeline for video projects and a separate page view for presentations and slide decks. Video clip transitions only appear when the video timeline is open; check the official page on creating and editing videos in Canva:
- Open the video timeline. In your Canva video project, click Show video timeline at the bottom of the workspace so your main-track video clips appear as horizontal bars rather than page thumbnails.
- Hover between two adjacent clips. Move your pointer directly into the seam between two clips on the main video track until the
+and Add transition control appears. - Pick a transition style. Click Add transition to open the Transitions panel on the left side of the editor, then hover or click a style (such as Dissolve, Slide, Circle Wipe, or Line Wipe) to preview it on the cut.
- Set timing and direction. In the Duration section of the Transitions panel, drag the slider to adjust how long the transition lasts and choose the movement direction or color option when the style supports it.
- Preview from the clip before the cut. Move the playhead two seconds before the seam and press Play to verify the pacing against your audio track.
If your project is in Canva page mode instead: Slide decks, social carousels, and standard multi-page designs use page transitions rather than the video timeline. In Pages view at the bottom of the editor, hover between two page thumbnails (or click a thumbnail’s More menu) and choose Add transition; check the official page for Canva page transitions. Keep the two workflows distinct: page transitions animate whole design pages, whereas video transitions join trimmed clips along the video timeline.
Add transitions in CapCut desktop and mobile
If you are looking up how to add transitions in CapCut, the control location depends on whether you are editing in the desktop app, the mobile app, or the web editor. According to CapCut’s official transitions troubleshooting guide, all three versions require at least two clips placed side by side on the main track with zero gaps:
In CapCut Desktop (Windows and macOS):
- Open your project in CapCut Desktop and drag at least two video clips side by side onto the main timeline track with no space between them.
- Click the Transitions tab in the top-left navigation bar (CapCut Help).
- Browse or search the categories, click a transition to preview it, and drag the effect down between the two adjacent clips on the timeline.
- Drag the edges of the transition block on the timeline (or use the duration slider in the upper-right panel) to shorten or lengthen the overlap, then play through the cut.
In CapCut Mobile (iPhone and Android) and CapCut Web:
- Open your project in the CapCut mobile app and add at least two clips to the main timeline. If the cut point looks crowded, pinch outward with two fingers to zoom in on the timeline (CapCut Help).
- Tap the small white square icon with a vertical line sitting directly between the two clips (in the CapCut Web Editor, hover between the two clips and click the small transition icon; see also CapCut’s guide to adding video transitions).
- Select a transition category and tap an effect to preview it on the join.
- Drag the duration slider at the bottom of the panel to set the transition speed, then tap the checkmark (
✓) to apply it and play back the cut.
For background on how classic wipes, dissolves, and cutaways differ from preset packs, see CapCut’s filmmaking transitions overview.
Add transitions in DaVinci Resolve Edit page
To follow the standard workflow for how to add transitions in DaVinci Resolve, switch to the Edit page (the third workspace tab along the bottom bar). Blackmagic Design’s official DaVinci Resolve Edit page documentation and the DaVinci Resolve 20 Beginner’s Guide PDF (check the official guide for full training exercises) outline the following path:
- Open the Effects Library. In the Edit page, click Effects Library in the top-left toolbar to reveal the asset sidebar.
- Navigate to Video Transitions. In the left column of the Effects Library, expand Toolbox → Video Transitions to view Resolve’s built-in dissolves, irises, wipes, slides, and motion transitions (DaVinci Resolve Edit documentation).
- Drag onto the edit point. Drag your chosen transition from Video Transitions onto the cut point between two touching clips on the timeline. If you are hiding a jump cut in a single-camera interview, drag Smooth Cut onto the edit point; Resolve uses optical-flow analysis to interpolate frames across the jump (DaVinci Resolve Edit documentation).
- Adjust duration on the timeline or Inspector. Drag the left or right edge of the transition box directly on the timeline to change its length, or click the transition and open the Inspector in the top-right corner to set exact duration, alignment, and easing curves.
- Preview playback. Scrub across the cut and press
Spacebarto verify smooth playback before exporting on the Deliver page.
Add transitions in iMovie on Mac and iPhone
If you are searching for how to add transitions in iMovie, note one prerequisite on macOS: when a project theme has automatic transitions enabled, iMovie blocks manual transition edits until you turn that setting off.
In iMovie on Mac:
- Turn off automatic transitions first. With your movie open in the timeline, click Settings in the upper-right corner of the timeline and deselect the Automatic content checkbox (Turn off automatic transitions in iMovie on Mac). Existing transitions stay on the timeline, and manual placement unlocks.
- Add a Cross Dissolve with a shortcut or drag from the browser. To insert a standard cross dissolve quickly, click the edge of either clip at the cut and choose Edit → Add Cross Dissolve or press
Command-T(Add transitions in iMovie on Mac; selecting a whole clip instead of one edge adds a cross dissolve to both ends of that clip). To choose another style such as Fade to Black, Wipe, or Slide, click Transitions above the browser, skim a thumbnail to preview it, and drag it between two clips in the timeline. - Set an exact duration in seconds. Double-click the transition icon between the clips in the timeline, double-click the Duration field in the transition controls, type the number of seconds, and click Apply (or click Apply to all to give every transition in the movie the same style and length; Modify transitions in iMovie on Mac). To change the default for future manual transitions (
0.5 secondsfor standard transitions;2.0 secondsfor theme transitions), choose iMovie → Settings and enter a new value in the Transitions field (Apple Support).
In iMovie on iPhone or iPad:
- Open your movie project in iMovie on iPhone; by default, iMovie places a transition icon between every clip and photo on the timeline (Adjust transitions in iMovie on iPhone).
- Tap the transition icon between the two clips you want to change.
- In the inspector at the bottom of the screen, tap None (for a straight cut), Theme, Cross-dissolve, Slide, Wipe, or Fade (to black or white).
- Tap the duration number in the inspector and pick a length up to
2.0 seconds(available durations depend on the lengths of the surrounding clips), then tap outside the inspector and press Play to preview (Apple Support).
Create and apply a transition in ChatCut
ChatCut is our own editor, available on desktop for macOS 13+ (Apple silicon and Intel) and Windows 10+ (x64) and in the web browser; Linux and ChromeOS are not supported (Product facts). You can connect clips in ChatCut manually from the Library and Timeline context menu, or ask the AI Agent to create and apply a transition at a specific cut.
1. Apply a built-in transition from Library or the cut menu
For standard transitions, use the built-in presets documented in ChatCut’s Library guide and Timeline reference:
- Place two visual clips side by side on the same video track. Drag both clips from My Assets onto
V1so their edges touch with no gap and both clips have enough spare source duration for the overlap (Library). - Open the Library panel. Select the Library tab in the media panel beside the Viewer. If Library is hidden in your layout, open Workspace → Library in the top bar (Editor Layout).
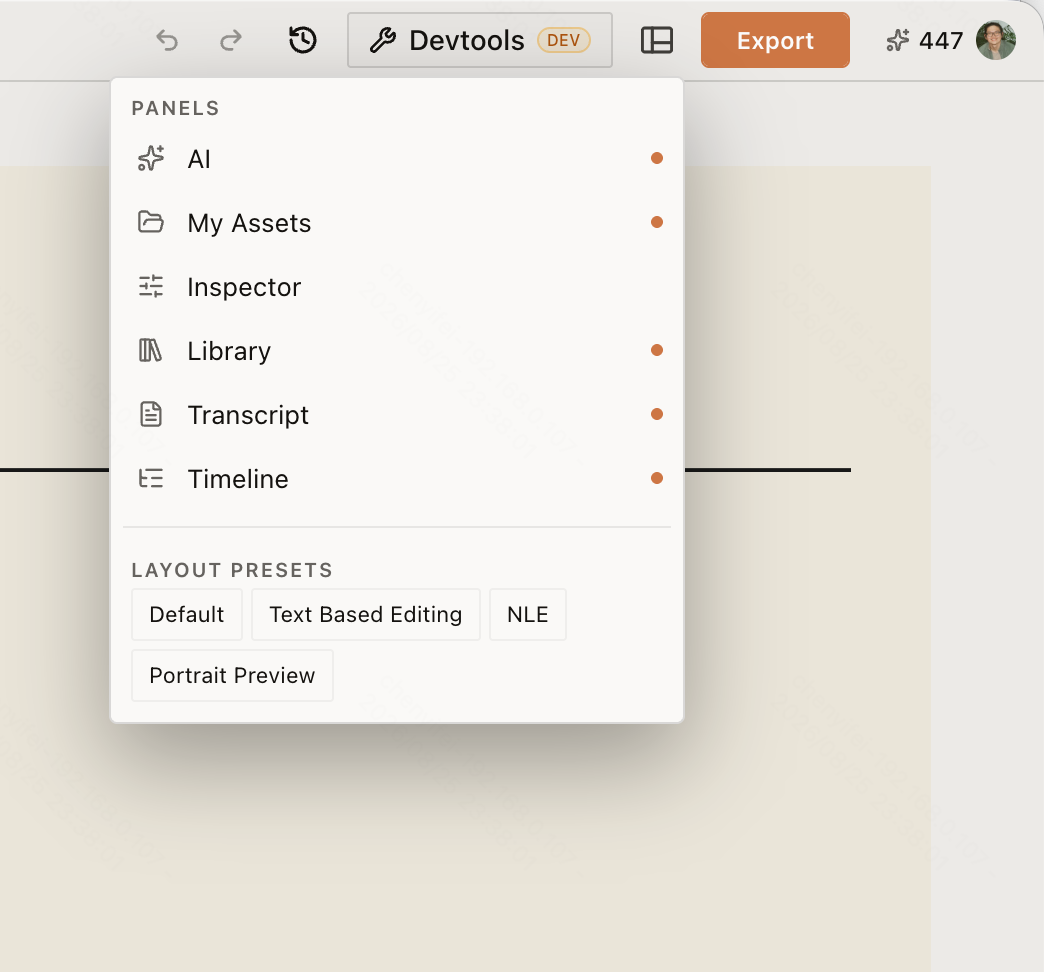
- Drag a transition onto the shared cut. Open Library → Transitions, preview the available styles, and drag a transition directly onto the cut between the two adjacent clips on
V1(Library). Alternatively, right-click the cut on the Timeline: when the neighboring clips have enough spare source media, the Timeline context menu can add a video cross dissolve, an audio cross fade, or both (Timeline). - Adjust or remove. Select the affected clip or transition to adjust available duration or strength controls in the toolbar, or delete the transition / press Undo to return to a straight cut (AI Effects). Note that deleting or separating either adjacent clip on the track also removes the transition (Library).
2. Prompt the Agent to create and apply a transition
When Library → Transitions does not have the exact treatment you want, ChatCut’s AI Effects workflow lets you describe a transition in natural language. ChatCut uses a compatible built-in transition when possible or generates a custom transition when needed.
Before sending a prompt, turn on Selection Mode below the prompt composer (or type @) to reference the two adjacent clips (@clip-A and @clip-B). In your prompt, always ask ChatCut to create and apply the transition: as noted in the AI Effects documentation, asking only to “create” a custom effect can leave it saved as an unapplied project resource.
The prompt below is an untested illustrative example showing how to specify both clips, frame count, direction, and flash limits:
ChatCut’s official AI Effects documentation also provides this reference prompt for a glass-refraction cut between two adjacent clips:
For broader prompt patterns covering rough cuts, B-roll cutaways, captions, and audio ducking on existing footage, see our 26 video editing prompts.
If you are building a branded promo or explainer where whole graphics cards and layouts need to animate continuously from shot to shot (rather than placing a pixel transition between two camera clips), explore our Motion Graphics Guide. The preview below from the Storyboard to ChatCut MG workflow illustrates how multi-shot motion graphics keep visual elements continuous across scene changes (shown as an example of multi-shot graphic continuity, not a drag-and-drop transition preset):
What costs nothing in ChatCut: The Free plan includes the core editor: manual timeline editing, applying built-in Library transitions, uploads, transcription, and standard caption editing never use credits (AI Effects). Exporting MP4/WebM video, MP3 audio, subtitles, and XML uses no credits either (Credits policy); on Free, web/cloud exports share a cumulative 60-minute account quota up to 1080p (Web export limits), while ChatCut Desktop renders video locally on your computer up to 4K. With Claude Code or Codex (plugin / MCP), the agent’s editing work is covered by your existing Claude or ChatGPT subscription rather than ChatCut credits, whereas messages to the built-in ChatCut Agent, custom effect/motion-graphics generation in the built-in Agent, and AI media generation use ChatCut credits.
Fix missing or awkward transitions
When a transition refuses to drop onto a cut, grays out in the menu, or causes a jump during playback, check these six conditions in order.
1. Close timeline gaps and zoom in on the cut
Transitions connect two touching clips. If even a one-frame black gap sits between Clip A and Clip B, CapCut hides the white transition square (CapCut Help) and ChatCut will not attach the dropped transition (Library). Zoom in on the timeline ruler, ripple-delete any gap between the clips, and verify both edges touch.
2. Confirm both clips share the same track and mode
A standard cut transition requires both clips to sit on the same video track (such as V1). If Clip A is on V1 and Clip B is stacked above it on V2, dragging a two-sided transition to the seam fails because there is no shared cut point. Also check editor-specific mode locks:
- Canva: Switch out of page thumbnail view by clicking Show video timeline so clip-to-clip transitions appear.
- iMovie on Mac: Open timeline Settings and uncheck Automatic content (Apple Support).
- ChatCut through-edits: If you split a single continuous clip into two pieces without trimming any frames out, ChatCut marks the join as a through-edit. To remove that split instead of adding a transition, right-click the seam and choose Delete Through Edit (Timeline).
3. Trim clip ends inward to create handle frames
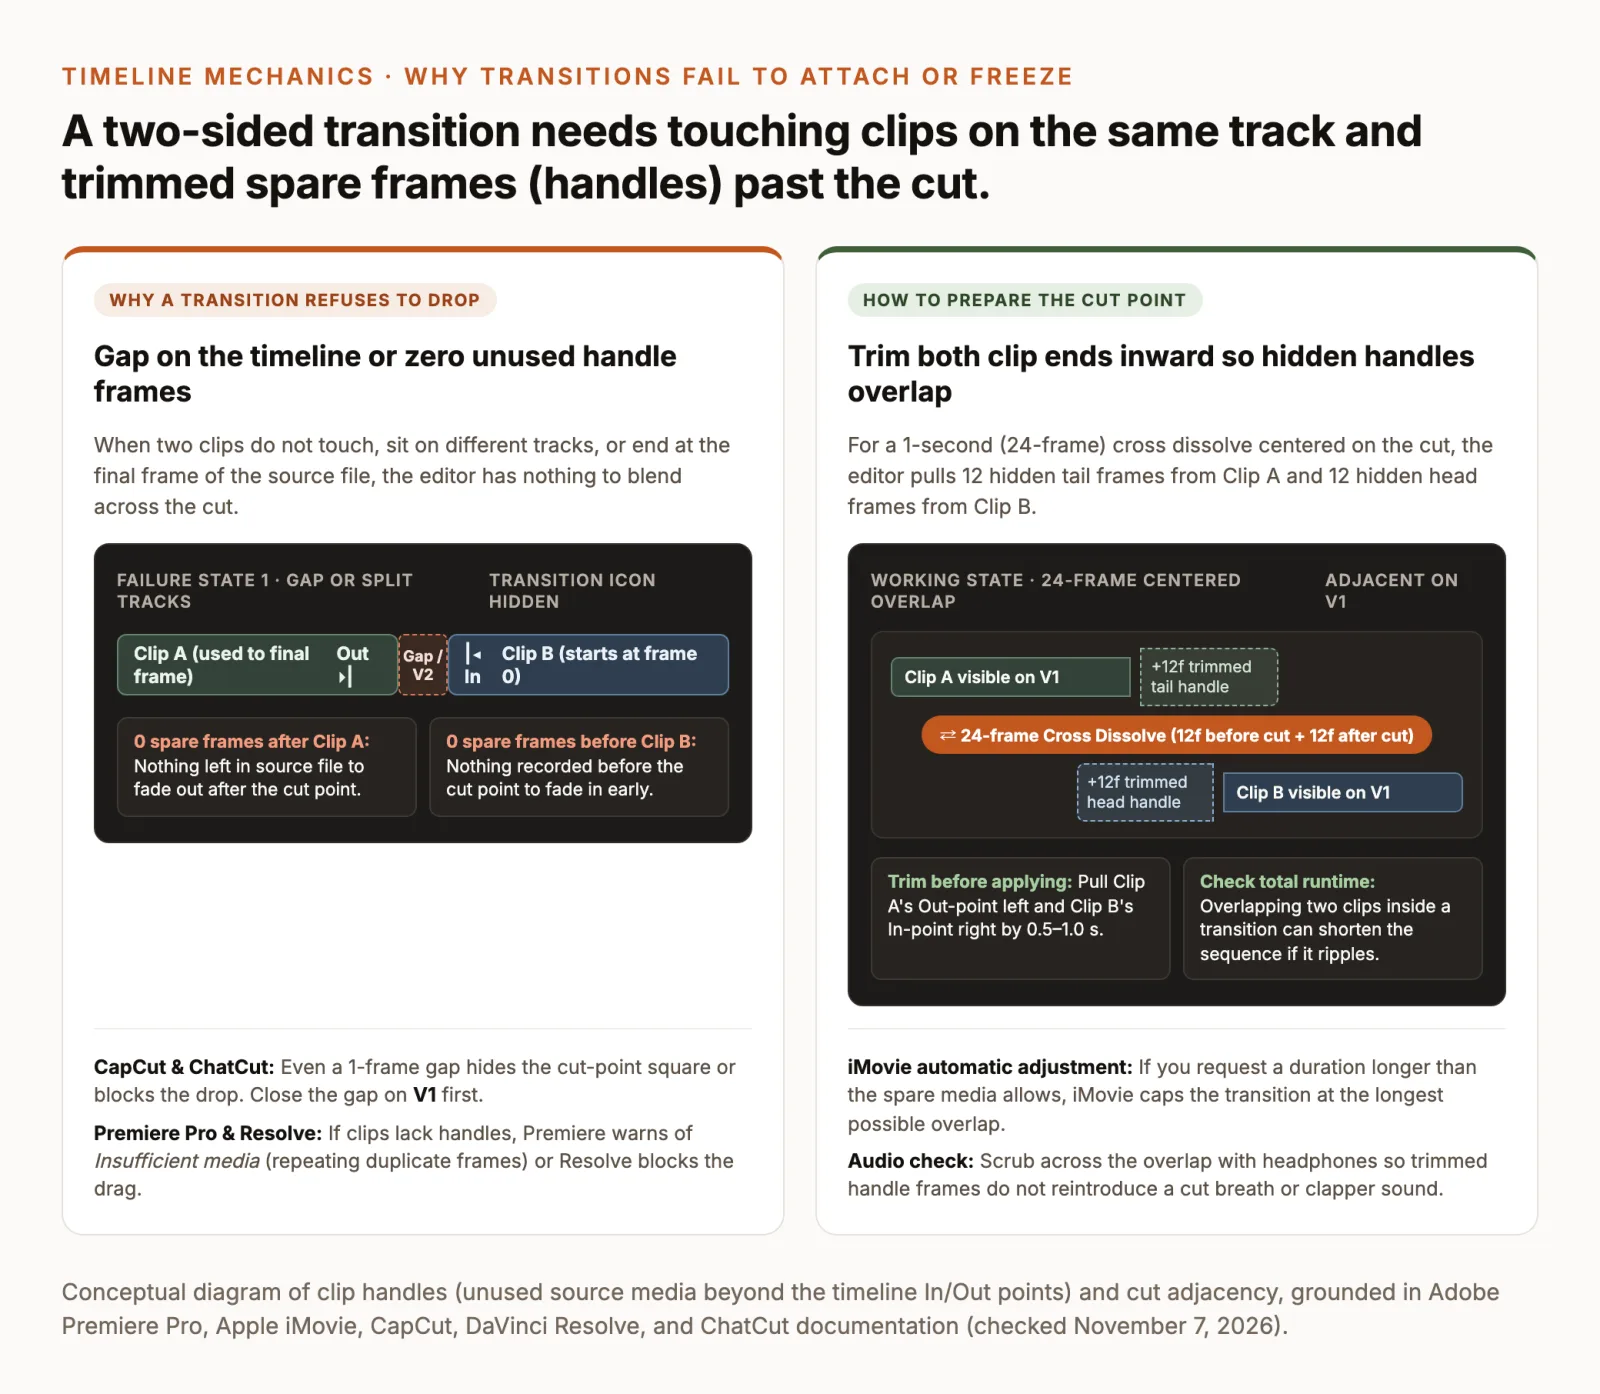
A centered one-second dissolve at 24 fps blends 12 frames of Clip A after the cut with 12 frames of Clip B before the cut. Those extra frames beyond the timeline In and Out points are called handles.
If you placed two untrimmed clips end to end (so Clip A plays to the final frame of its file and Clip B starts at frame zero), the editor has no hidden frames to blend:
- Premiere Pro warns of Insufficient media and repeats frozen duplicate frames during the transition; check the official page on adding transitions in Premiere Pro.
- iMovie on Mac and iPhone automatically shortens the transition to the longest duration the available media allows, or disables Cross-dissolve when clips are too short (Modify transitions in iMovie on Mac, Adjust transitions in iMovie on iPhone).
- ChatCut and DaVinci Resolve require enough overlap source duration on both clips before the transition can attach at full length (Library, DaVinci Resolve Edit documentation).
The fix: Trim 0.5 to 1.0 second off the end of Clip A and the start of Clip B, close the resulting gap on V1, and drop the transition onto the cut again.
4. Shorten sluggish durations and check total runtime
Default transition lengths (0.5 to 2.0 seconds depending on the editor and theme) are often too slow for fast dialogue or software demos. For an accent wipe or quick dissolve between tutorial steps, test a shorter range such as 6 to 12 frames (0.25 to 0.5 seconds). Also watch your sequence timer: in editors that overlap two clips to create handles automatically (such as CapCut, Canva, and iMovie), adding transitions across 20 clips can shorten the total runtime of your video and pull later cuts off-beat from your background music.
5. Watch for optical-flow warping and lighting flashes
Optical-flow transitions (Morph Cut in Premiere Pro, Smooth Cut in DaVinci Resolve) synthesize intermediate pixels to hide jump cuts in single-speaker footage. When the speaker’s hands cross the frame, the camera moves, or the background has busy lines, optical flow produces visible liquid warping. In those shots, remove the morph transition and place a 2–4 second B-roll cutaway or screen recording on V2 above the jump cut instead.
6. Check audio crossfades, detached tracks, and preview stutter
A visual dissolve rarely sounds smooth if the audio track snaps abruptly on a background hum or clipped breath. Pair a scene dissolve with a short audio crossfade, or offset the audio cut as a J-cut or L-cut. If you use Detach Audio in ChatCut to separate audio from selected video clips, note that detaching removes existing audio crossfades on those clips (ChatCut shows a confirmation before applying the change; Timeline).
Finally, remember that transitions blend two decoded video streams at once. If playback stutters right at the cut inside the editor, lower your preview playback resolution or let the timeline render its preview cache, then inspect the exported MP4 file before assuming the transition itself is broken.
Which transitions work for YouTube?
Viewers searching for the best transitions for YouTube usually need pacing rules for a specific video genre rather than a 200-preset download pack. Match your transition palette to how viewers watch each format:
| YouTube format | Primary join style | Why it fits the pacing |
|---|---|---|
| Software tutorials & demos | Straight cuts, V2 zoom-ins, and 6–8 frame dissolves between sections | Keeps UI labels readable and separates steps without distracting flashes |
| Talking-head explainers & interviews | Straight cuts on V1 covered by B-roll on V2, plus J/L audio cuts | Hides jump cuts from pause/filler removal while speech stays continuous |
| Travel vlogs & lifestyle montages | Matched camera motion, beat-aligned straight cuts, and 12–24 frame dissolves | Carries movement across locations and signals time passing between days |
| Gaming highlights & fast shorts | Hard cuts on action peaks, with an occasional short whip or zoom between rounds | Preserves fast gameplay readability; heavy presets obscure scoreboard text |
| Video essays & documentaries | 1–2 second cross dissolves and dips to black between numbered chapters | Gives the audience a deliberate pause to absorb a completed argument |
Keep your choices consistent across the upload: pick one cut style for ordinary scene changes and one transition for chapter breaks. Place transitions after your rough cut and pause tightening are finished so you do not have to rebuild overlaps when a sentence is deleted; our YouTube video editing guide covers that rough-cut-to-polish sequence in detail. If you are timing montage cuts to a song, check copyright and licensing rules first in our guide on how to add music to a video, and export your finished timeline as an H.264 MP4 at your source frame rate with AAC audio to match YouTube’s recommended upload encoding settings.