In this Adobe After Effects tutorial video guide for beginners, you will take one short 1080p video clip from import to a playable H.264 MP4 in five concrete steps: setting up a source-matched composition, splitting and trimming a layer (Edit > Split Layer), speeding up a segment with Time Stretch (50% duration for 2× playback), animating a title card with two keyframes, and rendering from the Render Queue. You need Adobe After Effects on macOS or Windows and one 10-to-20-second .mp4 or .mov file. All menu paths and shortcuts below are verified against Adobe’s official documentation (checked November 7, 2026); we did not run hands-on hardware export benchmarks for this guide.
Decide if After Effects fits your edit
Before opening a project for video editing with After Effects, check whether your goal is animating individual shots or assembling a multi-clip story. Adobe positions After Effects and Premiere Pro as complementary tools built for different stages of post-production rather than interchangeable editors (Adobe Premiere Pro vs. After Effects).
| Task | Recommended tool | Why it fits |
|---|---|---|
| Animated titles, lower thirds, callouts, compositing, VFX | Adobe After Effects | Vertical layer stack and per-property keyframes give frame-level control over short shots. |
| Multi-clip story assembly, interview cuts, audio mixing, color | Adobe Premiere Pro | Horizontal non-linear tracks play long timelines in real time and ripple cuts cleanly. |
| Talking-head motion-graphics packaging from a prompt | ChatCut | Reusable Skills and editable timeline graphics add callouts over speech without manual keyframing. |
Choose After Effects for animated shots
Use After Effects when you are building motion graphics, keyframing kinetic typography, compositing screen replacements, or styling a single 5-to-30-second sequence where every text element, mask, and graphic needs its own layer. Because After Effects caches rendered frames into system memory before playing back complex effects (Previewing video and audio), keeping each composition focused on one short scene or graphic package prevents slow previews.
Before installing, check the official After Effects product page for current subscription plans and trial terms, and check the official After Effects system requirements page to confirm supported macOS and Windows versions, RAM minimums, and GPU specifications.
Choose Premiere Pro for assembling edits
If your main job is cutting a 10-minute talking-head video, lining up interview takes, ducking background music, or grading camera clips end to end, assemble the sequence in Premiere Pro first. In After Effects, every split clip creates a new vertical layer row rather than continuing along a single horizontal track, so a 50-cut vlog quickly turns into a 50-layer stack.
When you use both Adobe apps, you can cut the main story in Premiere Pro and send only the shot that needs animated graphics to After Effects using Adobe Dynamic Link. If you are evaluating non-Adobe options, such as DaVinci Resolve Fusion for free node-based compositing or AI-assisted motion-graphics tools, see our After Effects alternatives comparison.
Set up your Adobe After Effects tutorial video
To follow this Adobe After Effects tutorial video walkthrough from start to finish, build one small practice composition around a single 10-to-20-second video clip. By the end of the exercise, your composition will contain a clean split and trim, a faster 2× playback segment, a two-keyframe animated title, and a finished .mp4 render.
Import footage into the Project panel
- Create and save a project. Launch After Effects, click New Project, and choose File > Save As > Save As… (
Ctrl+Shift+Son Windows,Cmd+Shift+Son macOS) to savefirst-exercise.aepon your drive. - Import one video clip. Choose File > Import > File… (
Ctrl+Ion Windows,Cmd+Ion macOS), or double-click empty dark space inside the Project panel in the upper-left corner, and select your 1080p.mp4or.movfile (Importing and interpreting footage items). - Check the footage header. Click the imported clip once in the Project panel. The top of the Project panel displays its pixel dimensions (for example,
1920 × 1080), duration, and native frame rate (such as24,25, or29.97fps).
Distinguish project, composition, and layer
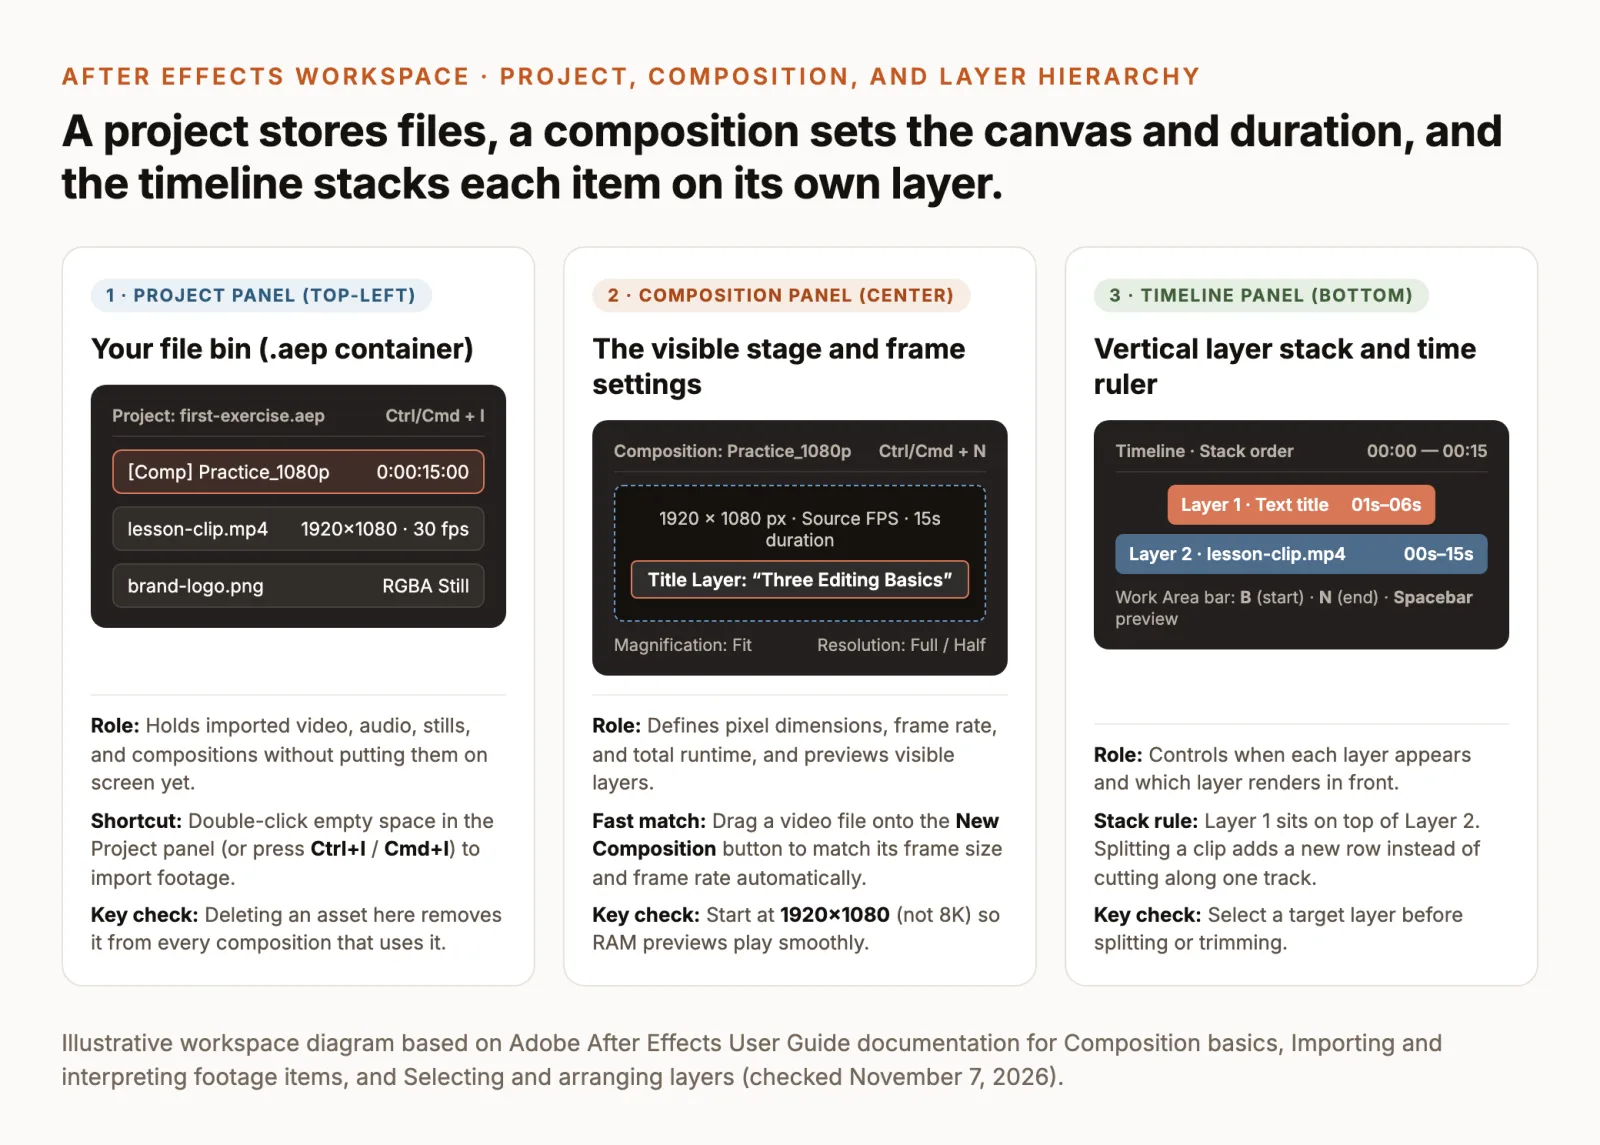
New users often stall because they expect importing a file to place it on screen immediately. Keep three containers separate (Composition basics):
- Project (
.aepfile): The top-level file that holds references to your imported clips, audio, stills, and compositions. It does not copy your source video onto its own drive space, so moving or deleting the source.mp4in Finder or Explorer breaks the link. - Composition (“comp”): The container with its own pixel dimensions, frame rate, and duration, comparable to a sequence in Premiere Pro. Only items placed inside an open composition appear in the center Composition viewer and render on export.
- Layer: Each video clip, text title, shape, or audio file placed inside a composition occupies its own numbered horizontal bar in the bottom Timeline panel. Layer
1renders in front of Layer2(Selecting and arranging layers).
To create your beginner composition without mismatched settings, use one of two documented routes (Composition basics):
- Auto-match route (fastest for one clip): Drag your imported video clip from the Project panel directly onto the New Composition icon at the bottom of the Project panel. After Effects creates a composition matching your clip’s exact resolution, frame rate, and duration, and places the clip on Layer
1. - Manual route (custom duration): Choose Composition > New Composition (
Ctrl+Non Windows,Cmd+Non macOS). Name itPractice_1080p, set Width to1920 pxand Height to1080 px(or1080 × 1920for vertical video), set Frame Rate to match your source clip, and set Duration to0:00:15:00(15 seconds). Click OK, then drag your video clip from the Project panel into the Timeline panel.
Avoid setting a beginner composition to 8K (7680 × 4320). High frame dimensions multiply memory usage per frame and force constant caching pauses during Spacebar previews (Previewing video and audio).
How to cut a video in After Effects
If you are looking for how to cut a video in After Effects, the first surprise is that the toolbar has no Razor or Blade icon (How to cut clips in After Effects). Because After Effects treats each clip as a separate layer bar rather than a shared track, you cut footage by splitting a layer at the playhead or trimming its In and Out points (Selecting and arranging layers).
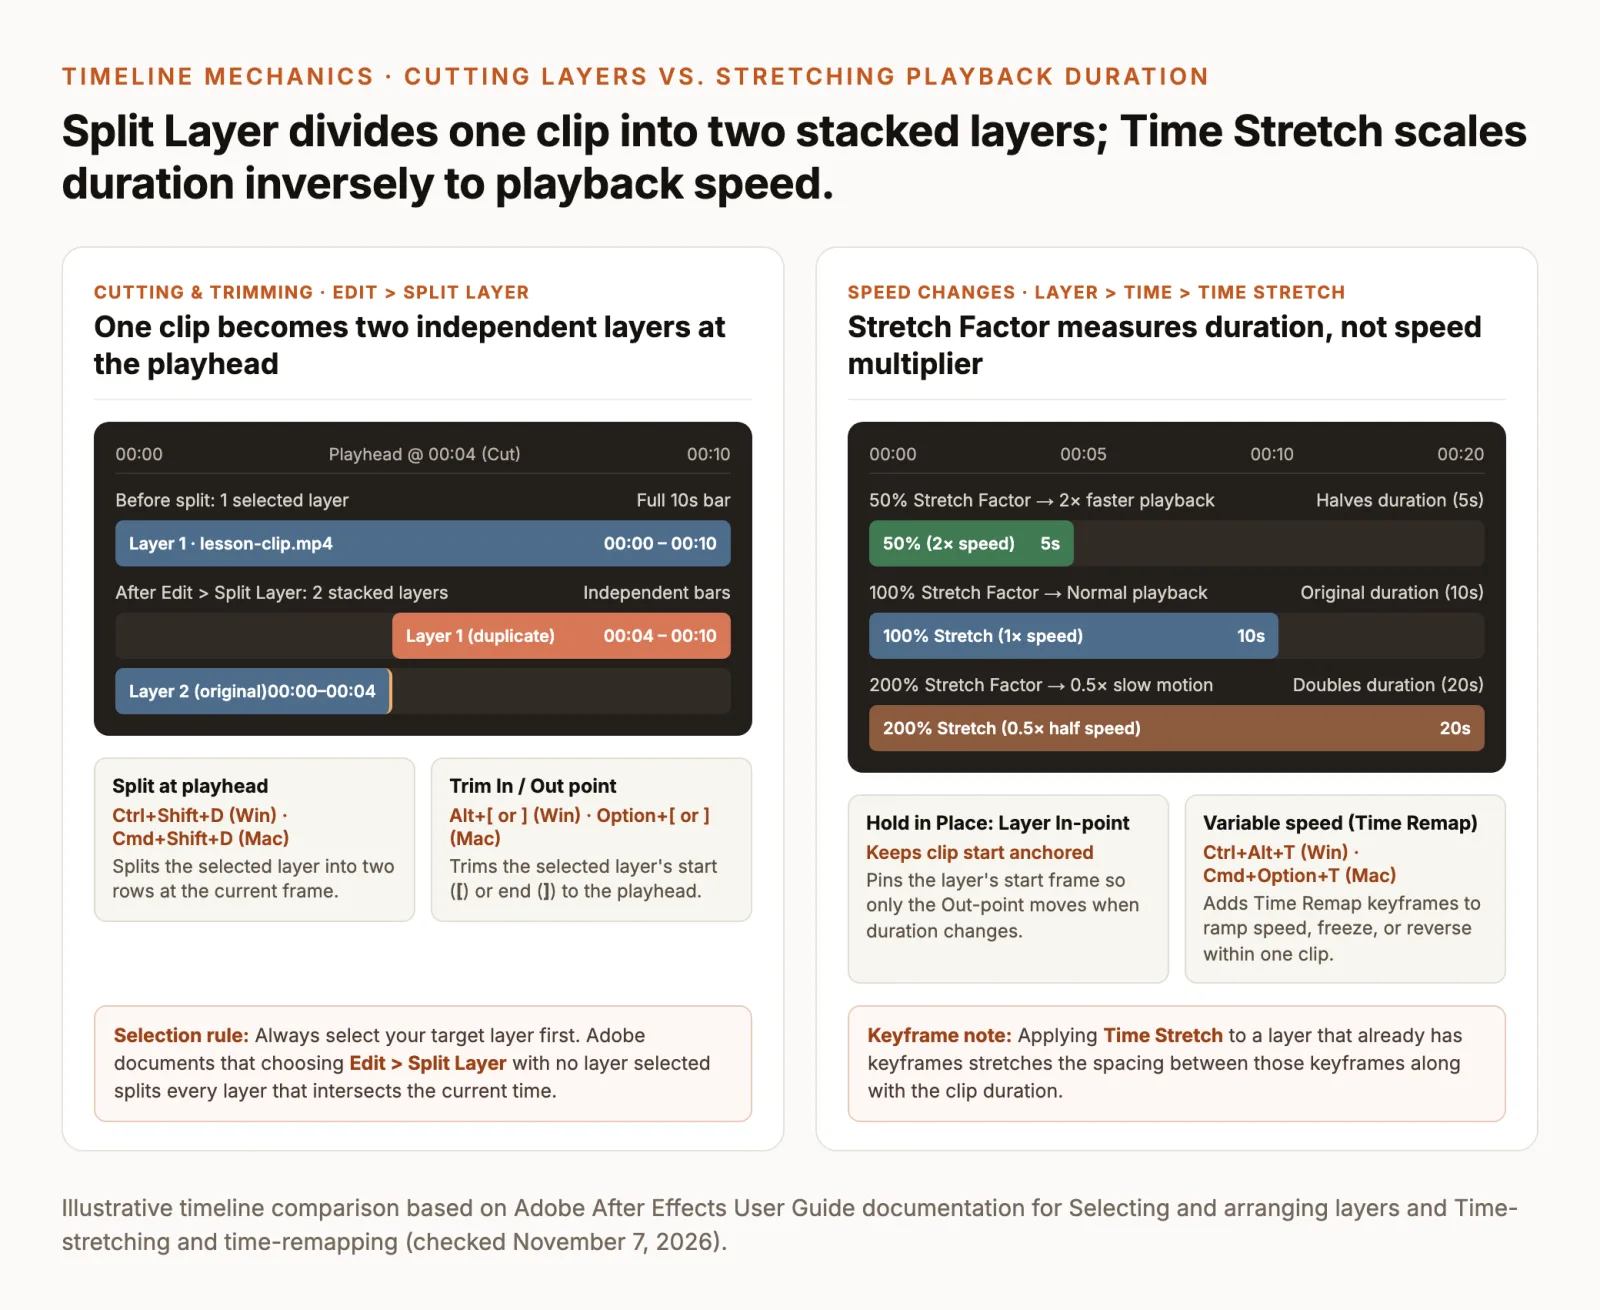
Split a layer at the playhead
Use Split Layer whenever you want to divide one clip into two independent pieces so you can delete a section, apply an effect to only half the shot, or change speed on one segment:
- Select the target layer. Click your video layer name in the Timeline panel so the row is highlighted. Do not skip selection: Adobe’s official guide states that if no layer is selected when you run Split Layer, After Effects splits every layer that intersects the current time (Selecting and arranging layers).
- Position the playhead. Drag the blue Current Time Indicator (playhead) along the time ruler to the exact frame where you want the cut (for example,
00:04). UsePage DownandPage Upto step forward or backward one frame at a time (Keyboard shortcuts reference). - Run Split Layer. Choose Edit > Split Layer from the top menu, or press
Ctrl+Shift+Don Windows (Cmd+Shift+Don macOS).
Observable result: Your single video bar divides at 00:04 into two stacked layers. The original layer now ends at 00:04, and a new duplicate layer directly above (or below, depending on your preferences) begins at 00:04 and runs to the end of the clip. Each piece can now be moved, trimmed, or deleted on its own.
Trim the beginning or end
When you only need to shorten the start (In-point) or end (Out-point) of a clip without creating a second layer, trim the layer duration bar (Selecting and arranging layers):
- Mouse drag method: Hover your pointer over the left or right edge of the colored layer bar in the Timeline until the cursor changes into a double-sided horizontal arrow. Drag inward to shorten the clip; hold
Shiftwhile dragging to snap the edge directly to the playhead. - Shortcut method (fastest): Select the layer, move the playhead to the frame where the clip should start or end, and press:
- Trim In-point (start) to playhead:
Alt+[on Windows ·Option+[on macOS - Trim Out-point (end) to playhead:
Alt+]on Windows ·Option+]on macOS
- Trim In-point (start) to playhead:
Note that trimming in After Effects is temporal (changing when the clip starts and stops on the timeline), not spatial cropping of the picture frame. Even after trimming, a faint gray ghost bar remains behind the colored duration bar, showing the unused source handles you can still drag back out later.
Remove a middle section cleanly
To cut out a stumble or pause in the middle of a clip (say, from 00:04 to 00:06) and join the remaining halves together:
- Select the video layer, move the playhead to
00:04, and pressCtrl+Shift+D(Windows) orCmd+Shift+D(macOS) to split the layer. - Move the playhead to
00:06, keep the upper (second) layer selected, and pressAlt+[(Windows) orOption+[(macOS) to trim off the00:04–00:06segment from the start of that second layer. - Click inside the colored bar of the second layer and drag it left while holding
Shiftuntil its left edge snaps to00:04(the Out-point of the first layer). - Press
Spacebarto play across00:04and confirm there is no empty gap. An unclosed gap between the two bars renders as a flash of black background in the Composition viewer.
How to speed up a video in After Effects
When learning how to speed up a video in After Effects, pick between two documented tools under Layer > Time: use Time Stretch when a clip or split segment should play at one constant faster or slower rate, and use Time Remapping when speed needs to change gradually inside the same clip (Time-stretching and time-remapping).
Use Time Stretch for constant speed
In our practice composition, suppose you want the second layer segment (starting at 00:04) to play at 2× double speed so a demonstration action finishes in half the time:
- Select the layer segment. Click the target video layer in the Timeline panel.
- Open Time Stretch. Choose Layer > Time > Time Stretch… from the top menu (or right-click the layer and choose Time > Time Stretch…).
- Enter the Stretch Factor. After Effects’ Stretch Factor scales the layer’s duration, not its speed percentage:
50%Stretch Factor halves the clip’s duration (a 10-second layer becomes 5 seconds) and plays it at2×double speed.100%Stretch Factor keeps the original duration and1×normal speed.200%Stretch Factor doubles the clip’s duration (a 10-second layer becomes 20 seconds) and plays it at0.5×half speed (slow motion).
- Set Hold in Place. Under Hold in Place, select Layer In-point so the clip’s start frame stays pinned at
00:04while only its Out-point pulls inward. (Choosing Current Frame or Layer Out-point anchors the stretch around the playhead or clip end instead.) - Click OK and check keyframes. Play the segment with
Spacebar. If a layer already contains animation keyframes when you apply Time Stretch, After Effects stretches the horizontal positions of those keyframes along with the clip duration. Time-stretch your footage before keyframing properties on that layer.
Use Time Remapping for variable speed
If you want a shot to start at normal speed, accelerate through the middle action, and slow down at the end (or freeze on a single frame), use Time Remapping instead:
- Select the video layer and choose Layer > Time > Enable Time Remapping (
Ctrl+Alt+Ton Windows,Cmd+Option+Ton macOS). - After Effects reveals a Time Remap property on the layer with two diamond keyframes: one at the layer’s In-point and one at its Out-point.
- Move the playhead to where the speed change should begin and click the diamond Add or remove keyframe at current time icon on the left of the Timeline, then add another keyframe where the speed change should end.
- Drag the second keyframe closer to the first keyframe on the timeline to make that section play faster (covering the same source frames in less composition time), or drag it farther apart to slow that section down.
For your first beginner edit, constant Time Stretch (50%) is easier to control and verify; save Time Remapping for shots that specifically need speed ramps or freeze frames.
Animate a title with two keyframes
Every property animation in After Effects, whether moving a title card, scaling a logo, or fading out a graphic, relies on keyframes. A keyframe records the value of a property (such as Position or Opacity) at a specific point in time, and After Effects interpolates the frames between two keyframes (Setting, selecting, and deleting keyframes).
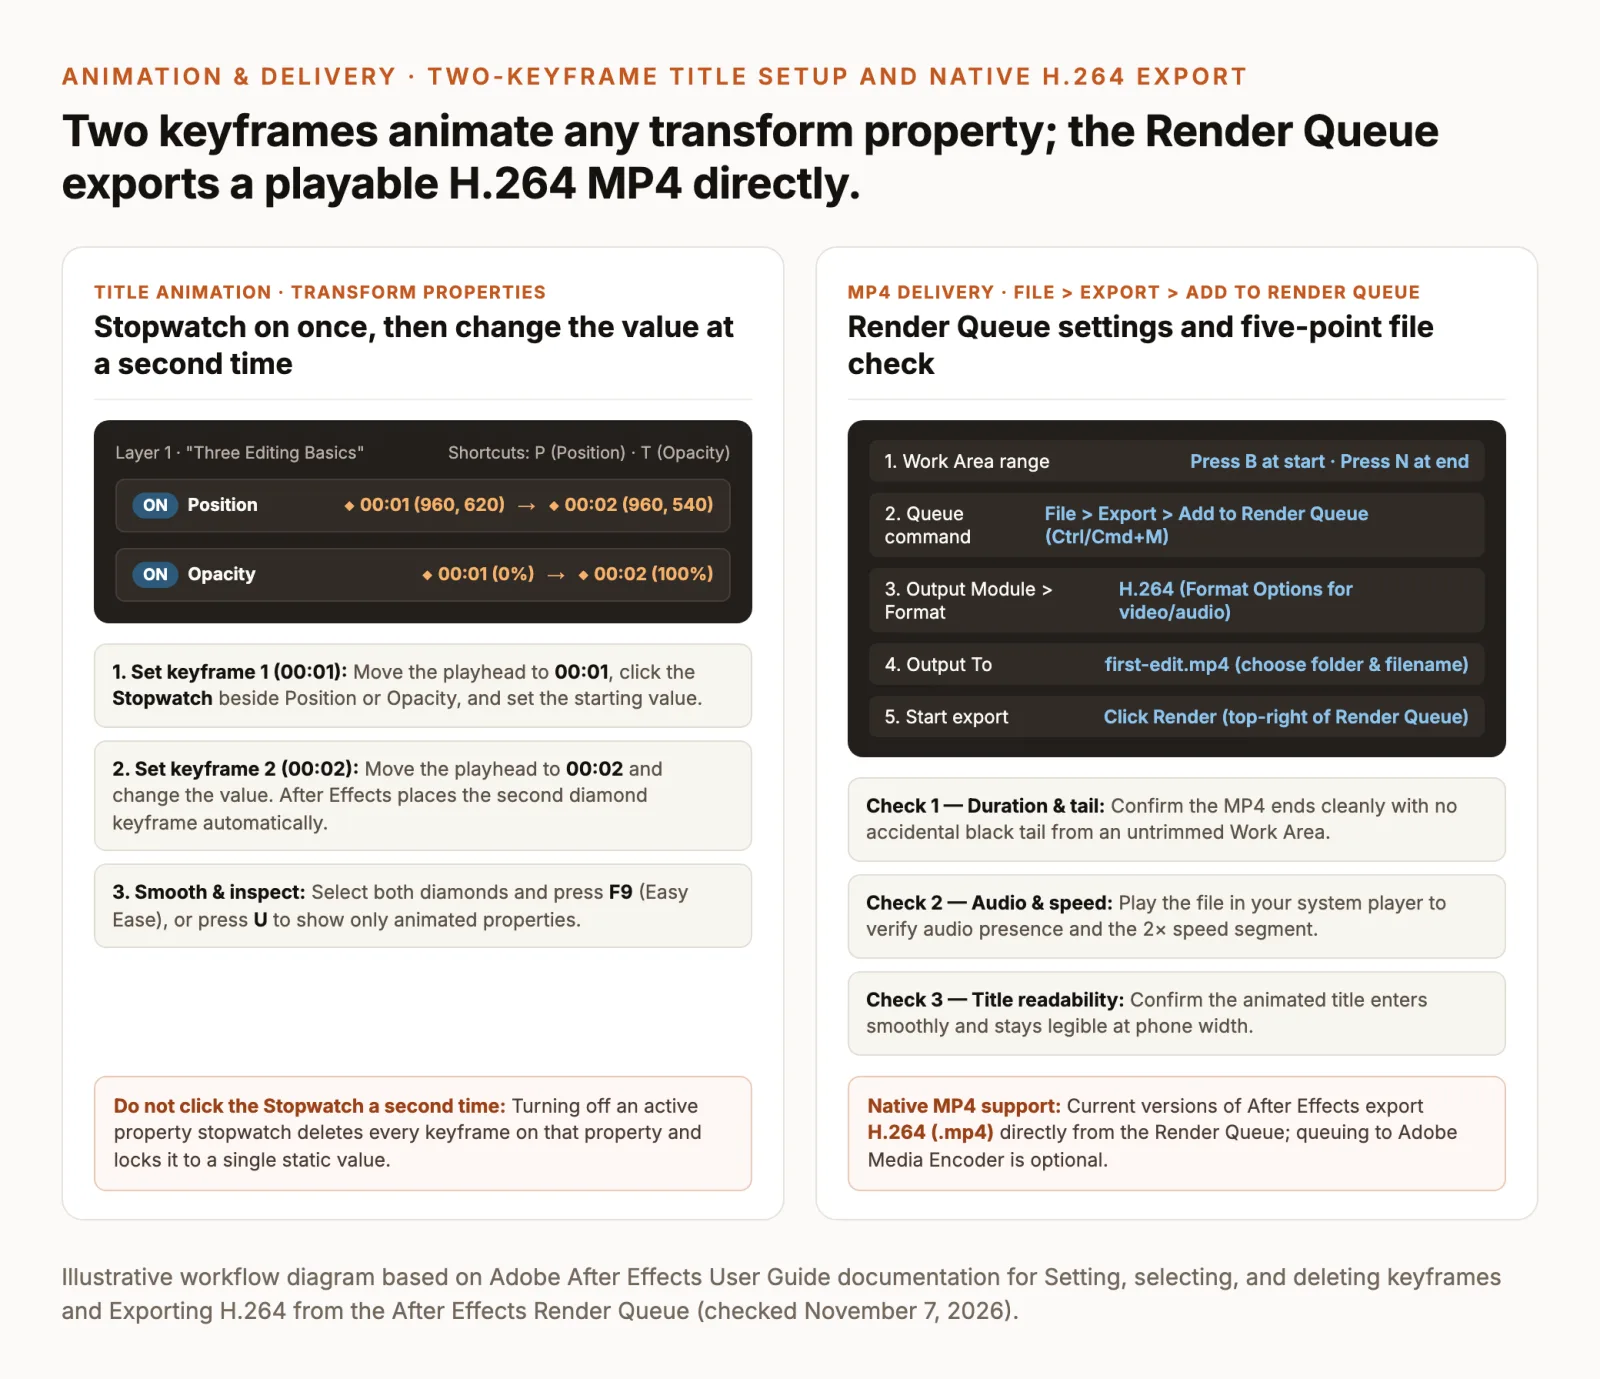
Set the first keyframe and move time
Let’s add a title reading Three Editing Basics that slides up and fades in between 00:01 and 00:02:
- Create the text layer. Select the Horizontal Type Tool in the top toolbar (
Ctrl+Ton Windows,Cmd+Ton macOS), click once inside the Composition panel to create point text, and typeThree Editing Basics(Creating and editing text layers). Adjust font size and color in the Properties or Character panel, then switch back to the Selection Tool (V). - Confirm layer order. Check the Timeline panel to make sure your new text layer sits on Layer
1above your video layers so the lettering renders in front of the footage. - Reveal Position or Opacity. With the text layer selected, press
Pto reveal Position or pressTto reveal Opacity (holdShiftwhile pressingPandTto display both at once) (Keyboard shortcuts reference). - Move to the start time (
00:01). Drag the playhead to00:01. - Click the Stopwatch once. Click the Stopwatch icon to the left of Position (and Opacity, if fading in). The icon turns blue and a diamond keyframe appears on the timeline at
00:01. Set your starting value here: for example, drag the Y-coordinate (the second number next to Position) slightly downward so the text starts lower on screen, or set Opacity to0%.
Change the value and preview motion
- Move the playhead to
00:02. Drag the Current Time Indicator forward one second to00:02. - Change the property value. Drag the Position Y-coordinate up to its final resting spot (or change Opacity to
100%). Because the Stopwatch is already active, After Effects automatically places a second diamond keyframe at00:02. - Smooth the stop (optional). Drag a selection box around both diamond keyframes and press
F9to apply Easy Ease, which softens the mechanical linear start and stop. PressUon any selected layer at any time to hide clutter and show only properties that have active keyframes. - Preview with Spacebar. Move the playhead to
00:00and pressSpacebar. Wait for the green cache indicator bar above the timeline to fill, then watch the title animate smoothly from00:01to00:02(Previewing video and audio).
Critical beginner rule: Do not click the blue Stopwatch icon a second time when adding later keyframes. Disabling an active Stopwatch immediately deletes every keyframe on that property and locks it to the current frame’s static value (Setting, selecting, and deleting keyframes). If you click it by mistake, press Ctrl+Z (Windows) or Cmd+Z (macOS) right away.
For broader guidance on choosing type weights, color contrast, and on-screen hold times across an entire video, see our guide on how to make motion graphics.
Export a playable MP4 file
Saving your project (File > Save) creates an .aep project file that only After Effects can open. To produce a standalone .mp4 video file you can watch on a phone or upload to social platforms, render your composition as H.264 from the Render Queue (Exporting H.264 from the After Effects Render Queue).
Render H.264 from the Render Queue
Older tutorials often state that After Effects can only export uncompressed .mov or .avi files unless you open Adobe Media Encoder. Current versions of After Effects include native H.264 encoding directly inside the built-in Render Queue, making Media Encoder optional:
- Set your Work Area range. In the Timeline panel, move the playhead to
00:00and pressBto set the start of the Work Area, then move the playhead to the exact end of your edited clip and pressNto set the end of the Work Area (Basics of rendering and exporting). By default, the Render Queue exports only the span covered by the gray Work Area bar. - Send the comp to the Render Queue. Make sure your composition tab is active in the Timeline or selected in the Project panel, then choose File > Export > Add to Render Queue (
Ctrl+Mon Windows,Cmd+Mon macOS). - Choose H.264 in Output Module. In the Render Queue panel, click the blue link next to Output Module (or open its preset dropdown). In the Output Module Settings dialog, set Format to H.264 (Exporting H.264 from the After Effects Render Queue). Click Format Options… if you need to adjust video bitrate, confirm Audio Output is set to Audio Output On (or Auto when audio layers are present), and click OK.
- Choose Output To destination. Click the blue filename next to Output To, select the folder where you want the rendered
.mp4saved, name the filefirst-edit.mp4, and click Save. - Click Render. Click the Render button on the right side of the Render Queue panel and wait for the progress bar to finish and chime.
Check the exported video file
Never assume a completed progress bar means the video looks and sounds right. Open first-edit.mp4 in QuickTime Player, Windows Media Player, or VLC and verify five points before closing your project:
- Total duration and no black tail: Scrub to the final second. If the video plays several seconds of black screen after your clip ends, your composition’s Work Area bar (
N) extended past your shortened50%Time Stretch layer. Trim the Work Area end (N) to the last visible frame and render again. - Audio playback: Confirm your clip’s audio plays cleanly. Note that speeding up a video layer with
Time Stretchalso speeds up and shifts the pitch of any audio attached to that layer. - Cut and
2×speed transition: Watch across your00:04split point to verify there is no single-frame black flash and that the50%stretched segment plays at double speed. - Title readability: Shrink your player window to roughly phone width and confirm
Three Editing Basicsenters smoothly between00:01and00:02and remains legible against the video behind it. - Source project backup: Press
Ctrl+S(Windows) orCmd+S(macOS) one final time sofirst-exercise.aeppreserves your editable keyframes and layers.
Make motion graphics without After Effects
Learning compositions, layer splits, and keyframe stopwatches pays off when you want custom frame-by-frame animation or visual effects. When your goal is instead to package an existing talking-head lesson, study guide, or news explainer with clean animated titles, chapter cards, and callouts without building an .aep composition, you can use a reusable workflow Skill in ChatCut.
ChatCut is our own editor, available on desktop for macOS 13+ (Apple silicon and Intel) and Windows 10+ (x64), in the web app, and via plugin or MCP connections in compatible coding agents such as Claude Code and Codex; Linux and ChromeOS are unsupported, and ChatCut cannot be installed inside the ChatGPT or Claude websites (Product facts). Note that ChatCut is a separate timeline and motion-graphics workflow; it does not open or export Adobe .aep project files.
Choose a Skill and attach footage
In ChatCut, a Skill attaches reusable workflow guidance to your AI composer draft so the agent follows a structured packaging method alongside your specific instructions (Skills overview). Two catalog Skills fit talking-head educational and explainer videos (both require footage of a presenter speaking to camera):
- Highlight Moments: Packages talking-head footage with Motion Graphics in the Highlight Moments Design Style for study tips, lessons, learning summaries, and book notes.
- Editorial Explainer: Packages talking-head footage with Motion Graphics in the Editorial Explainer Design Style for news explainers, current affairs, and data stories.
To attach a Skill and request your first graphic (Skills overview, Motion Graphics):
- Import your talking-head clip. Open a ChatCut project, upload your presenter video to My Assets, and wait for processing and transcription to finish.
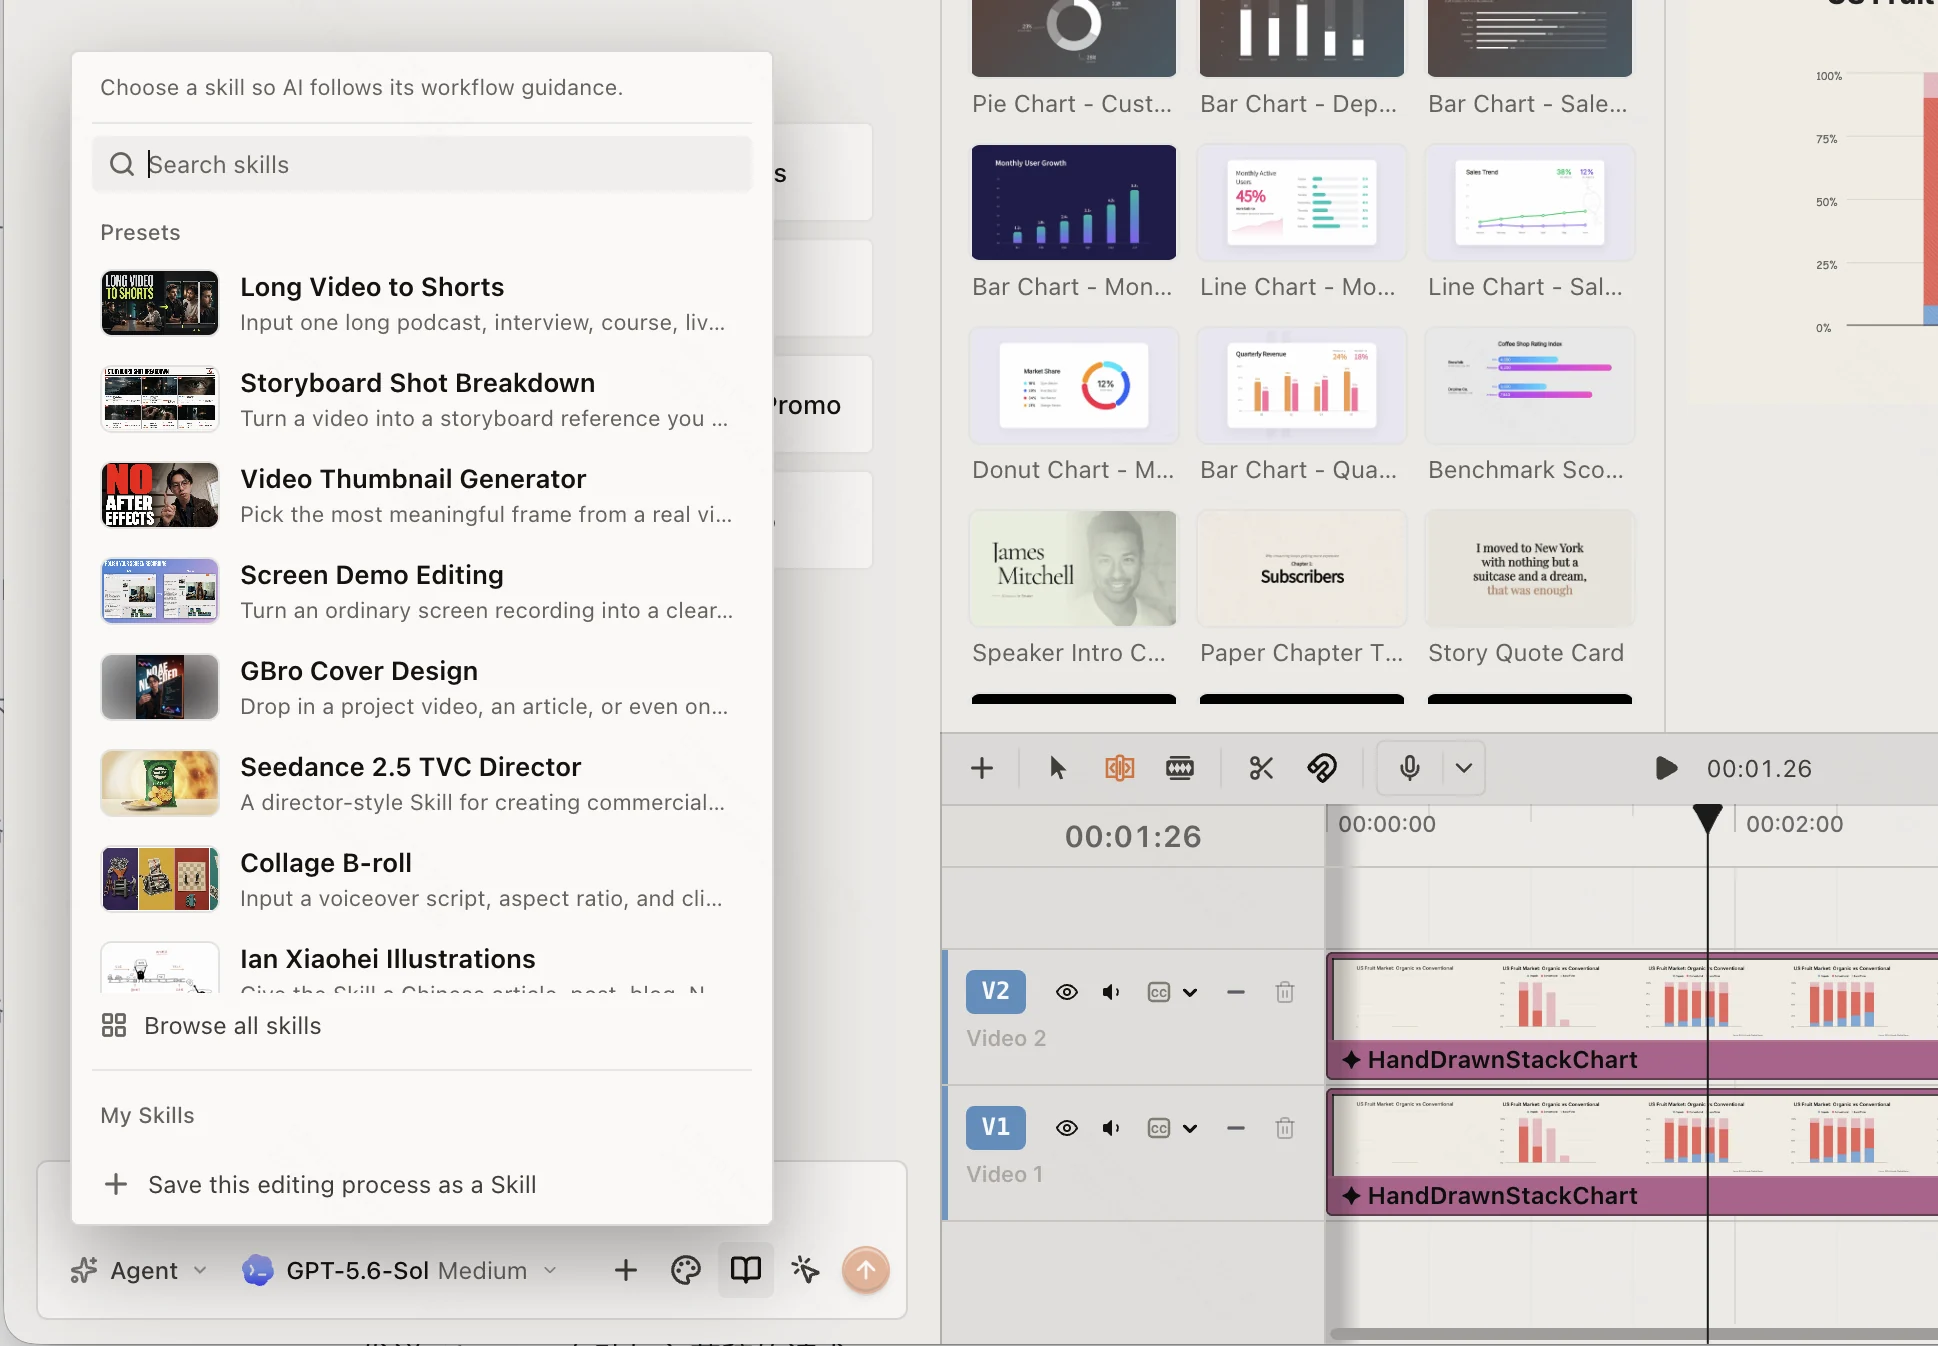
- Open the Skills menu. In the AI composer, click the book icon labeled Skills below the message field (or type
/in ChatCut Desktop to search Skills). - Select the Skill. Search for Highlight Moments (or Editorial Explainer), select it from Featured or Skill Marketplace, and confirm that the Skill appears as an attachment in your AI draft.
- Send a specific prompt. Reference your talking-head clip and specify the timestamp, duration, wording, colors, and review step. The proposed prompt below is an illustrative example you can adapt (not a recorded benchmark test):
If you also want to clean up false starts, shorten pauses, or add captions to your footage before adding graphics, see our library of 26 video editing prompts.
Review and revise on the timeline
When a generation confirmation appears, review the credit estimate before approving (Motion Graphics). Once the Motion Graphic lands on your timeline, play the section in the Viewer to check that the text enters on cue, stays readable on a phone screen, and leaves the presenter’s face unobstructed.
You can also browse Templates in the media panel and click Add to timeline for manual placement, or use direct element selection in the Motion Graphics Editor (available in ChatCut Desktop 0.3.13 or later) to click and edit exposed text, fonts, and colors on the canvas (Motion Graphics). For a deeper look at style consistency with Design Styles and transparent overlay exports, see our AI motion graphics generator guide. When your edit is ready to deliver, choose Export → Video, pick H.264 (MP4) or VP8 (WebM), set your resolution and frame rate, and export (Desktop local export).
What costs nothing in ChatCut: The Free plan includes the core editor: manual timeline editing, uploads, transcription, and standard caption editing never use credits, and exporting MP4/WebM video, MP3 audio, subtitles, and XML uses no credits either (Credits policy). On Free, web and cloud exports up to 1080p share a cumulative 60-minute account quota (Web export limits), while ChatCut Desktop renders video locally on your computer up to 4K (Desktop local export). With Claude Code or Codex (plugin / MCP), the agent’s editing work (including cutting, reordering, captions, and motion graphics the agent writes) is covered by your existing Claude or ChatGPT subscription and uses no ChatCut credits unless the workflow calls a ChatCut-hosted generation service; messages to the built-in ChatCut Agent and motion-graphics generation in the built-in Agent use ChatCut credits, and transparent ProRes 4444 motion-graphics export requires Pro.