An AI screen recorder combines real screen capture with automated post-production or agent-driven software operation to turn a multi-step workflow into a readable walkthrough. Most tools sold as a screen recorder with AI split two distinct jobs: rule-based capture utilities log cursor coordinates and clicks to animate zooms automatically, while speech and language models transcribe audio, cut dead waits, generate captions, or operate the interface for you. You need a prepared demo account, operating-system capture permissions, and an editable timeline to check the result. Want the agent to record the workflow as well as edit it? Open the Auto Screen Recorder guide and select the Skill in ChatCut Desktop on your Mac.
What does an AI screen recorder add?
Vendors of AI screen recording software often group coordinate-based animation rules, transcript editing, and autonomous computer control under one label. Separating those mechanisms helps you pick the right tool, because smoothing a mouse path solves a different problem from cutting failed takes or having an agent click through the app.
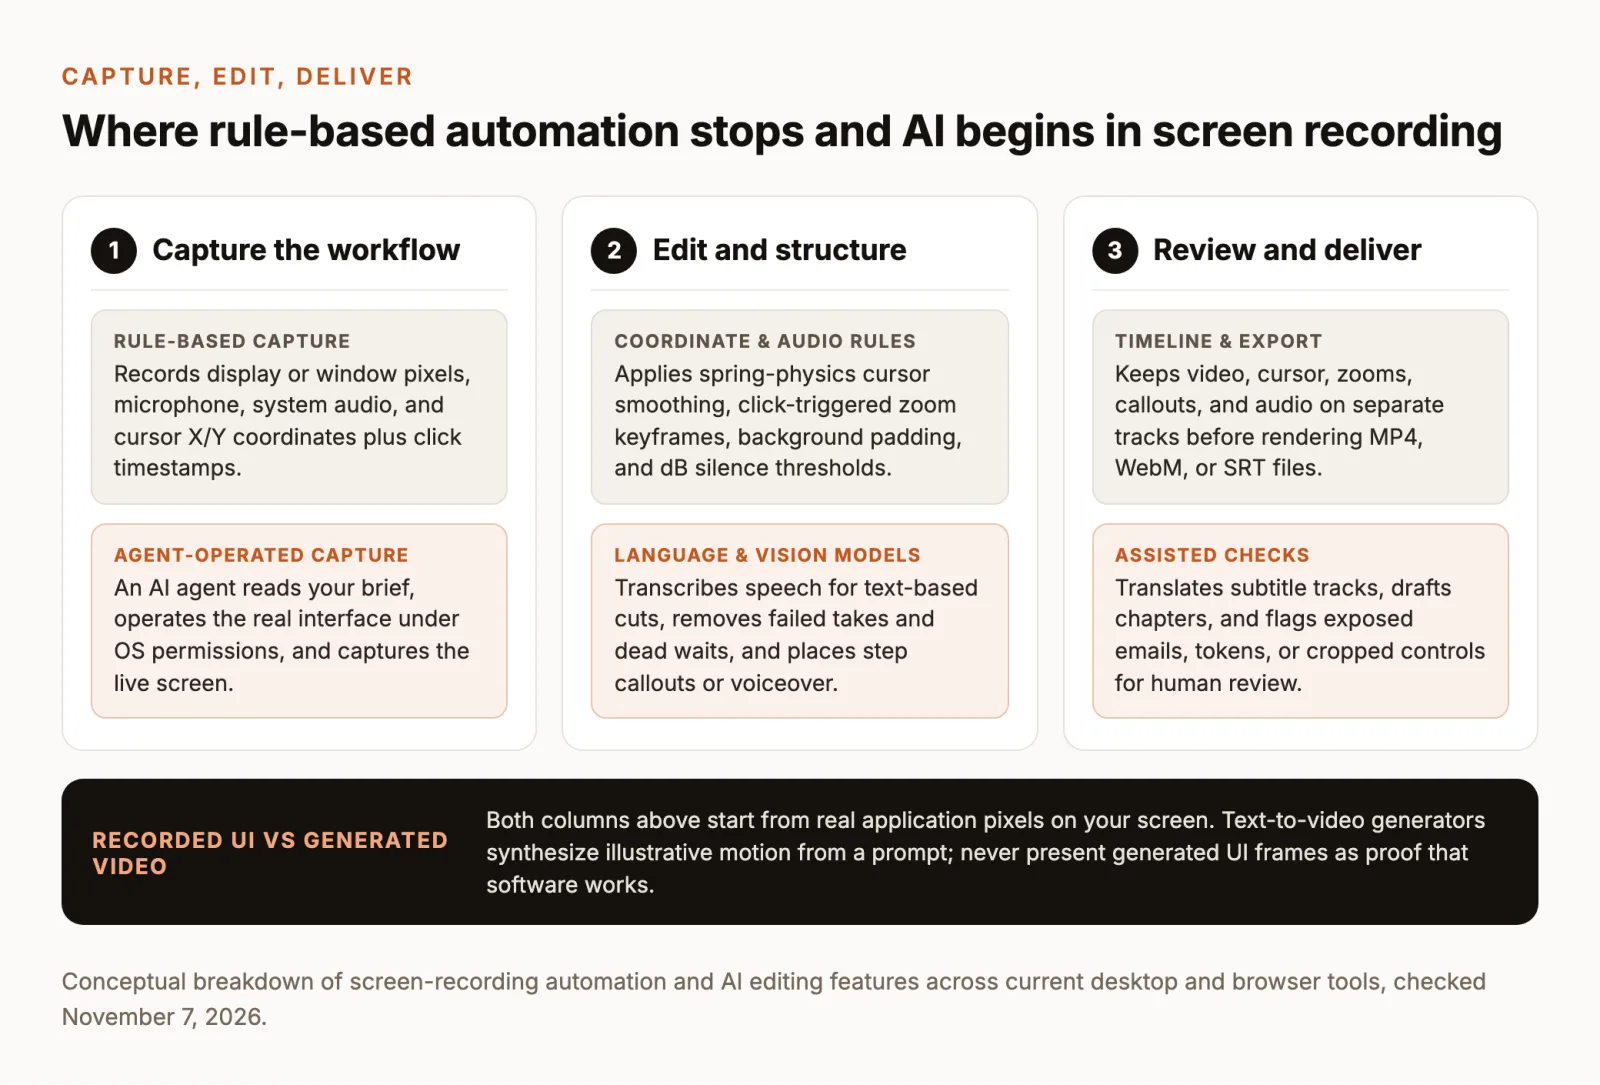
Just as important is the line between recorded screen footage and generated video. Every screen-demo workflow in this guide starts from real pixels rendered by your software. Text-to-video generators can synthesize decorative interface motion from a prompt, but generated screens invent labels, skip state changes, and never prove that a product works. When a viewer is evaluating software or following a tutorial, only a recording of the real interface counts as evidence.
Automatic zoom and framing
Full-screen laptop captures are hard to read on phones and embedded help players because small interface labels shrink into illegible gray bars. Automated framing and zoom tools fix this by placing the recorded window on a padded background canvas and enlarging active areas.
In dedicated capture recorders such as Screen Studio on macOS, automatic zoom animation and cursor smoothing rely on input telemetry logged during capture. While recording, the app records pointer X/Y coordinates, click timestamps, and window bounds. Afterward, it calculates a smooth curve between cursor stops to remove hand jitter and inserts zoom keyframes around clicks so the view pushes in on menus or buttons automatically.
When you import an existing MP4 or MOV file into an editor, that separate coordinate log is absent unless the recorder saved project metadata. Post-capture tools either analyze visual changes between frames or let you (or an editing agent) place zoom segments on an effect track where clicks occur. Which mechanism your tool uses determines what you can change later:
- Coordinate-logged capture: You can toggle cursor smoothing, swap pointer styles, adjust click rings, or delete an unwanted zoom block on a zoom track without re-recording.
- Post-capture timeline zoom: You place zoom regions over specific time ranges and target coordinates. Because zoom scales recorded pixels, capturing at retina resolution keeps text sharp at 1.25x, 1.5x, or 1.8x magnification.
- Aspect-ratio framing: Placing a window capture inside a 16:9, 4:3, 9:16, or 1:1 canvas with padding and rounded corners hides desktop clutter outside the target window.
Automatic zoom is not always helpful. Clicking a button near the top-left corner to open a wide centered modal can cause a click-centered zoom to crop out the modal itself. In ChatCut’s Auto Screen Recorder, zoom is off by default for that reason, with 1.25x, 1.5x, and 1.8x options available when dense interfaces need magnification.
Cutting idle time without losing steps
A raw software recording contains two different kinds of quiet stretches: mistakes or loading waits that waste viewer attention, and intentional pauses where the viewer needs a moment to read a menu or confirmation message. Audio-only silence cutters treat both identically by slicing out every gap below a decibel threshold.
For talking-head videos, cutting pauses longer than 0.7 seconds works well; our guide to removing silences and filler words from video covers those audio settings. In a software walkthrough, however, audio-only silence cutting often breaks the lesson. If you stop talking for two seconds while clicking Settings → API Keys → Generate Token, an audio threshold cutter deletes the exact frames where the menu opens. The viewer hears smooth narration while the screen jumps from the dashboard straight to the finished token.
Screen-aware editing separates dead air from necessary visual steps:
- Failed attempts and backtracks: When you open the wrong menu, mistype a value, or cancel a dialog before repeating the action cleanly, the editor removes the failed pass with a hard cut.
- Long loading waits: When an import, build, or query spins for several seconds without cursor movement or speech, the editor cuts the idle middle frames or speeds up the wait while keeping the start and finish visible.
- Reading beats: When a click opens a modal or updates a table, the cut leaves enough frames before and after the action for viewers to locate the button and read the outcome.
Because hard cuts between screen states can clip an intermediate frame, your editor should keep the raw take intact and cut non-destructively on the timeline. If an automated pass trims a button click half a second too early, you can drag the clip edge out on the timeline to restore it.
Captions and optional narration
Many product demos and internal tutorials play muted inside documentation pages, chat threads, or social feeds. Even with sound on, CLI flags, menu names, and settings labels are easier to follow when reinforced by on-screen text.
Speech-to-text models power two different editing passes in screen recording workflows:
- Transcript-based cuts: Editors such as Descript, Screen Studio, Loom, and ChatCut transcribe your spoken audio so you can delete false starts or repeated takes by deleting text.
- Synchronized captions and step callouts: Tools such as Clipchamp and ChatCut generate subtitle tracks from speech, while tutorial workflows also place motion-graphic step callouts (short titles such as 1. Create a sample project or 2. Invite a teammate) that guide viewers even in silent videos.
If you record silently or let an agent capture the workflow without a microphone, AI voiceover can add narration after capture. Rather than speaking live while trying not to misclick, the workflow writes one short voiceover clip per step and aligns each clip to the matching screen action. In ChatCut’s Auto Screen Recorder, enabling AI voiceover lets the picture wait for speech, up to about three seconds per step, so each spoken line finishes before the next transition. Captions are then generated directly from that narration.
An agent operating the app
The newest form of automatic screen recording moves automation from post-production into capture itself. Instead of clicking through the software yourself, you give an AI agent a written brief naming the task, the audience, and your framing choices, and the agent operates the live application on your computer while recording the screen.
Both ChatCut’s Auto Screen Recorder on macOS and Tella’s Auto Capture beta offer agent-driven capture for software workflows. In ChatCut Desktop on a Mac, the built-in Agent (or an embedded Claude or Codex agent) checks what it can control and record, sets the aspect ratio and background, brings only the target window to the front without moving your other windows, rehearses uncertain steps off-camera, and records the real interface. It then checks the saved video and builds an editable timeline with hard cuts, framing, optional pointer effects, step callouts, voiceover, and captions.
Letting an agent operate and record changes three practical constraints:
- No live performance pressure: You do not have to coordinate smooth cursor movement, accurate typing, and clear speaking in one take.
- Off-camera rehearsal: If a UI step behaves unexpectedly, the agent can rehearse or re-record the step and cut failed attempts before handing you the timeline.
- Explicit permission boundaries: The agent cannot bypass macOS security or log in with secret credentials on its own. You sign in to a safe demo account, load sample data, and grant macOS Screen Recording and Accessibility permissions yourself.
Choose the approach that matches your job
Not every walkthrough needs the same workflow. Before picking a tool, decide who should operate the software during capture and what format your viewers need. For a ranked comparison of standalone recorders, prices, and operating systems, read our guide to the best screen recording software. The matrix below is unranked and compares the four approaches by operator, input, deliverable, and review burden.
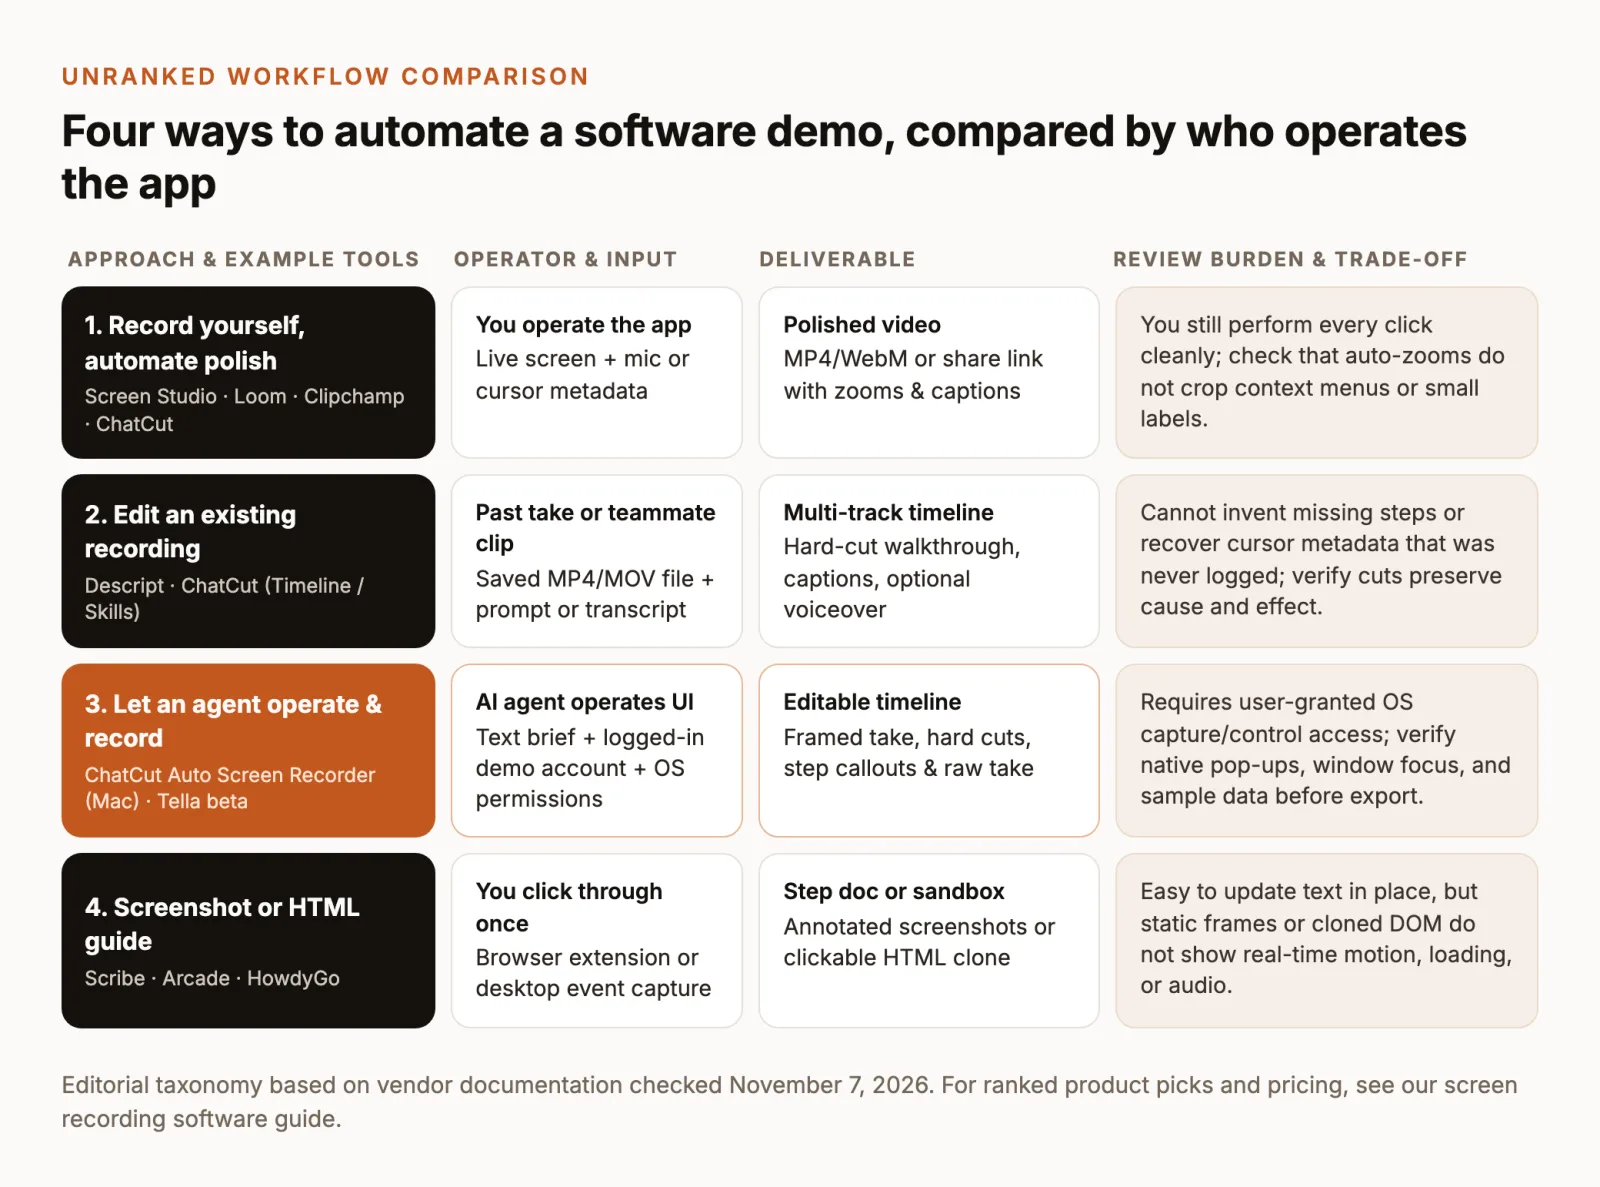
| Workflow approach | Operator | Best fit |
|---|---|---|
| 1. Record yourself, automate polish | You click and speak live | Quick founder demos, async video links, Windows or browser capture |
| 2. Edit an existing recording | Any prior operator (saved MP4/MOV) | Turning teammate clips, QA captures, or rough takes into tutorials |
| 3. Let an agent operate and record | AI agent on your Mac | Repeatable Mac software walkthroughs with automated capture and editing |
| 4. Screenshot or HTML guide | You click through once with an extension | Written help-center SOPs or clickable HTML sandboxes |
Record yourself, then automate polish
When you know the feature well and can click through it in a couple of minutes, recording it yourself is usually the quickest route. You control the exact timing of hovers and clicks, while the software smooths the cursor, adds click zooms, trims silences, or generates a share link.
- Best for: Founder updates, quick bug reproductions, or demos of visual canvas, 3D, or audio software where manual cursor control matters.
- How common tools handle it:
- Screen Studio (macOS) logs pointer and click data during capture to animate zooms and smooth cursor movement, alongside transcript editing.
- Loom (Mac, Windows, Chrome) shares a browser link as soon as you stop; its pricing page lists 25 videos of up to five minutes at 720p on the free Starter plan, while Business + AI adds filler-word and silence removal, titles, and chapters.
- Clipchamp (Windows app and browser) records screen and webcam sessions up to 30 minutes per take (with multiple sessions allowed) and provides AI subtitles on a multi-track timeline.
- ChatCut (Web, Mac, Windows) records directly onto the editor timeline via the Record control, or lets you record yourself inside Auto Screen Recorder on Mac so the Agent frames and cuts the take afterward.
- What to check: Watch every automatic zoom to ensure dropdown menus and toast notifications stay inside the frame, and listen across transcript cuts for clipped words.
Edit an existing recording
Often the raw footage already exists: a developer sent a .mov captured with macOS Screenshot (Shift-Command-5), a support teammate recorded a clip on Windows 11 with Snipping Tool (Windows + Shift + R), or you have an unedited webinar screen share. (For built-in OS shortcuts and system-audio rules, see our guides on how to screen record on Mac and how to screen record on Windows.)
Instead of re-recording the product, you import the video file into an AI editor and use transcript cuts or an agent prompt to remove dead air, cut false starts, place the video on a background canvas, and add callouts or voiceover.
- Best for: Cleaning up recordings handed over by teammates, salvaging a take with a few mid-video mistakes, or editing footage recorded on Windows or Linux.
- How tools handle it: Descript transcribes uploaded recordings for text-based cuts and AI speech cleanup (its page mixes online and desktop wording, so check whether your workflow needs the desktop app). In ChatCut, upload any clip to My Assets and ask the Agent, or use Auto Screen Recorder with existing footage, to cut failed attempts, frame the video on a background, and add step callouts.
- Main limitation: Post-production cannot recover missing steps or unlogged cursor metadata. If the operator skipped a dialog or recorded at low resolution, an editor cannot invent the missing interface state.
To edit a screen recording already in your project, select the clip and run a prompt structured around target, result, limits, and review checks (see our video editing prompts guide for more examples):
Check: Play across each hard cut to verify the click that triggers every dialog is still visible, and confirm no real email address or API key appears on screen.
Let an agent operate and record
When you want to turn a written procedure into a finished tutorial without performing the clicks yourself, agent-operated recording automates both capture and the first edit. You provide the brief, a logged-in demo account, and macOS permissions; the agent operates the application, records the window or display, and cuts the take onto an editable timeline.
- Best for: Standardized onboarding guides, help-center tutorials, and repeatable feature walkthroughs on macOS.
- Where it runs: ChatCut’s Auto Screen Recorder runs in ChatCut Desktop on a Mac using the built-in Agent or an embedded Claude or Codex agent. (An external Claude or Codex app must supply its own computer control; connecting ChatCut does not add one.) Tella also lists an Auto Capture beta on paid plans for recording web pages with an AI agent.
- What to check: Inspect the timeline for native OS pop-ups that fell outside a single-window capture, window focus interruptions, or places where the agent took a non-standard menu path.
Use a screenshot guide or interactive demo instead
Not every search for an AI demo video maker requires a linear video file. Three adjacent formats appear in the same category, each with different trade-offs:
- Step-by-step screenshot guides (Scribe): Scribe logs your clicks and keystrokes to build a written document with annotated screenshots (plus optional screenshare and voiceover features). Pick this when readers need a skimmable help article rather than a video timeline.
- Interactive click-through demos (Arcade, HowdyGo): These capture screenshots or the live HTML/CSS DOM as you click through a workflow, letting prospects click hotspots in an embedded sandbox. HTML-capture tools let you edit text or blur names directly in the captured DOM without re-recording, and can also export MP4 or GIF files. However, static screenshot tours can feel like slideshows when a feature depends on real-time motion or audio.
- AI avatar presenters (Synthesia, HeyGen): Avatar tools generate a talking presenter from a script. They work for spoken introductions, but an avatar does not capture your product screen, and prompt-generated UI animations should never be presented as recorded product evidence.
When you need to prove how a live application responds in real time, or publish to YouTube, social feeds, or video players where interactive DOM embeds do not run, record the real screen onto an editable video timeline. For scripting and story structure before you record, see our guide on how to make a product demo video.
How to make a screen demo with ChatCut
ChatCut’s Auto Screen Recorder Skill turns a software workflow into an edited, multi-track tutorial in ChatCut Desktop on a Mac (macOS 13+ on Apple silicon or Intel; see product facts). It supports agent-operated capture, user-operated capture, and editing existing screen footage, and always outputs an editable timeline.
Prepare a safe demo account and scope
Before attaching the Skill or starting capture, set up the application so login prompts and private data never interrupt the recording:
- Write a focused brief. Name what the tutorial teaches, who it is for, the key actions in order, and a target length if you have one. Keep each video to one clear job, such as creating a sample project and inviting a teammate.
- Sign in and stage sample data. Resolve logins and two-factor prompts yourself before recording. Populate the workspace with realistic test data and
example.comaddresses, which IANA reserves for documentation, so real customer emails, API keys, or billing numbers never appear. - Clean the window and mute notifications. Use a clean browser profile without personal bookmarks or autofill pop-ups, enable macOS Focus / Do Not Disturb, and use a separate clean project window if demonstrating ChatCut itself.
- Approve macOS permissions (agent-recorded demos). For the Agent to operate and capture your screen on a Mac, macOS asks you to grant two permissions in System Settings → Privacy & Security:
- Screen & System Audio Recording (called Screen Recording before macOS 15), which allows pixel capture (Apple’s Screen Recording permission guide).
- Accessibility, which allows an app to control your Mac via clicks and keystrokes (Apple’s Accessibility permission guide).
Only you can grant these permissions. If you denied Screen Recording once, macOS will not prompt again; enable ChatCut manually in System Settings → Privacy & Security → Screen & System Audio Recording, reopen ChatCut if asked, and tell the Agent to continue.
Select the Skill and recording route
In ChatCut Desktop on your Mac, start from the AI composer or record from the timeline:
- Select Auto Screen Recorder. Open Skills in the AI composer and choose Auto Screen Recorder, or type
/in the composer to search for it. Confirm the Skill is attached to your draft; attaching it does not start recording until you send the form or prompt. - Choose the recording route:
- Agent-recorded demo: Fill in the Skill form or prompt and let the built-in Agent (or an embedded Claude or Codex agent in ChatCut Desktop) operate the app and record the screen.
- User-recorded demo: Ask to record the steps yourself. In ChatCut Desktop, the Agent shows a record button in the chat; you click it, pick the screen or window, and control the countdown and stop button before the Agent edits the saved take.
- Manual timeline recording (Web, Mac, or Windows) or external agents: In an external agent app (where connecting ChatCut does not add screen control), or whenever you prefer manual capture first, use the Timeline’s Record button.
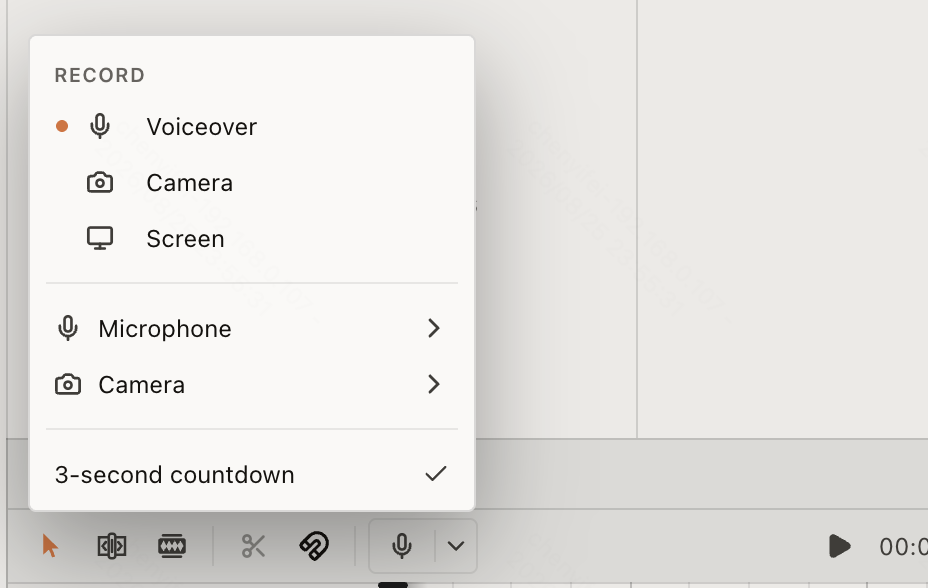
As detailed in the recording guide, click the chevron on the Timeline’s Record control, choose Screen under Recording settings, set a microphone or 3-second countdown if wanted, and select the left side of Record to choose a screen or window. When you select Stop recording, the clip is saved to My Assets and placed at the playhead on a video track.
Set framing, cursor, zoom and narration
The Auto Screen Recorder form in ChatCut Desktop has two tabs that configure framing and pointer behavior (you can also specify these in your message):
- General tab:
- What to demonstrate: The steps to show in plain words, such as “In ChatCut, import a clip, split it on the timeline, then export.”
- Aspect ratio: 16:9, 4:3, 9:16, or 1:1. More settings controls window shape, padding, and corner radius.
- Background: Choose a wallpaper, open View all for more, or use a solid color or blurred copy of the recording.
- AI extras: None, AI voiceover, MG step callouts, or both.
- Cursor tab:
- Pointer: System pointer, or a smooth, halo, or spotlight pointer (drawn pointers require a current Desktop release; otherwise the Agent uses the system pointer and tells you first).
- Clicks: Optional visual click effect and click sound.
- Zoom: Off by default, or 1.25x, 1.5x, or 1.8x.
Select Create tutorial to start the workflow.
Record, review the timeline, then export
You can also run the Skill by pasting a complete prompt into the AI composer with Auto Screen Recorder attached:
Check on the finished timeline:
- Every required step is visible from click to result.
- No private information appears in any frame.
- Zoom (if enabled) does not crop controls or dialogs.
- Final duration reflects the actual steps; Auto Screen Recorder does not force a guaranteed fixed duration.
During an agent-recorded session, avoid switching windows while the Agent works. Here is what the Agent does and what you get:
- Setup and capture: The Agent checks what it can control and capture, sets the aspect ratio and background first, and rehearses uncertain actions off-camera. It brings only the target window to the front without minimizing or moving your other windows, and avoids risky shortcuts such as select-all and quit. It uses a window capture for a self-contained app and a display capture when menus, native dialogs, or multiple windows are involved.
- Hard-cut editing: The Agent checks the saved recording and edits with hard cuts only, removing failed attempts and idle time, speeding up long loading waits, and adding no transitions.
- Separate editable tracks: The background, recording, callouts, pointer effects, click sound, zooms, voiceover, and captions sit on separate timeline tracks so you can adjust or mute any layer independently. The original raw take is kept in the project.
- Matched narration and captions: When AI voiceover is enabled, it writes one clip per step, lets the picture wait up to about three seconds per step for speech to finish, and derives captions from that narration.
To adjust a single part of the draft after review, send a targeted follow-up prompt:
What costs nothing vs what uses credits: On ChatCut’s Free plan, the core editor is included: manual timeline editing, uploads, transcription, standard caption editing, and screen recording itself never use credits (recording docs, credits policy). Exporting MP4/WebM video, MP3 audio, subtitles, and XML also uses no credits; Free accounts share a cumulative 60-minute web/cloud export quota (up to 1080p; see web export limits), while ChatCut Desktop renders video locally on your computer at up to 4K. When you edit with Claude Code or Codex (plugin or MCP), the agent’s work (cutting, reordering, removing pauses and fillers, captions, B-roll placement, and motion graphics the agent writes) is covered by your existing Claude or ChatGPT subscription rather than ChatCut credits (desktop agent workflows). ChatCut credits are used only when the workflow calls the built-in ChatCut Agent’s messages, built-in Agent motion-graphics generation, or a ChatCut-hosted generation service such as AI voiceover.
Check what automation can miss
Automated capture and cutting eliminate tedious keyframing and rough cuts, but neither coordinate rules nor an AI agent can verify whether a tutorial actually teaches the right lesson. Check two areas before exporting.
Pop-ups, focus and missing steps
Window-level capture keeps your desktop tidy, but operating-system capture APIs isolate individual windows strictly:
- Native dialogs and menus: A single-window capture records only that window; separate native file pickers, permission dialogs, or system menus can be missed. In Auto Screen Recorder, the Agent switches to a display capture or re-records the step when menus or native pop-ups appear. When recording manually, pick full-screen capture if your tutorial uses OS file dialogs.
- Lost window focus: If the target window keeps losing focus during agent-operated capture, the Agent stops and asks you to keep the desktop still rather than clicking into the wrong app.
- Over-trimmed transitions: Check every hard cut around form submissions and modal triggers. If an automated cut removed the button click or the confirmation banner, drag the clip edge out on the recording track to restore those frames.
Caption accuracy, readability and privacy
Screen demos combine dense interface text with captions or callouts. As the W3C WAI captions guide notes, captions need accurate wording and synchronization to remain usable for muted or hard-of-hearing viewers. Run three checks before you export:
- Fix technical terms in captions: Speech recognition often misspells product names, CLI commands, and acronyms. Edit spelling in the caption text rather than deleting words in the Transcript panel, where deleting text cuts the video track.
- Verify mobile readability: Preview the timeline at phone width to make sure captions and step callouts do not cover buttons, terminal prompts, or status bars at the bottom of the window. Because callouts, zooms, and captions sit on separate tracks, you can move or resize any overlapping element.
- Scan for private data: Scrub through address bars, sidebar lists, and dropdowns to confirm only sample data (
example.com) appears.
You can also run a pre-export verification prompt before rendering your final MP4:
Check: Review the flagged timestamps, then watch the exported video once at full screen with sound on.