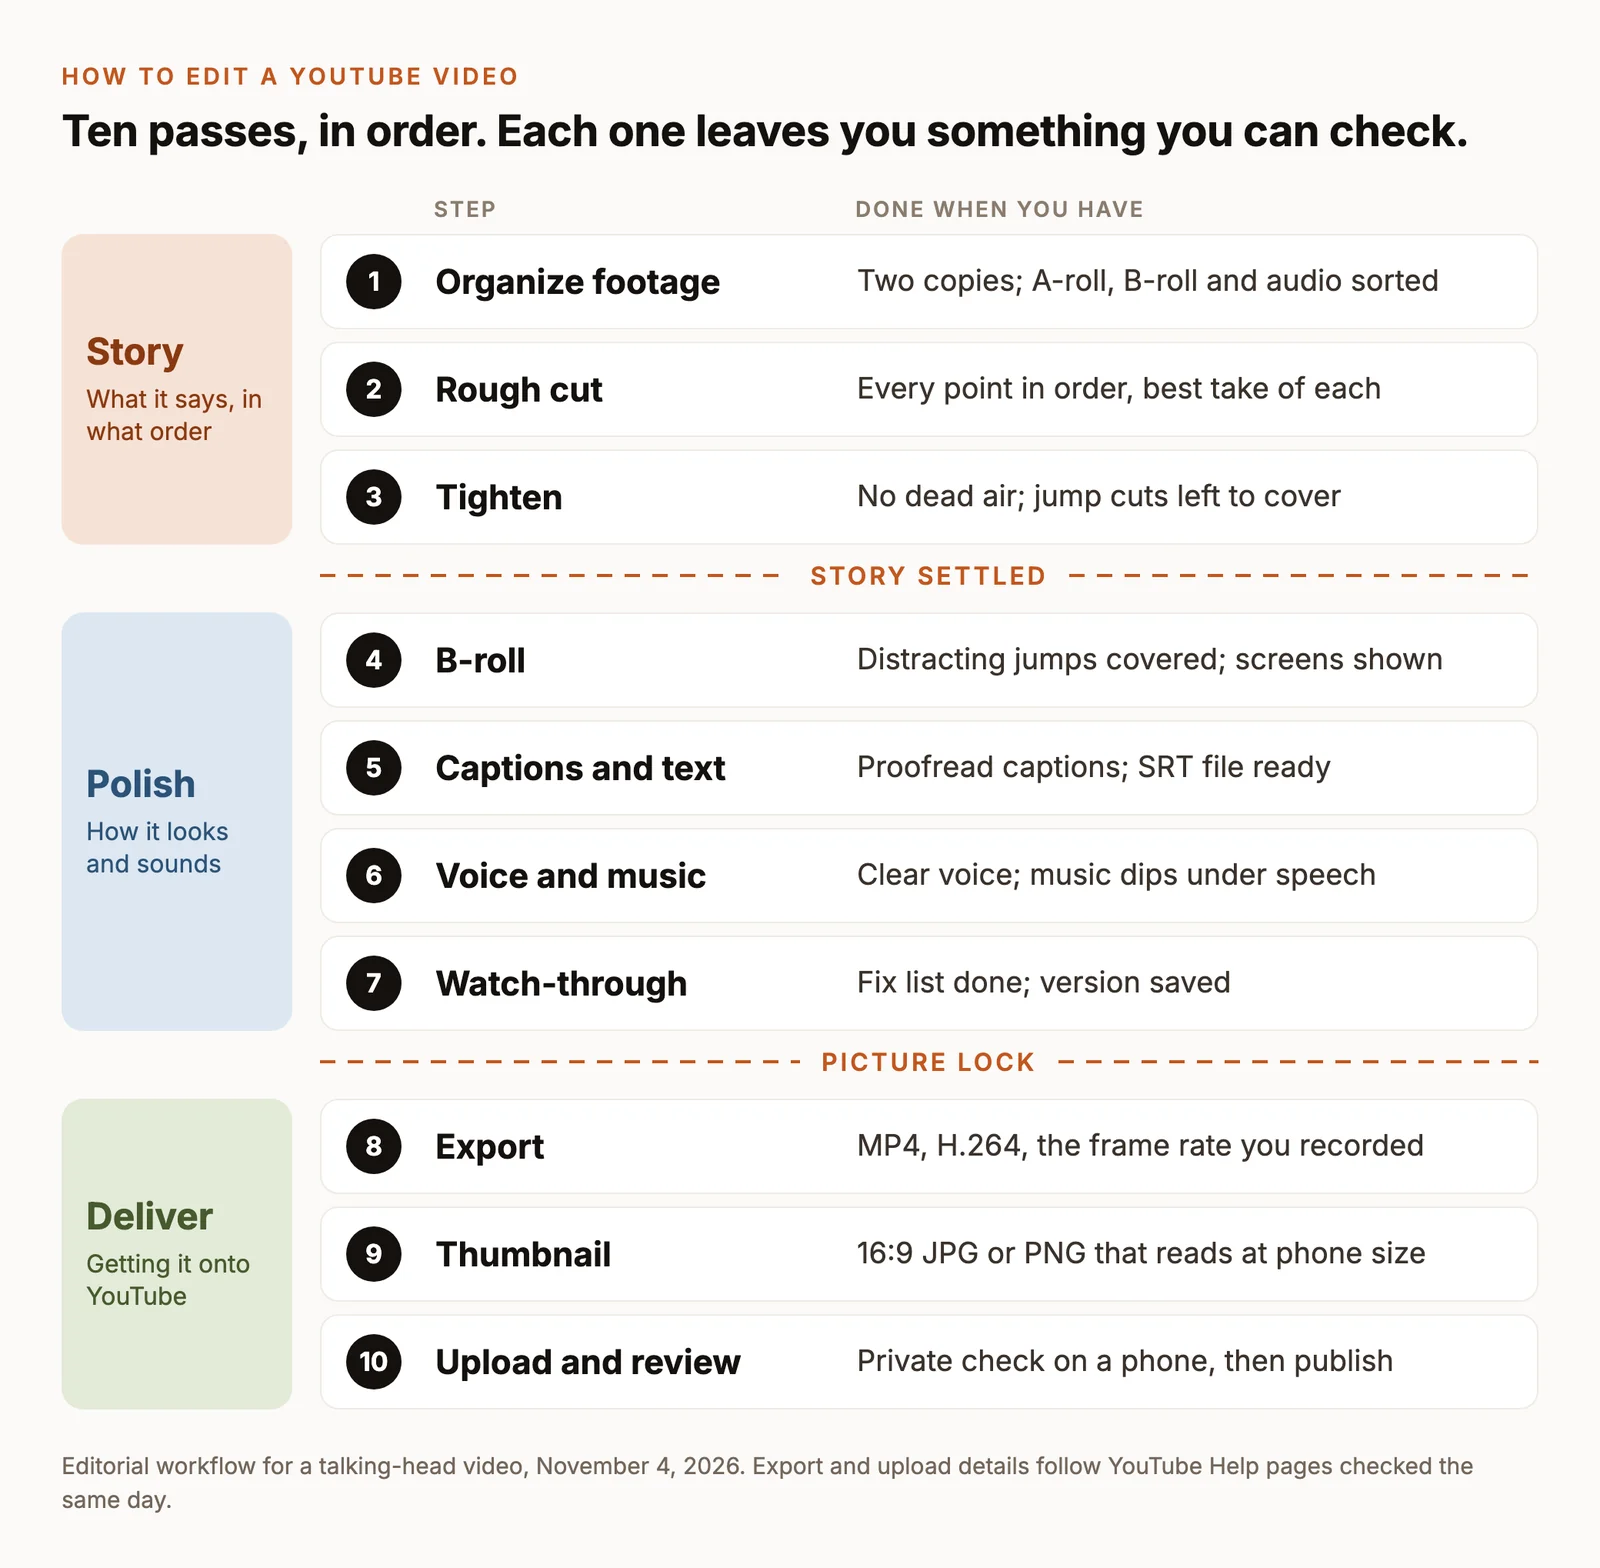
To edit a YouTube video, work in passes instead of doing everything at once. Organize the footage, build a rough cut that tells the story, and tighten it. Then add B-roll, captions and music, export an MP4 that matches YouTube’s recommended settings, and check the upload before it goes public. The order matters: polish added before the story works usually gets thrown away.
This guide follows one talking-head video through ten steps. Each step covers the decision that matters, what to check, and how to do it in ChatCut, by prompt or by hand. The same order works in Premiere Pro, DaVinci Resolve or CapCut. YouTube’s settings and menus were checked against YouTube Help on November 4, 2026. If you’re still planning or filming, start with how to make a talking head video.
Key Takeaways
- Fix the story first. Choosing takes, ordering points and cutting pauses come before B-roll, captions and music.
- For talking-head videos, most of the edit happens in the words. Editing by transcript lets you find and cut lines by reading them instead of scrubbing through the audio.
- Export an MP4 with H.264 video at the frame rate you recorded, at 1080p or 4K, with AAC audio at 48 kHz. That matches YouTube’s recommended upload settings.
- Upload as private first, wait for HD processing, and watch it on a phone before you publish. YouTube Studio can trim a published video, but saved edits can’t be reverted.
What you need to edit a YouTube video
- Your footage. The main recording, any separate microphone audio, and the extra shots you plan to cut away to.
- Music you’re allowed to use. The YouTube Audio Library is free inside YouTube Studio and its tracks are cleared for YouTube.
- An editor. Any timeline editor works. If you’re still choosing, see what editing software YouTubers actually use. This guide shows ChatCut, which runs as a desktop app for macOS 13+ (Apple silicon or Intel) and Windows 10+, and as a web app.
ChatCut’s free plan includes the editor, transcription and captions. Asking its AI Agent to make an edit uses credits based on how much the model processes; uploading, transcribing, editing by hand and exporting don’t.
Step 1: Organize and back up your footage
Copy everything off the camera or phone before you start, and keep a second copy somewhere other than your editing drive. Every step after this changes a timeline, not your files, but a card that gets formatted or a phone that gets cleared can’t be undone.
Then sort the material into three groups. A-roll is the footage that carries the story, usually you talking to camera. B-roll is everything you’ll cut away to: screen recordings, product shots, photos, establishing shots. Audio covers a separate microphone recording and any music or sound effects. A folder for each, inside one folder per video, keeps the next nine steps fast.
In ChatCut: open My Assets → Upload → Folder… and select that folder. ChatCut recreates your subfolders as Bins, and each file’s card shows its progress while it uploads and its speech is transcribed. If you recorded audio on a separate microphone, select the camera clip and the audio file, right-click, and choose AI multicam sync to line them up by sound.
Step 2: Build the rough cut
A rough cut is the whole story in the right order, before any polish. It’s allowed to be long and a little loose. What it can’t be is unclear, because every later step builds on it.
Watch or read through all the A-roll once and mark what’s worth keeping. How you build the cut depends on how you recorded:
- Scripted, with several takes of each section: keep the clearest complete take of each section and drop the rest.
- Unscripted, one long take: find the three to five strongest points, then build the video around those. Most of a long take won’t make it in.
- Sections recorded out of order: lay them out to match your outline, then listen for the joins.
Then order the points. A structure that suits most explainers and talking-head videos: a hook that shows or says what the viewer will get, context in a sentence or two, the main points in a logical order, and a payoff that delivers the promise, followed by your call to action.
In ChatCut: reference the recording with @ or Selection Mode, then ask for a first cut:
To work by hand, open Transcript, select the words you don’t want and press Delete; ChatCut removes that stretch of audio and video. In Clip view, drag a paragraph to move its clip. If you’re unsure about the order, save a version (Versions → Save Current Version) and ask for an alternative:
Step 3: Tighten the pacing
With the order settled, remove what slows it down: long pauses, filler words, restarts mid-sentence and points made twice. Cut between words, never inside one, and keep the breaths and pauses that give a line its weight. A tutorial can afford more air than a commentary video; listen to the result rather than following a fixed number.
The cuts you make here leave jump cuts, small jumps in the picture where time was removed. On YouTube these are normal for talking-head videos. You’ll cover the distracting ones with B-roll in step 4.
In ChatCut: the Agent can remove fillers and long pauses while keeping the delivery natural.
By hand, the Pauses control in the Transcript applies one pause length across the selected track and can restore pause time from the original recording.
Check: play the whole cut at normal speed with headphones on. Listen at every edit for clipped syllables, a breath cut in half, or a change in tone that makes the jump obvious.
Step 4: Add B-roll where the words need it
B-roll earns its place when it shows something the words can’t: the screen you’re describing, the product in your hand, the place you’re talking about. It also covers jump cuts, which lets you keep the tight pacing from step 3 without the picture twitching.
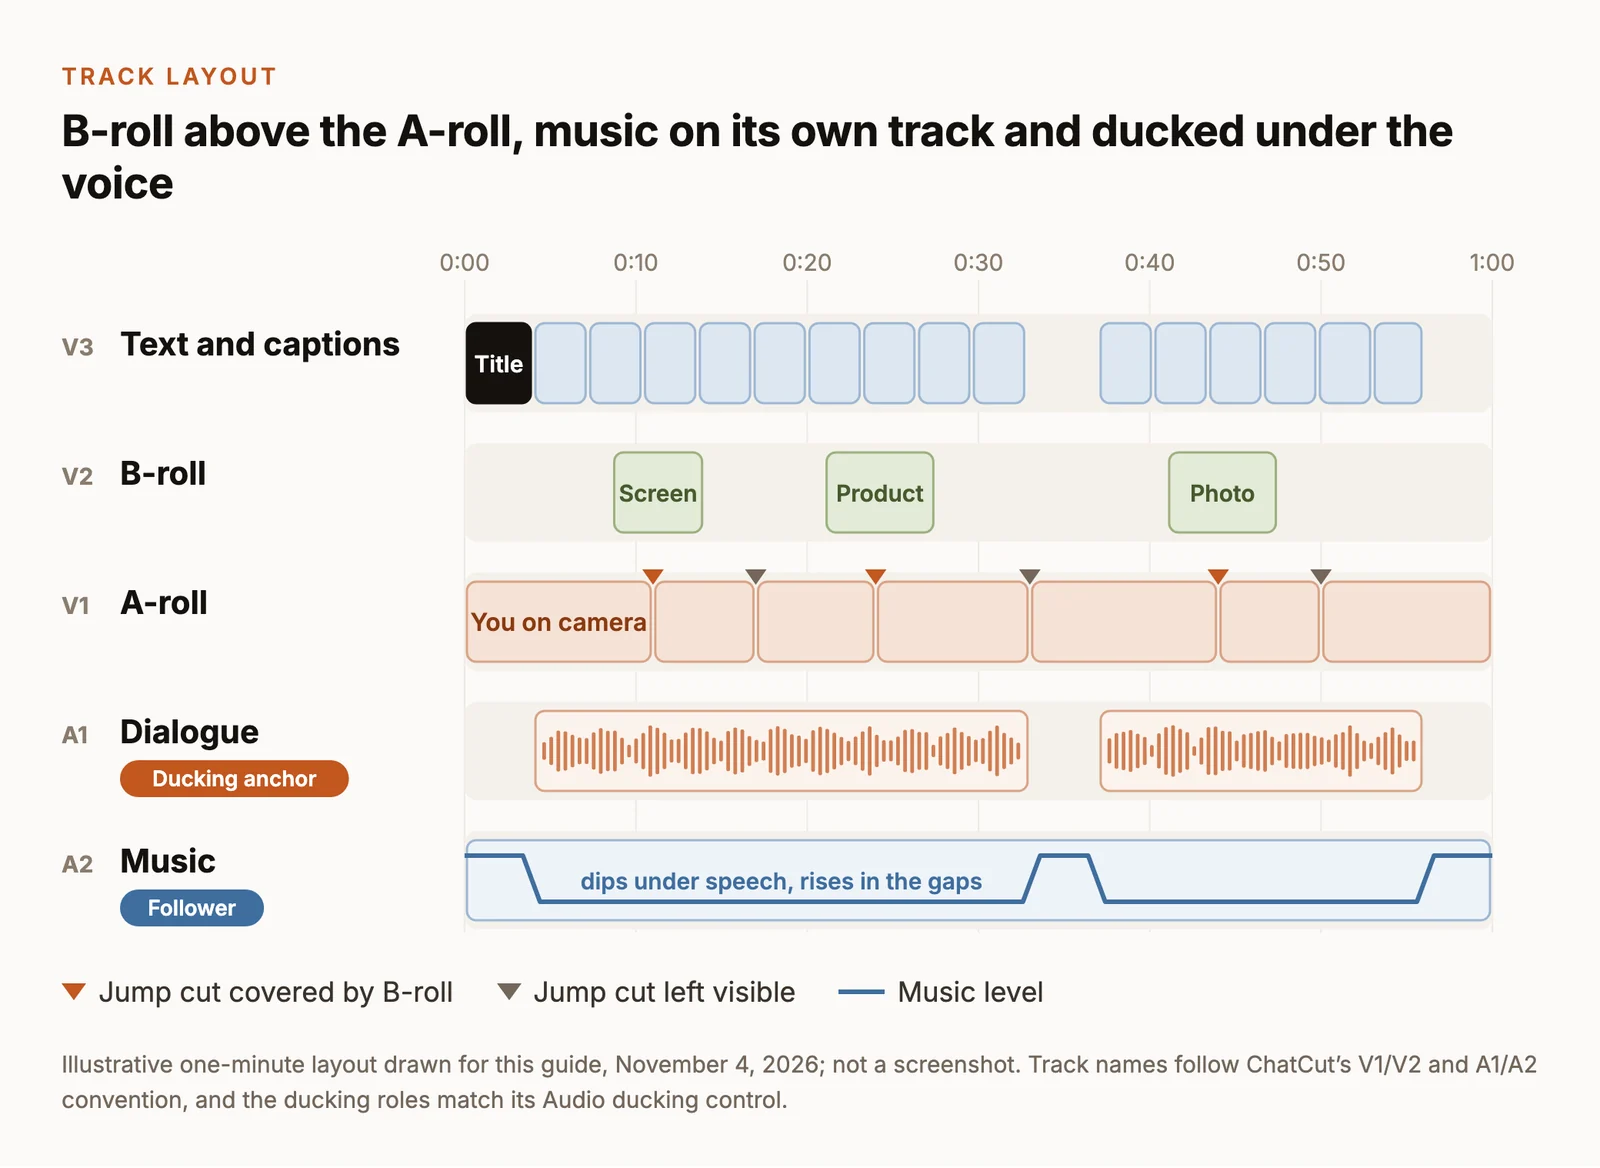
- Put B-roll on the track above the A-roll. The voice keeps playing underneath, so cutting away never interrupts the sentence.
- Start each cutaway on the word it illustrates. B-roll that arrives a sentence late reads as a mistake.
- Prefer your own footage and screen recordings. Stock and AI-generated shots work for abstract points, but they’re easy to spot as filler.
- Match the look roughly. If a cutaway is much darker or warmer than the A-roll, correct its brightness and color so the cut doesn’t jump. In ChatCut, right-click a clip for Apply Effect or Apply LUT.
In ChatCut: drag B-roll from My Assets onto the track above your A-roll, or select your B-roll clips and ask:
If you use AI-generated footage that looks like a real event or a real person, YouTube asks you to mark it as altered or synthetic content when you upload. Generating video in ChatCut needs a paid plan and uses credits.
Step 5: Add captions and on-screen text
Captions help viewers who watch with the sound off, who are hard of hearing, or who are watching in a second language. For a long-form YouTube video there are two ways to deliver them:
- A subtitle file (SRT) uploaded to YouTube. Viewers can switch it on or off, and you can correct it later without re-uploading the video. This is a good default for long-form.
- Captions burned into the picture. Always visible and fully styled. Common for Shorts and for short emphasis lines in long videos, but they can’t be turned off.
YouTube also creates automatic captions after upload. They’re a draft: names, numbers and technical terms are the usual errors. Our subtitles guide compares both outputs across editors.
In ChatCut: turn captions on with the Captions control below the Viewer, open the chevron to pick a style, and correct words in the caption track’s Content panel. Fix spelling there, not in the Transcript: deleting words in the Transcript cuts that audio and video. When you’re ready, Export → Subtitles → SubRip (.srt) saves the file for YouTube.
Before you move on, read the captions once with the sound off and check:
- Names, brands and numbers, against the audio.
- Line breaks: two short lines read faster than one long one.
- Timing: each line appears with its words and stays long enough to read.
- Placement: captions don’t cover faces or other on-screen text.
Keep other on-screen text to what helps: a title card, a speaker’s name the first time they appear, a key number or the name of a step. If a line of text just repeats what you’re saying, cut it.
Step 6: Balance voice and music
A talking-head video is carried by the voice, so get that right before you touch the music.
- Clean the dialogue. If there’s fan hum, traffic or room echo, select the dialogue clips in ChatCut, right-click and choose AI Voice Isolation. It’s built for speech, not music, and Restore original audio undoes it.
- Even out the level. The voice should sound about equally loud from clip to clip, so viewers never reach for the volume.
- Set music under the voice. Put music on its own track. In ChatCut, open Track controls → Audio ducking, set the dialogue track as the anchor and the music track as the follower, and the music dips whenever someone speaks.
- Use music you’re allowed to use. Tracks from the YouTube Audio Library are cleared for YouTube; some are Creative Commons and require a credit line in your description, which the library gives you to copy.
- Listen twice. Once on headphones for noise and clicks, once on a phone speaker for balance. Music that sounds quiet on headphones can bury speech on a phone.
Step 7: Watch it through and lock the picture
Watch the whole video once, start to finish, at full screen and without stopping. Note problems on paper instead of fixing them as you go, so you judge the video the way a viewer will. If you can, ask one other person to watch it too.
| If you notice | Fix |
|---|---|
| The opening doesn’t say what the video is about | Move the clearest promise to the start, or cut the warm-up |
| A cutaway arrives after the words it illustrates | Slide it so it starts on the word |
| A jump cut is jarring on a key line | Cover it with B-roll or a slight zoom on the A-roll |
| Music competes with speech | Lower the music or check the ducking setup |
| A caption shows a wrong name or number | Correct it in the caption text, then re-export the SRT |
| The video ends abruptly | Leave 5 to 20 seconds at the end for an end screen |
When the list is done, you’ve reached picture lock: the cut won’t change again. Save a version with that name, so you can return to exactly this cut for re-exports or a translated version later.
Step 8: Export with YouTube’s recommended settings
YouTube publishes recommended upload settings. For standard (SDR) uploads they come down to this:
| Setting | Recommended for YouTube |
|---|---|
| Container | MP4 |
| Video codec | H.264, progressive (not interlaced) |
| Frame rate | The rate you recorded at, such as 24, 25, 30 or 60 fps |
| Resolution and aspect ratio | 1080p or 4K, 16:9 |
| Video bitrate, 1080p | 8 Mbps at 24 to 30 fps; 12 Mbps at 48 to 60 fps |
| Video bitrate, 4K | 35 to 45 Mbps at 24 to 30 fps; 53 to 68 Mbps at 48 to 60 fps |
| Audio | AAC-LC, stereo, 48 kHz |
Source: YouTube recommended upload encoding settings, checked November 4, 2026.
Two rules matter more than any bitrate. Don’t change the frame rate: exporting 30 fps footage at 60 fps doesn’t make it smoother. Don’t upscale: footage shot in 1080p doesn’t gain detail by exporting it at 4K.
In ChatCut: select Export → Video. In ChatCut Desktop, choose the dynamic range (SDR unless you shot and graded HDR), the resolution (480p, 720p, 1080p or 4K), the frame rate, the video bitrate and the range, then pick a destination. Desktop renders on your computer, so it can export 4K; exports from the cloud go up to 1080p, and on the free plan they share a 60-minute total. Then use Export → Subtitles to save the SRT from step 5. The local export guide has the details.
Open the exported file in a normal video player and watch the first and last minute with sound. A finished render can still have a missing clip or a caption you meant to hide.
Step 9: Make a thumbnail
Viewers see the thumbnail and title before anything else, so treat the thumbnail as part of the edit. YouTube’s custom thumbnail requirements:
- Your channel must be verified to upload a custom thumbnail.
- JPG or PNG, at a 16:9 aspect ratio.
- Recommended 3840 × 2160 pixels; at least 640 pixels wide.
- Up to 50 MB when uploaded from a computer; 2 MB from the mobile app.
Start from a sharp frame of your own footage or a photo taken for the purpose. Keep it to one subject and a few words at most, and make it match what the title promises. Then shrink it to the size of a phone search result: if you can’t read it there, simplify it.
Step 10: Upload and review in YouTube Studio
In YouTube Studio, select CREATE → Upload videos and choose your file. The upload walks through four pages:
- Details: title, description, thumbnail, playlist and audience (whether the video is made for kids). To add chapters, list timestamps in the description: the first must be 00:00, you need at least three, and each chapter must be at least 10 seconds long (chapter rules).
- Video elements: subtitles, an end screen and cards.
- Checks: YouTube scans for copyright issues. The results aren’t final; a claim can still arrive later.
- Visibility: private, unlisted, public, or scheduled.
To add your SRT, open Subtitles, select the video, choose ADD LANGUAGE, then ADD → Upload file → With timing, select the file and save (upload help).
Upload as private or unlisted first. Higher-quality versions such as HD and 4K can take longer to process, so wait until they’re available, then watch it on a computer and on a phone with captions on. Publish or schedule when it looks right.
If you find a problem after publishing, YouTube Studio’s Editor → Trim and cut can remove the start, the end or a section in the middle, and the video keeps its URL, views and comments. Once you save, you can’t revert to the original; YouTube removed that option in June 2025. Unedited videos with more than 100,000 views may not be able to save changes unless the channel is in the YouTube Partner Program (editor help). For anything beyond a trim, fix the project and upload a new video, which is one more reason to keep it.
What to edit next
The same recording can usually feed short-form too. Our guide to making YouTube Shorts covers the vertical format, and turning long videos into Shorts shows how to pull complete ideas out of the edit you just finished. If you want AI to take on more of the first pass, see how the AI editors for YouTube creators compare.