To use After Effects for motion graphics, start with one reproducible asset: a six-second, 1920×1080 title card (Ship faster in white type over a lime accent bar on a dark canvas). In Adobe After Effects on desktop, you build that graphic in five stages with no third-party plugins: create a 30 fps composition with separate text and shape layers, keyframe Position and Scale with Easy Ease, add an Opacity Text Animator driven by a Range Selector, save reusable .ffx presets or .mogrt templates, and render an H.264 MP4 from the Render Queue. Prefer a prompt-led title treatment? Preview SaaS Kinetic Type Launch and adapt it to your own product.
Set up After Effects for motion graphics
Building motion graphics in After Effects starts with a fixed canvas and separated layers so every visual element can move on its own schedule. If you are still deciding which application fits your team or planning a multi-graphic video from scratch, see our comparison of motion graphics software and our general guide on how to make motion graphics. The steps below follow documented Adobe menu paths; we verified the workflow against official documentation on November 7, 2026, rather than a timed studio benchmark.
Composition settings
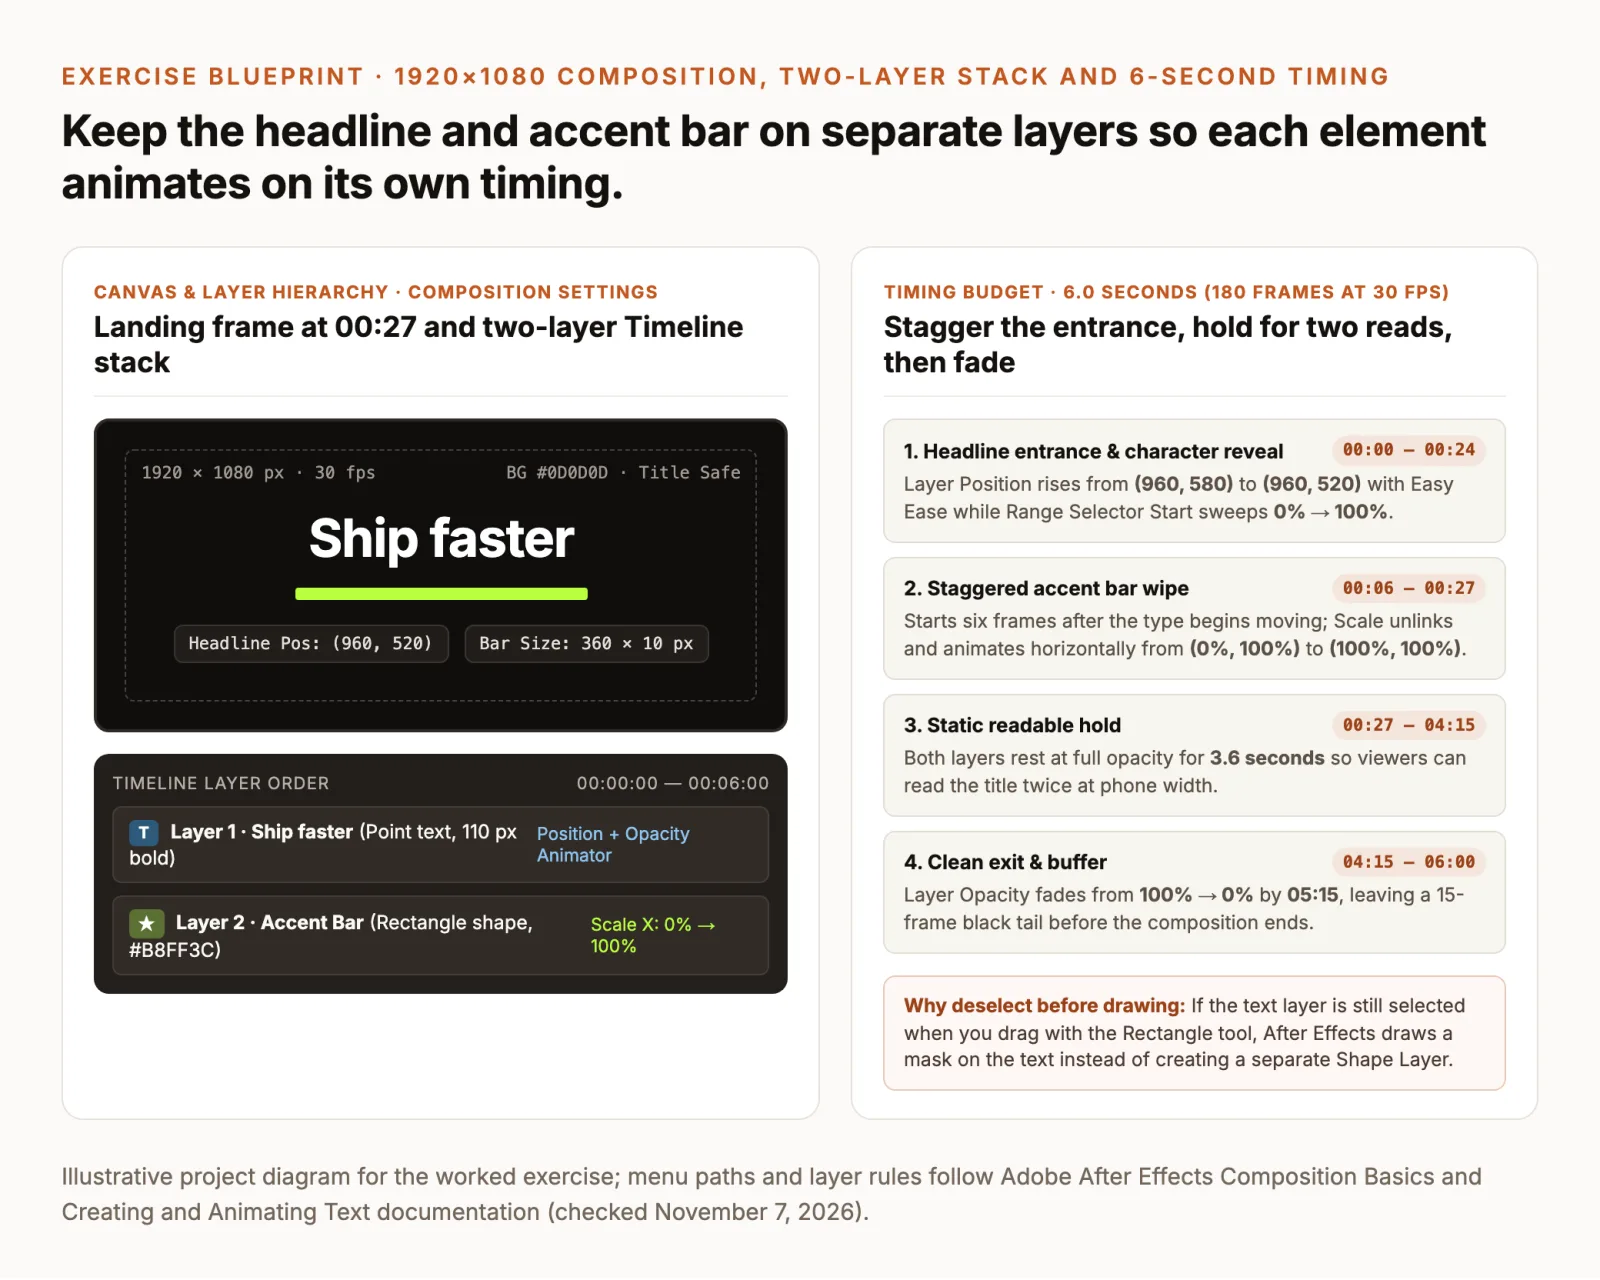
A composition is the timeline container and frame specification for your animation. To create one, open After Effects and choose Composition → New Composition (Ctrl+N on Windows, Cmd+N on macOS); check the official Adobe Composition basics page for full dialog options. Enter these exercise settings so the frame counts in this tutorial match your timeline:
| Parameter | Exercise value | Why it matters |
|---|---|---|
| Name | Ship Faster Title | Identifies the comp when exporting. |
| Size | 1920 × 1080 px | Standard 16:9 widescreen HD canvas. |
| Frame Rate | 30 fps | 180 total frames for clean staggers. |
| Duration | 0:00:06:00 | Fits entrance, 3.6 s hold, and exit. |
| Background | #0D0D0D | High contrast for white and lime. |
Set the Composition panel’s Resolution dropdown (bottom of the viewer) to Full while aligning type, or drop it to Half if playback stutters during previews. As noted on the official Composition basics page, viewport preview resolution affects only real-time playback speed, not final render dimensions unless your export settings explicitly copy the comp’s current preview state.
Text and accent shape
Design the final resting state of the graphic first (what the viewer sees at 00:27 once both elements have settled) before adding any keyframes. Keeping text and geometric shapes on separate layers is the core layout rule in After Effects; check the official Adobe motion graphics overview and the official Adobe Learn text tutorial for formatting and alignment controls.
- Create the point-text headline: Select the Horizontal Type Tool (
Ctrl+T/Cmd+T) in the Tools panel. Click once near the center of the Composition panel (do not drag a paragraph box) and typeShip faster. - Format the typography: With the text layer selected, use the Properties panel (or the Character and Paragraph panels) to choose a clean bold sans-serif typeface at
110 px, set Fill Color to pure white (#FFFFFF), set Tracking to-10, and set paragraph alignment to Center Text. - Center the headline on the canvas: Open the Align panel (
Window → Align), set Align Layers To to Composition, and click Align Horizontally and Align Vertically. Then nudge the text layer’s Position to(960, 520)so it sits slightly above the vertical midpoint. Double-check that its Anchor Point sits at the horizontal center of the baseline so any scale or rotation stays centered. - Deselect before drawing the shape: Press
F2or click an empty gray area of the Timeline panel so no layer is active. Why this matters: if your text layer remains selected when you drag with a shape tool, After Effects draws a vector mask onto the text layer instead of creating a new shape layer. - Add the lime accent bar: Select the Rectangle Tool (
Q), set Fill to#B8FF3C(lime) and Stroke toNone(0 px), and draw a horizontal bar beneath the headline. ExpandShape Layer 1 → Contents → Rectangle 1 → Rectangle Path 1, uncheck the Constrain Proportions link icon beside Size, and set Size to(360, 10). - Center and name both layers: Use the Align panel to center the shape layer horizontally at
(960, 590), 70 pixels below the headline baseline. Select the shape layer, pressEnter(Returnon macOS), and rename itAccent Bar. ConfirmShip fastersits on Layer 1 andAccent Barsits on Layer 2.
Animate the layout with keyframes
In After Effects, a keyframe records the value of a layer property at a specific frame on the timeline. Set two values at two different points in time, and After Effects interpolates every frame between them. Animating the landing position first and moving backward to set the starting offset prevents your final layout from drifting off-center.
Position and scale
Expand the Transform group on each layer, or use the direct property shortcuts (P for Position, S for Scale, T for Opacity), to set the entrance, hold, and fade-out keyframes:
- Lock the headline’s landing position (
00:24): Move the playhead (Current Time Indicator) to00:24(24 frames into the first second). Select Layer 1 (Ship faster), pressPto reveal Position, and click the Stopwatch icon beside Position to record a keyframe at(960, 520). - Set the starting offset (
00:00): Move the playhead back to00:00(frame 0). Change the Y coordinate of Position from520to580so the coordinate reads(960, 580). After Effects places a new diamond keyframe at00:00automatically. Do not click the Stopwatch icon a second time: toggling an active stopwatch off deletes every keyframe on that property. - Prepare the accent bar’s anchor point: Select Layer 2 (
Accent Bar). Choose the Pan Behind (Anchor Point) Tool (Y) and confirm the layer’s anchor point sits at the horizontal and vertical center of the rectangle (or pressCtrl+Alt+Home/Cmd+Option+Hometo center the anchor point on the shape content). Centered anchor placement makes the bar expand evenly outward from the middle; placing the anchor on the left edge makes it wipe left-to-right. - Animate the accent bar’s horizontal wipe (
00:06to00:27): Move the playhead to00:27(three frames after the headline finishes rising) and pressSon Layer 2 (Accent Bar) to reveal Scale. Uncheck the Constrain Proportions link icon beside the percentage values (100%, 100%) so X and Y scale independently, then click the Scale stopwatch at(100%, 100%). Move the playhead back to00:06and change Scale to(0%, 100%). Staggering the bar by six frames lets the viewer’s eye catch the headline first before the underline locks into place. - Preserve a 3.6-second readable hold (
00:27to04:15): Leave both layers completely untouched between00:27and04:15. A six-second title card fails if it spends four seconds animating and only one second resting. Holding the finished layout static for 3.6 seconds gives viewers time to read the words twice at normal playback speed. - Add a clean exit fade (
04:15to05:15): Select both Layer 1 and Layer 2, move the playhead to04:15, pressTto expose Opacity, and click the Opacity stopwatch (100%). Move the playhead to05:15and change Opacity to0%on both layers. The final 15 frames (05:15to06:00) act as a clean dark buffer before the next cut.
Easy Ease and the Graph Editor
If you press the Spacebar to preview your animation right now, both the headline rise and the accent-bar wipe will look mechanical. Default diamond keyframes use linear interpolation: the layer starts moving at constant speed on frame 0 and slams to a halt on frame 24. Real-world motion accelerates and decelerates, which After Effects controls through keyframe easing and the Speed Graph; check the official Adobe guide on controlling speed between keyframes for curve types and keyboard shortcuts.
- Convert linear diamonds to Easy Ease: Select both Position keyframes on Layer 1 (
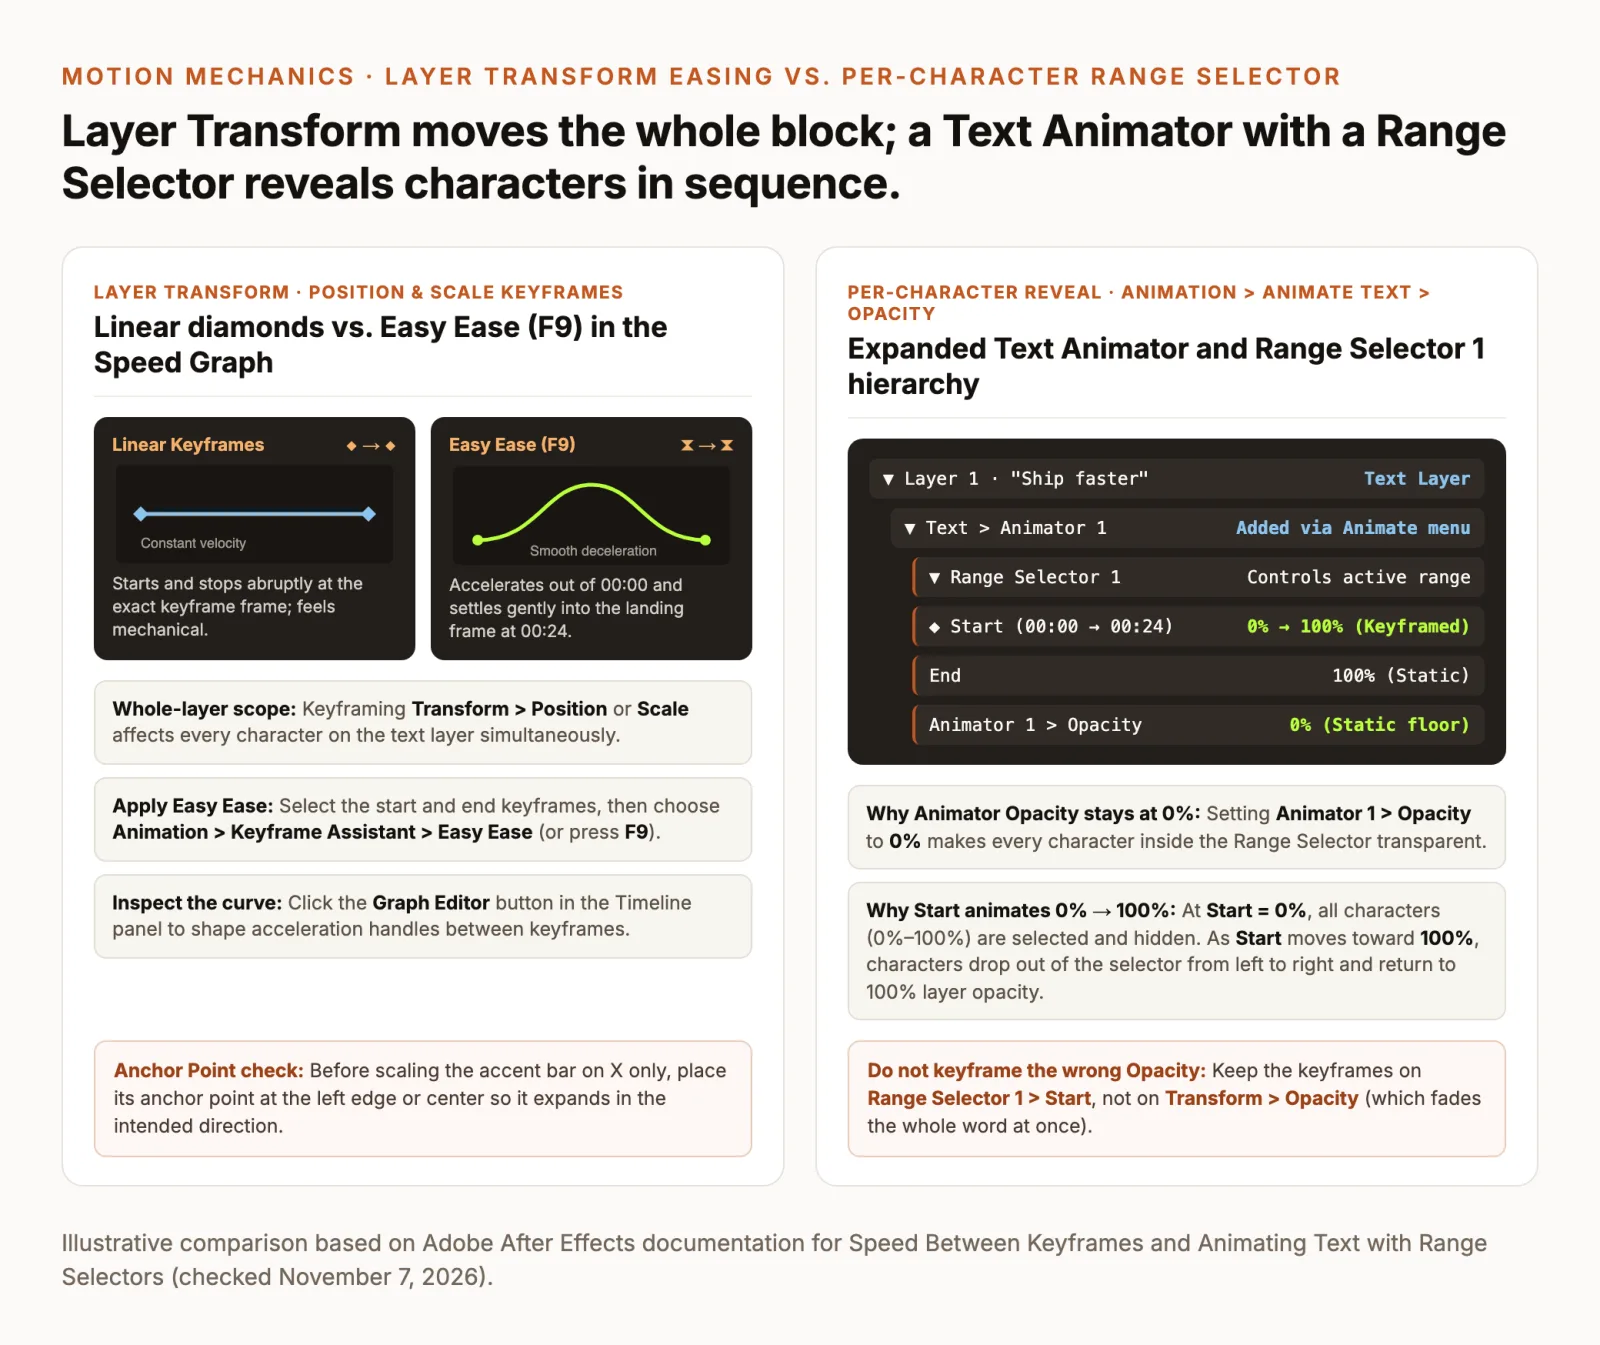
00:00and00:24) and both Scale keyframes on Layer 2 (00:06and00:27). Choose Animation → Keyframe Assistant → Easy Ease (or pressF9). The diamond icons change to hourglass icons (⧗), smoothing the departure and arrival speeds. - Open the Speed Graph: With Layer 1’s Position keyframes still selected, click the Graph Editor button at the top of the Timeline panel. Click the Choose Graph Type and Options icon at the bottom of the Graph Editor and select Edit Speed Graph.
- Shape the deceleration curve: Instead of a flat horizontal line (constant velocity), Easy Ease produces a bell-shaped arc that rises in the middle and drops to zero speed at both ends. Select the ending keyframe at
00:24and drag its yellow left direction handle slightly toward the left (increasing incoming influence to roughly70%–75%). The peak of the arc shifts left: the headline now moves briskly out of frame 0 and glides gently into its landing coordinate at00:24. - Match the accent bar’s curve: Repeat the handle pull on Layer 2’s ending Scale keyframe at
00:27, then click the Graph Editor button again to return to the standard layer timeline. PressUon your keyboard with both layers selected whenever you want to collapse the timeline down to only properties that carry keyframes.
Add one character-by-character text reveal
Moving the entire headline upward with Transform → Position treats Ship faster as a single rigid block. Pairing that upward glide with a per-character fade makes the letters appear sequentially from left to right without splitting the headline into ten separate layers.
Text animator versus layer Transform
Every After Effects text layer contains two distinct property groups in the Timeline panel: Text and Transform. Understanding which group to animate prevents one of the most common beginner mistakes in After Effects text animation; check the official Adobe Animating Text guide and the official Adobe text animation overview for the full list of per-character properties.
| Group | Timeline path | Scope |
|---|---|---|
| Transform | Transform → Position, Scale, Opacity | Moves or fades the whole text layer at once. |
| Animator | Text → Animate → Opacity | Animates individual characters or words via Range Selector. |
To add an Opacity Text Animator to Ship faster, select Layer 1 in the Timeline panel and choose Animation → Animate Text → Opacity from the top menu bar (or twirl open Layer 1 → Text and click the Animate > button on the right side of the Text row, then choose Opacity). After Effects inserts a new group named Animator 1 inside Text, containing two items: Range Selector 1 and an Opacity property specific to that animator.
Range Selector
A Range Selector acts like a sliding bracket across your characters, defined by Start (0% before the first character) and End (100% after the last character). Whatever characters fall between Start and End take on the value set in Animator 1 → Opacity, while characters outside that bracket return to the layer’s normal appearance. That logic is why the setup below leaves Animator 1 → Opacity unkeyframed at 0% and keyframes only the selector’s Start percentage; check the official Adobe text animation examples page for additional selector patterns.
- Set the Animator Opacity floor (
0%): InsideLayer 1 → Text → Animator 1, change Opacity from100%to0%. Do not click the stopwatch beside this Opacity property. BecauseRange Selector 1currently spans0%to100%, every character inShip fasteris selected and immediately turns transparent. - Keyframe Range Selector Start at
00:00: ExpandAnimator 1 → Range Selector 1. Move the playhead to00:00, confirm Start is0%and End is100%, and click the Stopwatch beside Start. - Sweep Start to
100%at00:24: Move the playhead to00:24(matching the landing frame of your Position animation) and change Start to100%. As Start advances from0%to100%, characters drop out of the transparent selection from left to right:Sappears first, followed byh,i,p, andfaster, until the entire phrase is 100% visible at frame 24. - Optional smoothness adjustment: If you want each character’s fade to overlap softly with its neighbor rather than stepping briskly, expand
Range Selector 1 → Advancedand confirm Smoothness is set to100%(the default). You can also switch Based On underAdvancedfromCharacterstoWordsif you preferShipandfasterto reveal as two whole words instead of ten letters.
Press the Spacebar to preview 00:00 through 01:00. You should see the headline rise 60 pixels while revealing character by character, followed six frames later by the lime accent bar wiping outward beneath it.
Reuse the result without confusing file types
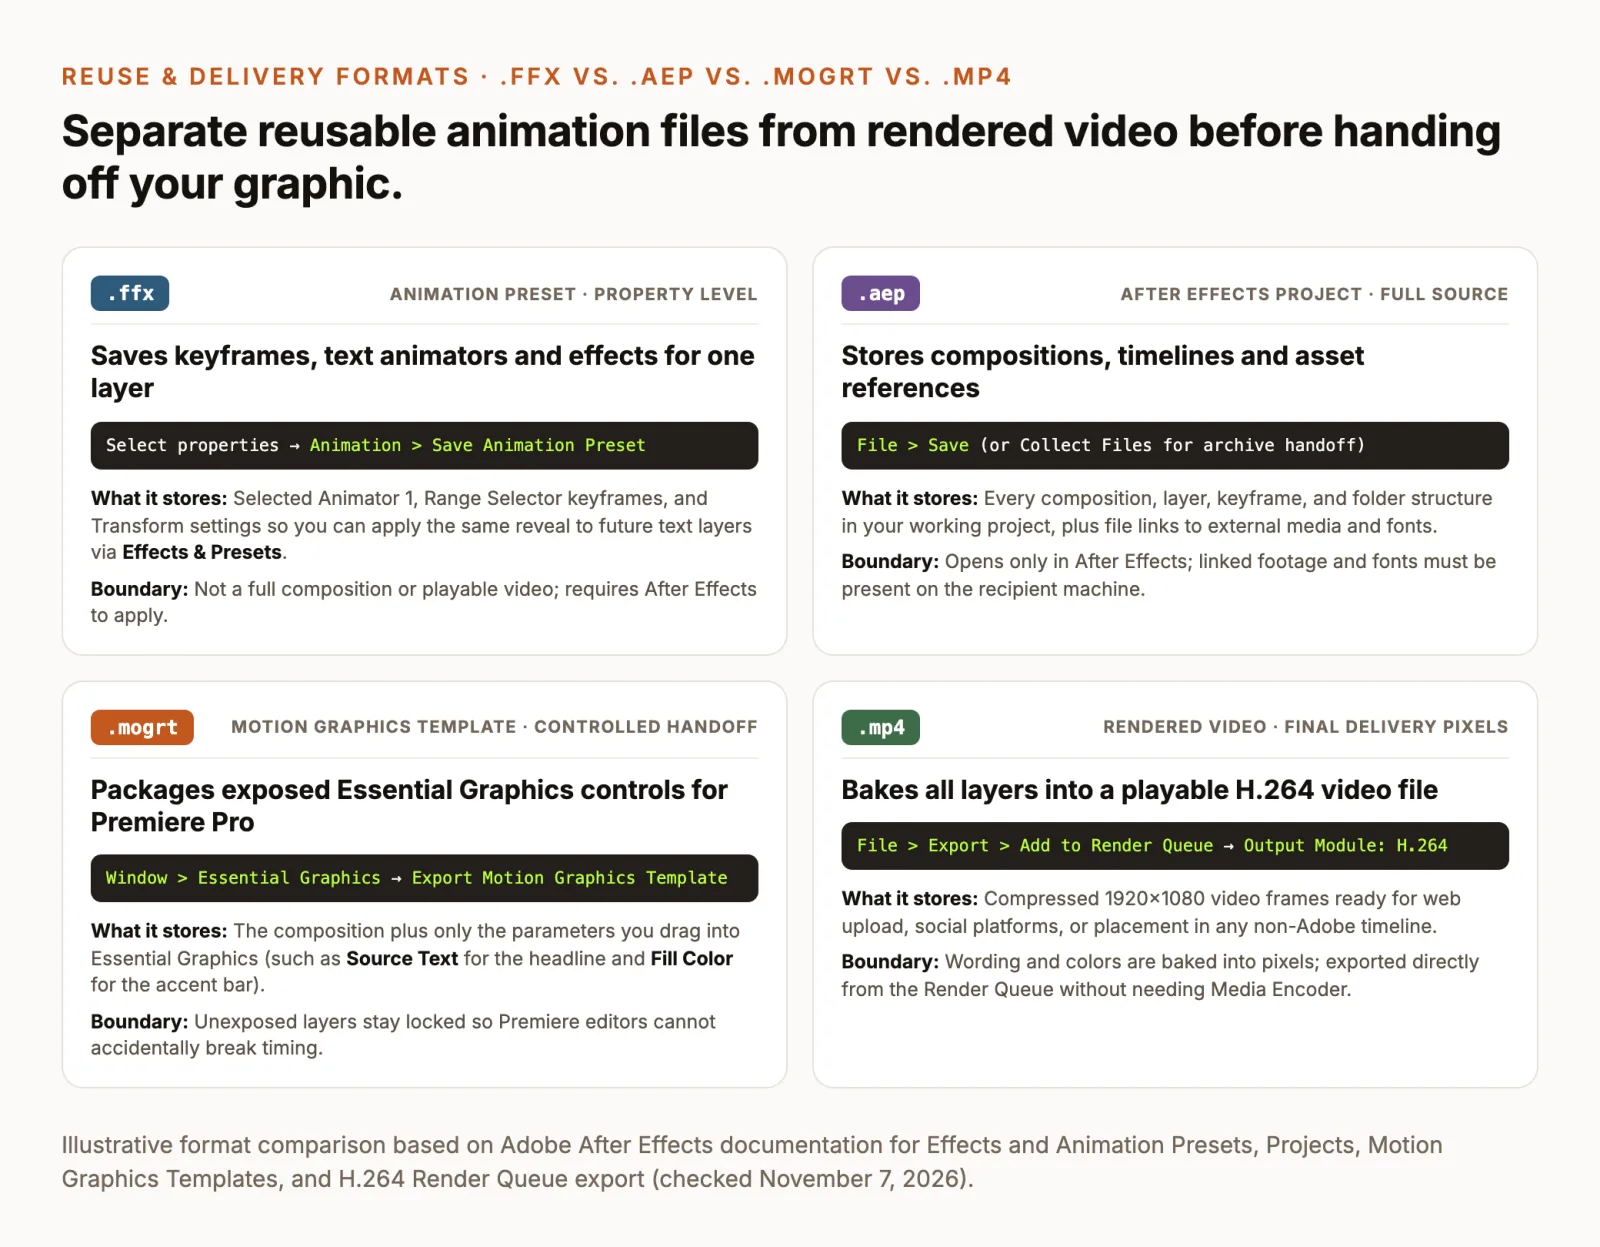
Once your six-second graphic works, how you save it determines who can reuse it and what they can change. Treating an animation preset, a source project, a template package, and a rendered video as interchangeable is a frequent source of broken handoffs.
Presets and project files
If you will stay inside After Effects for future videos, Adobe provides two native storage formats: one for isolated layer behaviors and one for entire projects:
.ffxAnimation Preset (Animation → Save Animation Preset): Stores selected properties, keyframes, text animators, expressions, and effects from a single layer so you can apply the exact same behavior to new layers later; check the official Adobe effects and animation presets overview for storage locations and application rules. To save your headline reveal as a reusable preset, select Layer 1 (Ship faster), holdCtrl/Cmdand click both Text → Animator 1 and Transform → Position so only those animated groups are highlighted, then choose Animation → Save Animation Preset. Save the.ffxfile into your default User Presets folder; it then appears underWindow → Effects & Presets → Animation Presets → User Presets. Whenever you apply a saved or downloaded.ffxpreset to a new text layer, pressUtwice (UU) to reveal every modified property on the layer..aepProject File (File → Save): Stores your compositions, timelines, layer stacks, and links to external assets; check the official Adobe After Effects projects guide for project management details. An.aepfile is not a video and cannot be uploaded to YouTube or dropped into a non-Adobe editor. If you send an.aepfile to another motion designer and your project uses external logos, audio, or footage, use File → Dependencies → Collect Files so After Effects copies all linked media into a single archive folder alongside the.aepfile.
When downloading third-party After Effects templates (.aep or .mogrt) or free .ffx text presets, such as those cataloged by School of Motion’s text preset guide or Mixkit’s free After Effects template library, check four dependencies before committing them to a client timeline:
- After Effects release compatibility: Templates built in the latest release often require the current version of After Effects to open cleanly, while very old presets can trigger expression-engine syntax errors in newer versions.
- Required fonts: Missing typefaces substitute silently with a system default and break alignment over accent bars; sync required Adobe Fonts or install licensed font files before rendering.
- Third-party plugins: Confirm the preset or template uses native After Effects effects unless you own the required third-party plugin.
- Commercial license terms: Verify whether a free preset or template permits commercial client work without attribution.
Motion Graphics templates
When a video editor working in Adobe Premiere Pro needs to reuse your title card across twenty episodes, changing the headline text and accent color each time without opening After Effects or accidentally shifting your keyframes, package the composition as a Motion Graphics template (.mogrt). Check the official Adobe guide to creating Motion Graphics templates for supported property types.
- Open the Essential Graphics panel: In After Effects, choose Window → Essential Graphics.
- Select the target composition: In the Primary (or Master) dropdown at the top of the Essential Graphics panel, select
Ship Faster Titleand give the template a clear title such asClean Launch Title Card. - Expose the headline wording: In the Timeline panel, expand
Layer 1 (Ship faster) → Textto locate Source Text. Drag Source Text directly into the Essential Graphics panel, rename the control labelHeadline Text, and optionally click Edit Properties beside it to allow font, size, or faux-style adjustments if your design permits. - Expose the accent bar color: Expand
Layer 2 (Accent Bar) → Contents → Rectangle 1 → Fill 1to locate Color. Drag Color into the Essential Graphics panel and label itAccent Bar Color. - Set the poster frame and export: Scrub the timeline to
01:00(where the headline and lime bar are both fully visible) and click Set Poster Time in the Essential Graphics panel so editors see a meaningful thumbnail. Then click Export Motion Graphics Template at the bottom of the panel, save the.mogrtto your local drive or Creative Cloud Library, and leave any unchecking of font warnings only after verifying the typeface is available.
Crucial handoff boundary: As documented on the official Motion Graphics templates page, only the specific properties you drag into the Essential Graphics panel can be edited in the recipient workflow. Your keyframe timing (00:00–00:24), Easy Ease curves, and 60-pixel vertical travel stay locked inside the .mogrt, preventing downstream editors from breaking the animation.
Render and inspect the finished graphic
When the graphic itself is the final deliverable, or when you need a standalone video file to upload or drop into any NLE, render the composition to a playable movie file.
H.264 delivery
Older tutorials frequently claim you must send every composition to Adobe Media Encoder to output an .mp4 file. Current versions of After Effects include native H.264 (.mp4) encoding directly inside the built-in Render Queue; check the official Adobe guide to exporting H.264 from the After Effects Render Queue for the documented steps:
- Trim or confirm the Work Area: Make sure the composition
Ship Faster Titleis active in the Timeline panel and that the Work Area bar spans the full00:00to06:00range (pressBat00:00to set the Work Area start andNat the end frame to set the Work Area end). - Send to the Render Queue: Choose File → Export → Add to Render Queue (or press
Ctrl+Mon Windows,Cmd+Mon macOS). - Select H.264 in the Output Module: In the Render Queue panel, click the blue text beside Output Module (often defaulting to
LosslessorHigh Quality). In the Output Module Settings dialog, open the Format dropdown and choose H.264, then click OK. - Choose the destination file: Click the blue filename beside Output To, select your export folder, and name the file
ship-faster-title.mp4. - Render the file: Click the Render button in the top-right corner of the Render Queue panel and wait for the progress bar and completion chime.
When you need a transparent overlay instead of a solid black background: Standard H.264 MP4 files do not carry an alpha transparency channel, so the composition’s #0D0D0D background color renders as solid black pixels. If you want to composite Ship faster and its lime accent bar directly over live-action video in another editor, open the Output Module Settings, choose Format: QuickTime, click Format Options to select Apple ProRes 4444, and change Channels under Video Output from RGB to RGB + Alpha.
Readability and edge checks
Never judge a rendered motion graphic solely from a paused frame inside the After Effects viewport. Open the finished ship-faster-title.mp4 in your operating system’s media player and run five checks before sending or publishing it:
- Hold readability at phone width: Shrink the player window to roughly the width of a smartphone screen and watch at 1× speed. Confirm you can comfortably read
Ship fastertwice during the00:27–04:15hold without feeling rushed. - Frame edges and crop safety: Watch the entrance (
00:00–00:27) to make sure neither the letter descenders (p) nor the ends of the accent bar clip awkwardly or sit where social-platform captions and UI buttons will cover them. - Motion smoothness at 30 fps: Verify that the Easy Ease deceleration into
00:24and00:27lands cleanly without a single-frame pop or sudden linear stop. - Font and glyph accuracy: If you swapped the headline text or opened a template on a second machine, verify that kerning, punctuation, and font weight match the intended typeface rather than a silent fallback font.
- Container and resolution verification: Inspect the exported file’s properties (
Get Infoon macOS orProperties → Detailson Windows) to confirm1920×1080dimensions,30 fpsframe rate, and a progressive H.264.mp4container matching standard web delivery guidelines such as YouTube’s recommended upload encoding settings.
Try a prompt-led version in ChatCut
When you do not need custom Bezier speed graphs or .mogrt handoffs for Premiere Pro, and instead want an editable title card, lower third, or chart generated directly on your video editing timeline, you can reuse the exact same creative brief in ChatCut.
Be clear about the file-format boundary first: ChatCut does not import or export After Effects .aep projects, .ffx presets, or .mogrt templates. Instead, ChatCut generates its own editable Motion Graphics on the timeline from a natural-language prompt or built-in template. For a deeper walkthrough of style consistency and prompt-generated overlays, see our AI motion graphics generator guide (or if you specifically need speaker nameplates over interviews, see how to make animated lower thirds without After Effects).
The preview above comes from the SaaS Kinetic Type Launch Skill (you can also browse general timeline graphics in the Motion Graphics Skill). To build the six-second Ship faster title card in ChatCut, follow the workflow documented in the ChatCut Motion Graphics guide:
- Check Templates first, or prompt from scratch: Open Templates in the media panel to see whether an existing title card fits (Add to timeline places it at the playhead; Use with AI attaches it to your AI draft). When you want a custom design, paste a specific brief naming the text, hierarchy, colors, motion, duration, and placement. The prompt below adapts our exercise brief (it is an illustrative proposal based on the Motion Graphics documentation, not an executed test or a guaranteed replica of the Skill demo above):
- Review and edit in the Motion Graphics Editor: Once the graphic appears on your timeline, play it back in the Viewer. In ChatCut Desktop 0.3.13 or later, click the Motion Graphic on the timeline to enter its editable canvas state, hover over text or colors in the Viewer (highlighted by a blue outline), and click an element to edit its text, font, or color directly, or drag it to reposition it. Press Esc once to close property controls and again to exit graphic editing.
- Revise by prompt while locking what works: On the web app, or whenever you want structural or animation changes that do not have a direct canvas control, reference the graphic with
@and state both what should change and what must stay unchanged (the same revision rule used in our video editing prompts guide):
- Save for reuse and export: To reuse a finished graphic across future edits in ChatCut, select it in My Assets, open its context menu, and choose Add as template to Favorite (saving it under Templates → Favorite). You can also pick or save a Design Style (
My Styles) below the AI composer to guide graphics generated afterward. For delivery, export the full timeline as MP4/WebM (up to 1080p in the cloud, or up to 4K locally in ChatCut Desktop), or use Export → Graphics to render each timeline motion graphic as a separate transparent ProRes 4444.movfile (requires Pro; see Export Transparent Motion Graphics).
Platform support: Per ChatCut Product Facts, ChatCut Desktop runs on macOS 13+ (Apple silicon and Intel) and Windows 10+ x64 (Linux and ChromeOS are not supported), alongside the web app and agent integrations for Claude Code, Codex, WorkBuddy, and Hermes. ChatCut cannot be installed inside the ChatGPT or Claude websites.
What costs nothing vs. what uses credits: The Free plan includes the core editor: manual timeline editing, uploads, transcription, and standard caption editing never use credits. Exporting MP4/WebM video, MP3 audio, subtitles, and XML also uses no credits (Free web and cloud exports share a cumulative 60-minute account quota, while ChatCut Desktop renders video locally on your computer). With Claude Code or Codex (plugin / MCP), the agent’s work (cutting, reordering, removing pauses and fillers, captions, B-roll placement, and motion graphics the agent writes) is covered by your existing Claude or ChatGPT subscription and uses no ChatCut credits. Generating motion graphics in the built-in ChatCut Agent uses credits, and transparent ProRes 4444 graphics export requires Pro (see Free and Pro, Credits Policy, and Web Export Limits).