To add an image to a video, import both files into a multi-track editor, place the photo or logo on a visual layer above your main video clip, trim its start and end handles, resize it in the preview canvas, and export a new video file. Placing the still on an upper overlay track keeps the video and spoken audio playing behind it; expanding the still to fill the frame or dropping it onto the main track replaces the scene. Below is how to add image to a video in ChatCut, CapCut, iMovie and Premiere Pro using one video and one PNG, JPEG or WebP still.
Choose overlay, full-screen insert or animation
Before importing your files, decide what the viewer should see and hear while the picture is on screen. Most beginner mistakes happen when an editor drops a photo directly into the main video track, pushing the rest of the edit forward, when the goal was to float a product shot or logo over continuous speech.
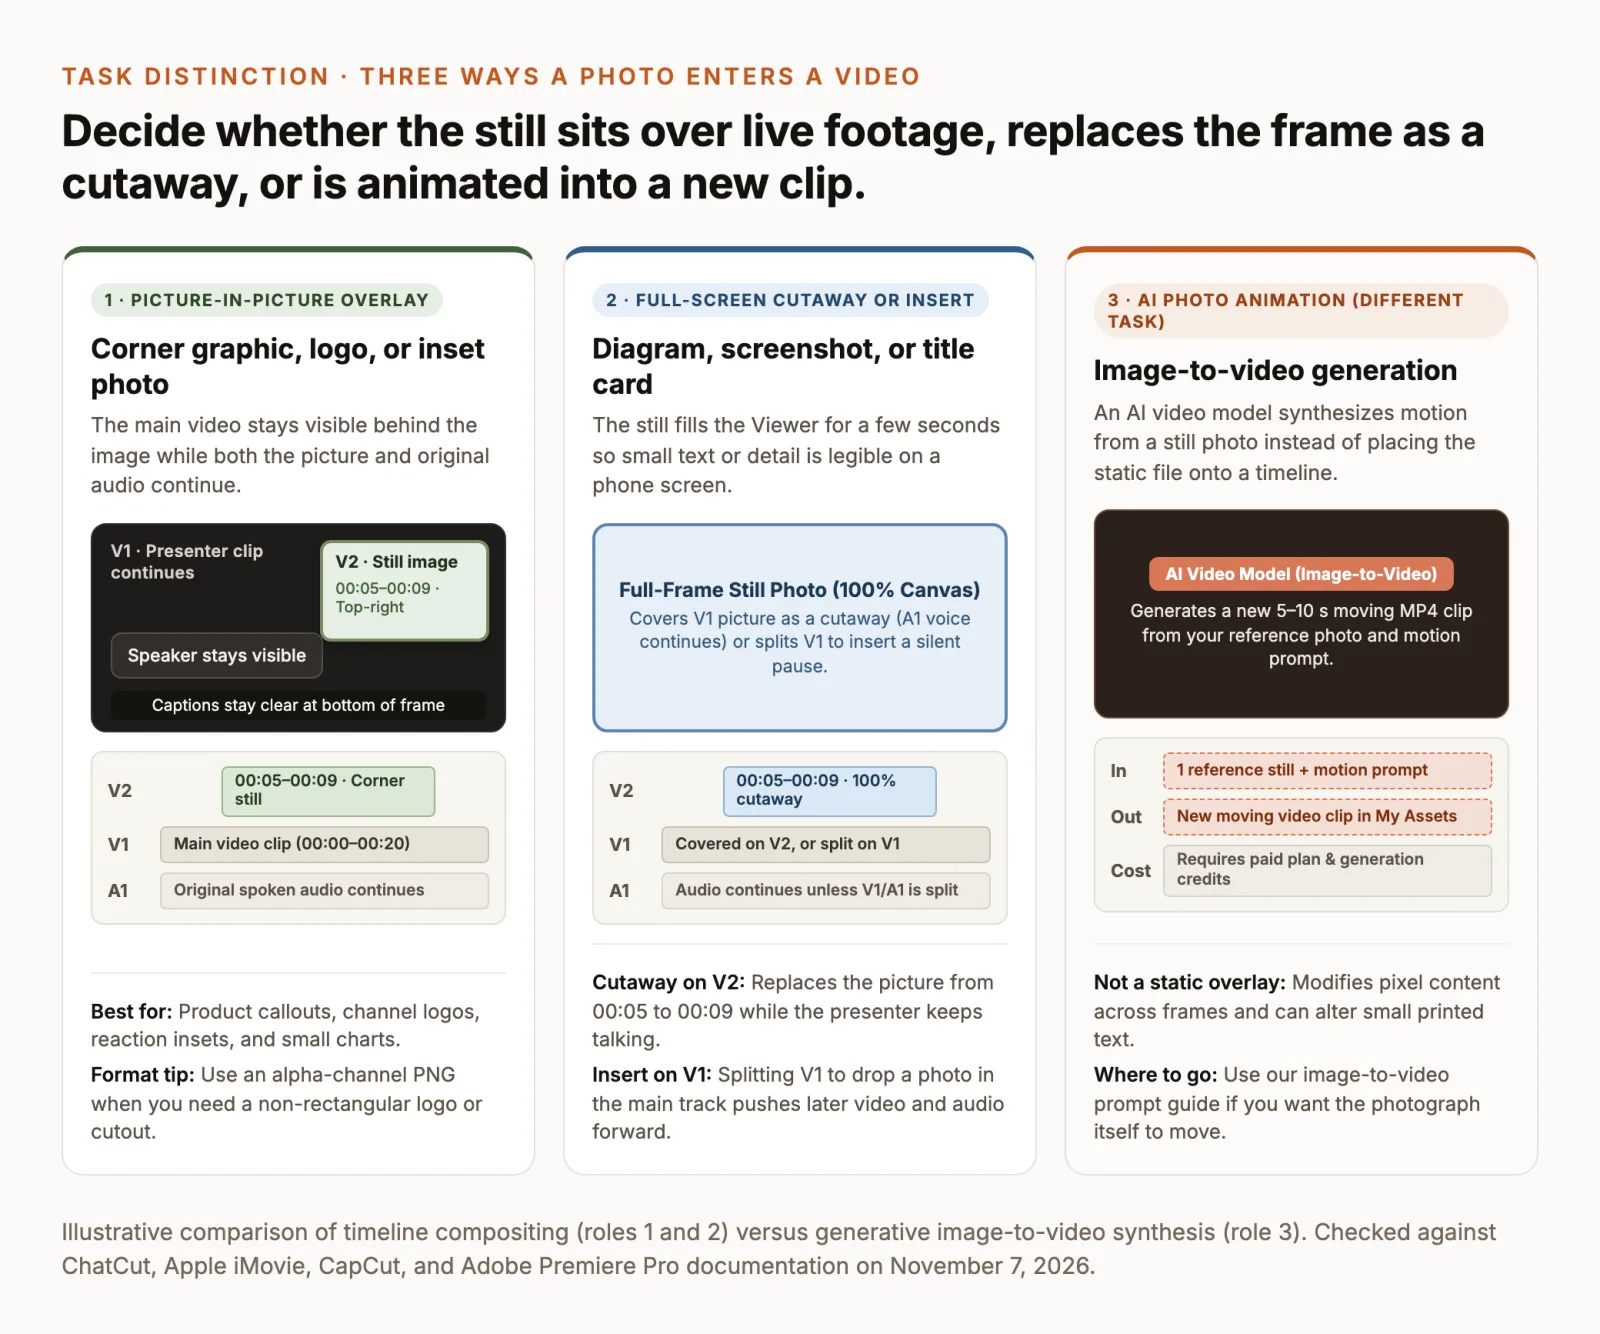
- Picture-in-picture overlay (upper track, scaled down). The photo, screenshot or transparent logo sits on an upper video track (
V2) in a corner or side inset while your primary recording (V1) and its dialogue (A1) continue underneath. Timeline picture in picture bakes the inset into the exported video file, unlike operating-system floating playback windows. - Full-screen cutaway or main-track insert. When a chart or UI screenshot has small text that would be illegible in a corner box, scale the
V2image to100%of the frame. Placing it onV2creates a cutaway that covers theV1picture for a few seconds whileA1dialogue keeps running; splittingV1to drop the photo into the main track creates a sequential insert that shifts later video and audio forward. - AI photo animation (a separate generation task). If you want a still portrait or product photograph to move, such as a camera pan or subject motion, that is image-to-video generation rather than timeline compositing. See our image-to-video prompts guide if you want to animate a photograph into a new video clip.
Pick the section below that matches your device and editor:
| Editor | Device | Primary control |
|---|---|---|
| ChatCut | macOS, Windows, Web | V2 track above V1 plus Viewer and Inspector controls |
| CapCut | iPhone, Android, Windows, macOS | Overlay → Add overlay on phone; upper track on PC |
| Apple iMovie | iPhone, iPad, Mac | More (…) → Picture in Picture on iPhone; connected clip on Mac |
| Adobe Premiere Pro | macOS, Windows | V2 track composite and Effect Controls → Motion |
How to add image to a video in ChatCut
ChatCut is our own editor, available on desktop for macOS 13+ (Apple silicon and Intel) and Windows 10+ (x64), as well as in the browser; Linux and ChromeOS are not supported (Product facts). The steps below are verified against ChatCut’s official documentation checked on November 7, 2026; we did not run comparative export benchmarks across tools for this guide.
1. Import the video and image to My Assets
Open your project and locate My Assets beside the Viewer (if hidden, open Workspace in the editor header and enable My Assets). Click My Assets → Upload → Files… and select both your video clip and the image you want to add (My Assets). Note that ChatCut’s AI Image Generation guide calls this manual path My Assets → Import → Files…, while the My Assets toolbar labels the button Upload.
If the photo is on your phone and you are editing on a computer, choose My Assets → Upload → From phone… to open a QR code and upload link (My Assets). Scanning the QR code sends files from your phone gallery into the desktop or web project’s My Assets pool; it is a file-transfer helper, not a mobile timeline editor.
Wait until each asset card finishes processing before dragging it to the Timeline. Do not attach the image only with the + button beside the AI prompt composer: a composer attachment supplies message context without adding the file to the project media pool (My Assets). For reliable interchange, ChatCut’s Supported Formats reference recommends H.264 video in MP4 and PNG or JPEG images (it also accepts BMP, GIF, SVG and WebP stills).
2. Layer the still on V2 above your footage
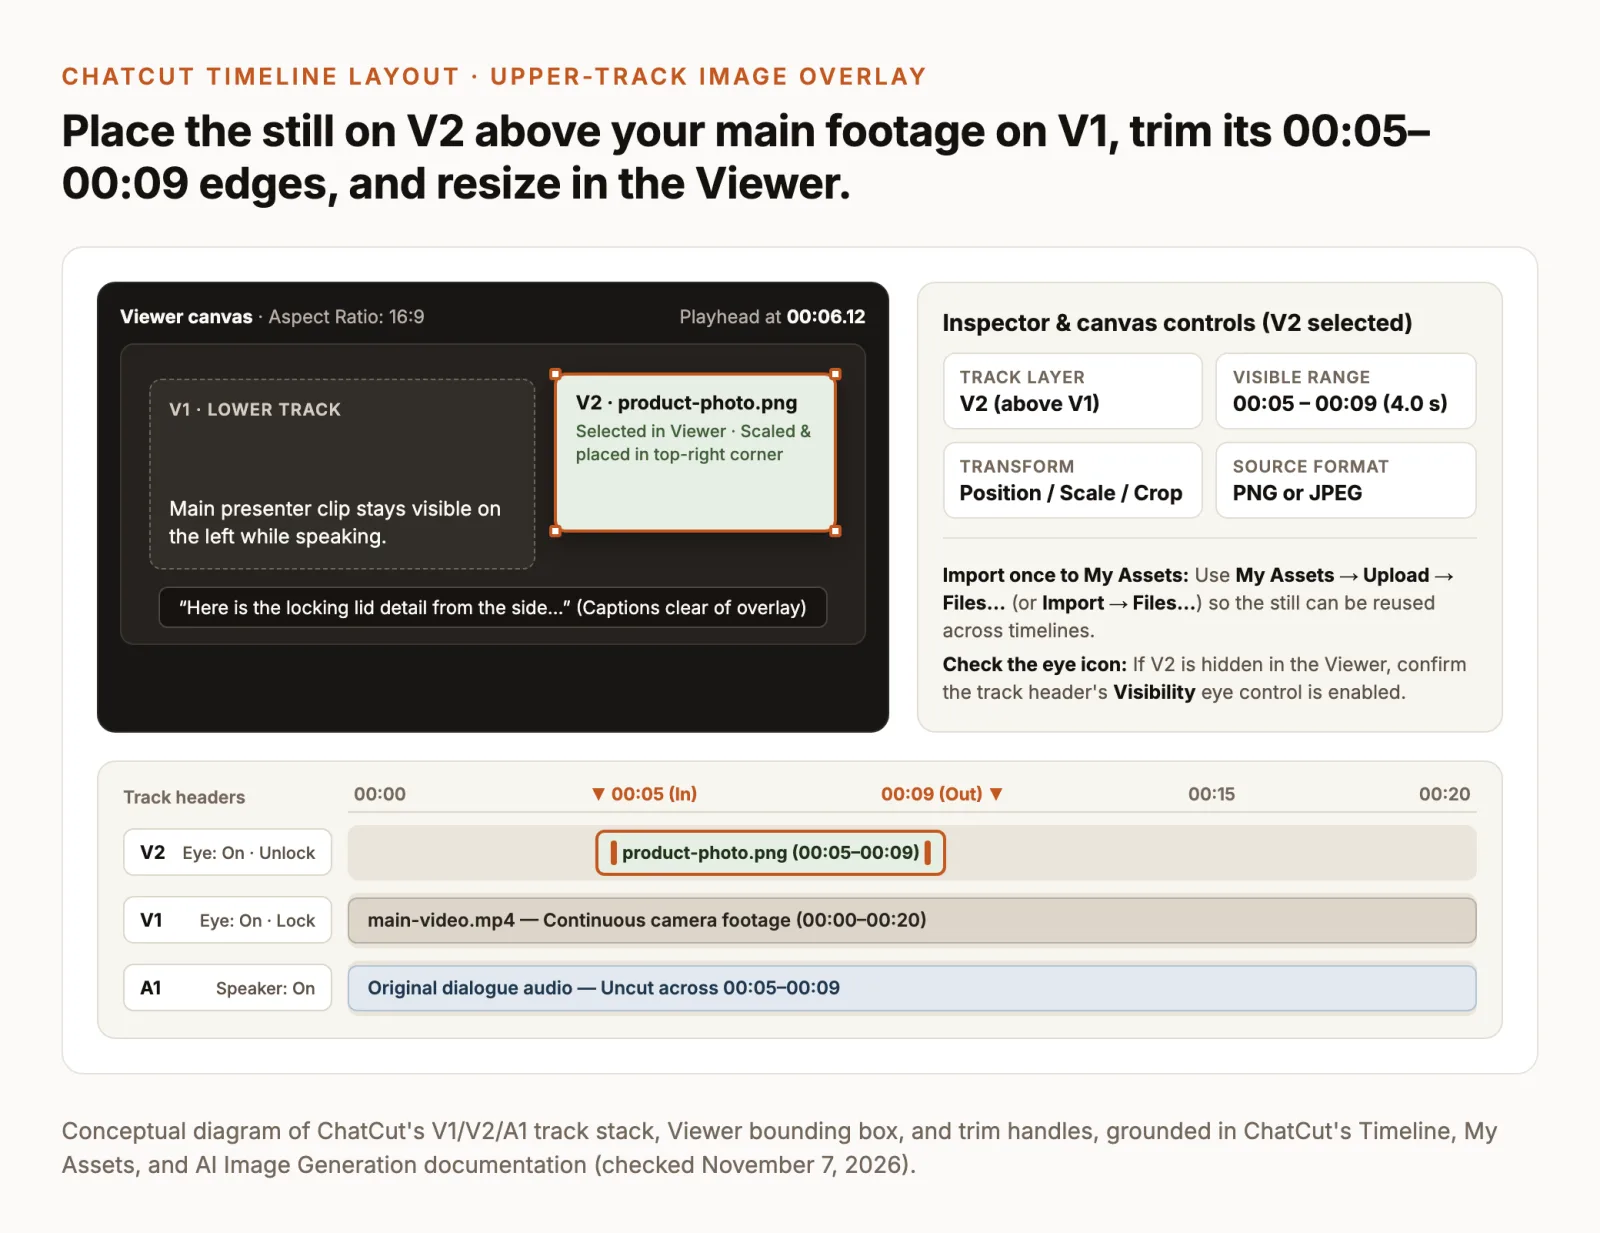
Drag your main video clip from My Assets onto video track V1 (its spoken audio lands on A1), then drag your image asset onto V2 directly above V1. In ChatCut’s Timeline, visual tracks sit above audio tracks and higher video tracks (V2, V3) appear in front of lower ones (V1).
3. Set start and end timing on the timeline
With Selection Mode active above the Timeline, drag the image clip on V2 left or right so its start aligns with the spoken cue (for example, 00:05). Drag the left or right edge of the V2 clip to set how long it remains visible (for example, 00:05 to 00:09).
Trimming an edge on V2 in Selection Mode or Trim Edit Mode changes only that still’s duration without shifting V1 (Timeline). To show the same picture at two separate timestamps, select the V2 clip and choose Duplicate (or press C / Split at the playhead), then drag the second copy to the later moment (Timeline).
4. Resize, crop and position in the Viewer
Select the image item on V2 to adjust its position, scale, crop and duration in the Inspector or Viewer canvas controls (AI Image Generation):
- Corner callout or logo: Scale the still down and drag it into an upper corner clear of the speaker’s face and lower-third captions.
- Full-screen cutaway: Leave the image scaled to fill the canvas on
V2so it replaces the picture from00:05to00:09whileA1speech continues underneath. - Vertical 9:16 framing: If you switch Aspect Ratio → 9:16 below the Viewer (Timeline), keep logos and photos clear of platform UI overlays. Meta recommends leaving the top
14%, bottom35%, and side6%of a 9:16 Reels ad free of text and logos (Meta Ads Guide), and TikTok publishes safe-zone templates for 9:16 in-feed ads (TikTok Ads Help).
5. Preview, export or direct the placement with a prompt
Play across 00:05–00:09 with sound on to confirm that A1 dialogue is uninterrupted and captions stay readable. Then open Export → Video and choose H.264 in MP4 (or VP8 in WebM) at your source frame rate (Supported Formats). For full channel uploads, see our guide on how to edit a YouTube video and YouTube’s recommended upload encoding settings.
To direct the placement through ChatCut’s Agent after importing both files to My Assets, use Selection Mode or type @ to reference each asset. The illustrative prompt below uses ChatCut’s @ syntax (it was not hands-on tested for this article, so inspect the V2 clip edges and Viewer placement afterward):
For tested prompt patterns covering rough cuts, B-roll cutaways and captions on existing footage, see our 26 video editing prompts.
What costs nothing in ChatCut: The Free plan includes the core editor: manual timeline editing, uploads, transcription and standard caption editing never use credits, and exporting MP4/WebM video, MP3 audio, subtitles and XML uses no credits either (Credits policy). Free web/cloud exports share a cumulative 60-minute account quota up to 1080p (Web export limits), while ChatCut Desktop renders video locally on your computer up to 4K. With Claude Code or Codex (plugin / MCP), the agent’s editing work is covered by your existing Claude or ChatGPT subscription and uses no ChatCut credits unless the workflow calls a ChatCut-hosted generation service; messages to the built-in ChatCut Agent and AI media generation use ChatCut credits.
Add a photo on phone or PC with CapCut
CapCut is widely used to add a photo to a video on iPhone or Android, or to stack tracks on a computer. Because CapCut’s phone app and desktop app organize layers differently, follow the route for your device.
Overlay a picture on iPhone or Android in CapCut
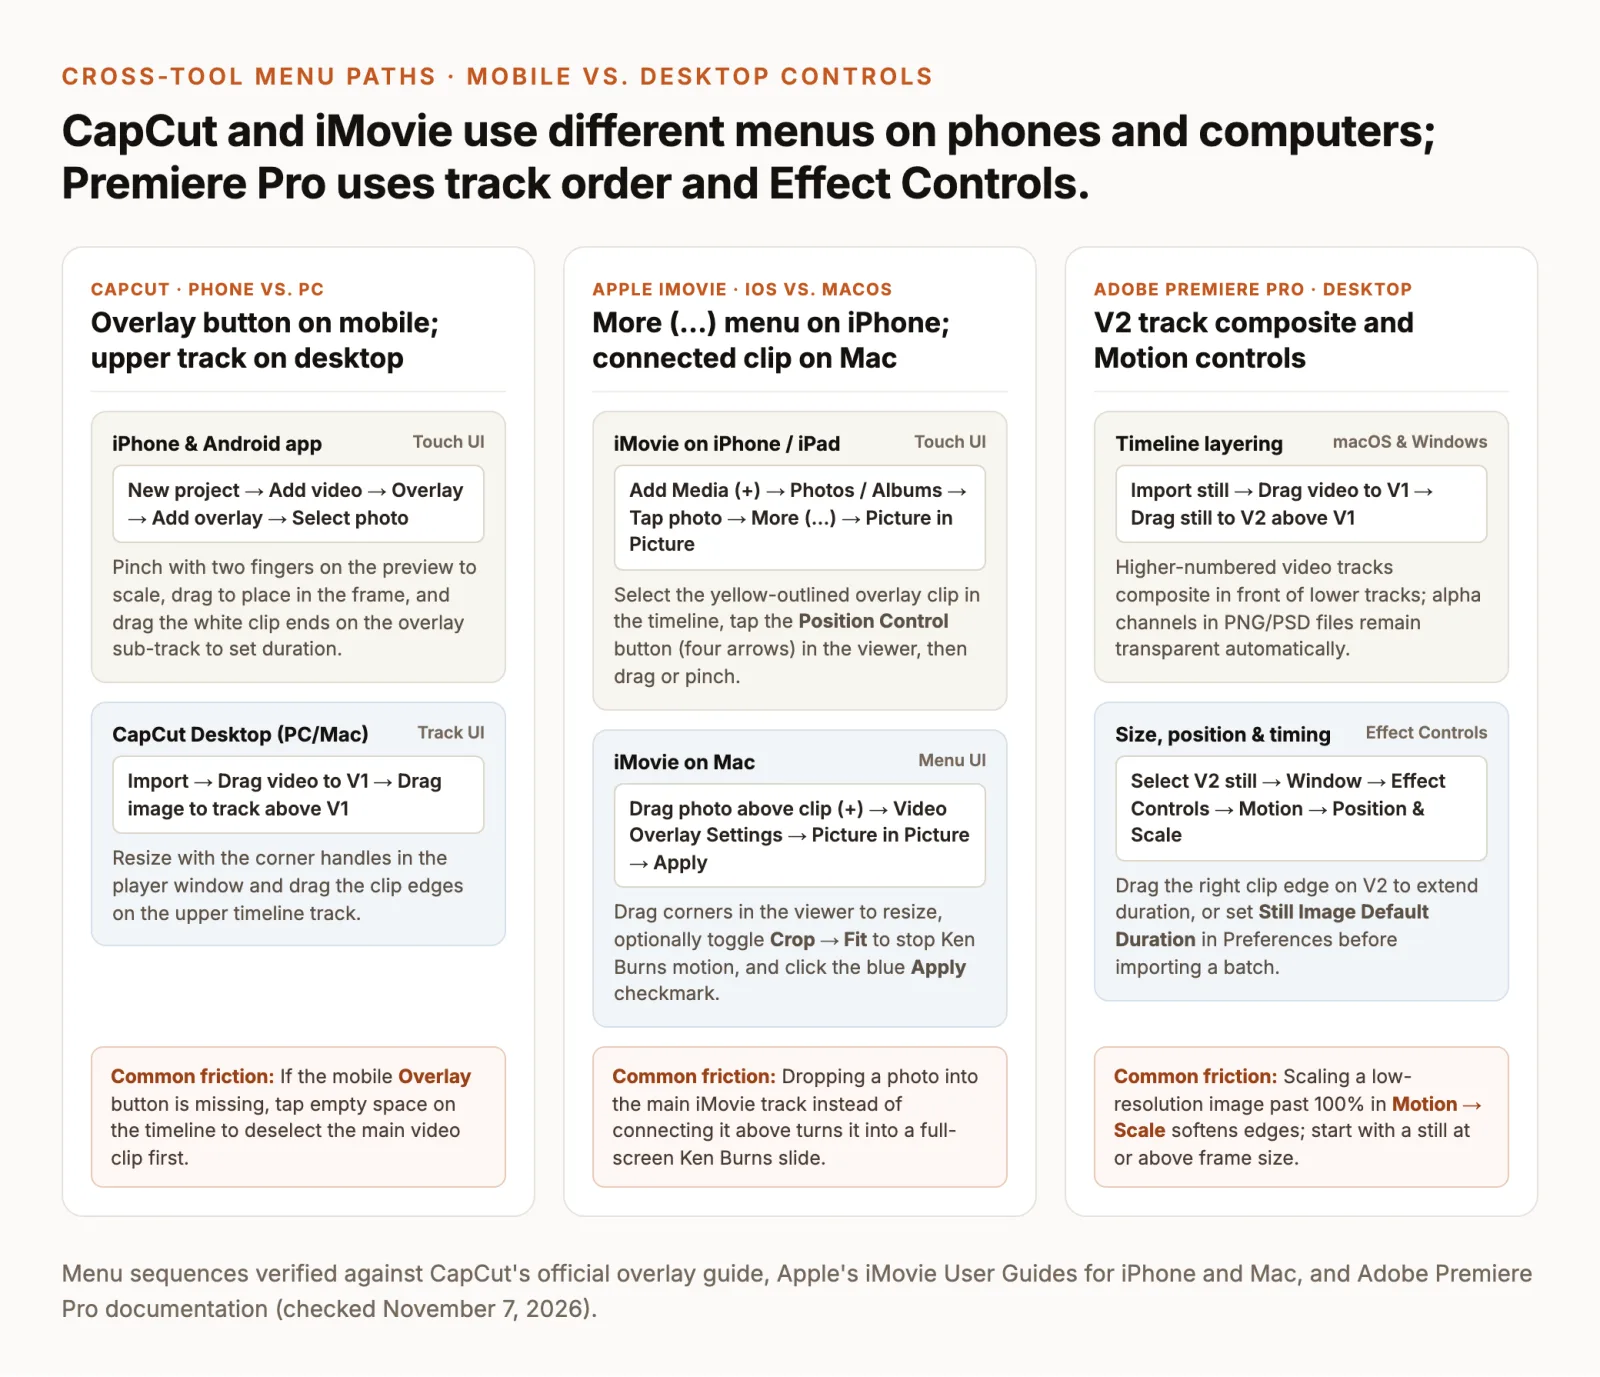
In the CapCut mobile app, tapping the main timeline + button inserts a photo sequentially into the main track. To float an image over a playing video, use the Overlay tool in CapCut’s official overlay guide:
- Load the background video. Open CapCut, tap New project, pick your main video clip, and tap Add.
- Open the Overlay menu. Tap Overlay → Add overlay in the bottom toolbar. If Overlay is hidden, your main video clip is selected on the timeline; tap empty dark space below the track to deselect it.
- Select your photo. Switch to the Photos tab, pick the picture or PNG logo from your gallery, and tap Add. CapCut places the still on a sub-track beneath the main video strip.
- Trim the duration handles. Tap the photo clip on the overlay strip and drag its white left or right handles to set when the picture appears and disappears.
- Resize and position on the preview. Pinch the image with two fingers on the preview canvas to scale or rotate it, then drag it into a clear corner.
- Export. Tap the resolution label at the top (such as 720p or 1080p) to check Resolution, Frame rate, and Code rate, then tap Export (CapCut overlay guide).
Mobile button labels can vary by app version and region, and we have not verified current free-plan versus paid watermark policies on CapCut exports. Check your export preview before publishing.
Place an image on an upper track in CapCut Desktop
On Windows and macOS, CapCut Desktop uses vertical track stacking (CapCut overlay guide):
- Open CapCut PC, click New project, and click Import to choose your background video and still image.
- Drag the background video onto the main timeline track.
- Drag the imported photo onto a track above the main video clip.
- Drag the corner handles in the player window to resize and position the image, trim its edges on the upper track, and click Export.
Use iMovie on iPhone or Mac
Apple includes iMovie on iOS, iPadOS and macOS, and both versions support picture-in-picture insets and full-frame cutaways through device-specific menus.
Add a picture-in-picture photo on iPhone or iPad
On an iPhone or iPad, tapping + on a photo inserts it into the main track. Use the More (…) menu documented in Apple’s iMovie for iPhone overlay guide instead:
- Park the playhead. Open your movie project in iMovie on iPhone and scroll the timeline so the white playhead sits where the photo should appear.
- Pick the photo. Tap Add Media (+), tap Photos or Albums, tap an album, and tap the photo (Import video clips and photos in iMovie on iPhone).
- Choose Picture in Picture. In the pop-up menu, tap More (…) and choose Picture in Picture for an inset window (or Cutaway for a full-frame photo over continuous audio).
- Move and resize in the viewer. Tap the yellow-outlined overlay clip in the timeline, tap the Position Control button (four arrows) in the viewer, then drag to move the inset or pinch to resize it (Apple iPhone overlay guide).
- Adjust crop, border and timing. Tap Zoom Control to pinch-zoom inside the inset or Border to toggle the frame outline, and drag the yellow clip ends in the timeline to set duration.
- Export a full-resolution file. Tap Done, tap Share, and select Share Video → Options to set resolution and frame rate (Share your movie as a video file in iMovie on iPhone). Avoid sharing via Mail or Messages, which downscales video to
360pat30 fps.
Create a picture-in-picture or cutaway image on Mac
In iMovie on Mac, connect the photo above the primary clip and switch its mode in the viewer bar (Create a picture-in-picture effect in iMovie on Mac):
- Connect the photo above the timeline clip. Drag the photo above the video clip in the timeline until the green Add (+) icon and connection line appear, then release.
- Select Picture in Picture. Click the connected photo clip, click the Video Overlay Settings button (two overlapping rectangles above the viewer) if needed, and choose Picture in Picture from the left dropdown (Apple Mac picture-in-picture guide) or Cutaway for a full-frame image (Create a cutaway effect in iMovie on Mac).
- Position and resize. Drag the inset inside the viewer using the yellow alignment guides, drag any corner handle to resize it, and pick a transition (Dissolve, Zoom, or Swap), border, or drop shadow.
- Disable unwanted Ken Burns motion. If the photo slowly zooms during playback, click the Cropping button above the viewer and switch from Ken Burns to Fit or Crop to Fill (Add the Ken Burns effect in iMovie on Mac).
- Apply and export. Click the blue Apply checkmark, drag the clip edges in the timeline to adjust timing, and click Share → Export File (Export a movie, trailer, or clip as a file in iMovie on Mac).
Add an image in Adobe Premiere Pro
In Adobe Premiere Pro, any still placed on a higher video track composites over lower tracks automatically, and you adjust placement under Effect Controls → Motion:
- Import the still (and optional batch duration). Choose File → Import and select your
PNG,JPEG,TIFForPSDfile. To change the default length for future imports, set Still Image Default Duration in Preferences → Timeline before importing; check the official page for importing still images in Premiere Pro. - Place the photo on V2 above V1. Drag your main video clip to
V1and drag the still image ontoV2at the target playhead position. Higher tracks composite over lower tracks, and alpha channels in transparentPNG,TIFForPSDfiles stay transparent automatically; check the official page on combining multiple videos or still images in Premiere Pro. - Adjust Position and Scale. Select the
V2still clip, open Window → Effect Controls, and expand Motion to set Position and Scale, or double-click the image in the Program Monitor to drag its handles directly; check the official page on applying the Motion effect in Premiere Pro. - Trim and export. Drag the right or left edge of the
V2clip on the timeline to set its duration, then pressCmd+M(macOS) orCtrl+M(Windows) to export anH.264(MP4) file.
Fix hidden, oversized, blurry or short-lived images
When an added image disappears, looks soft, or shows a solid box around a logo, check these five settings:
- The image is on the timeline, but hidden in the Viewer. Confirm the playhead sits inside the image clip’s time range (
00:05–00:09), the image is on a track above the video (V2aboveV1), and the track header’s visibility toggle is enabled. In ChatCut, check the eye control onV2(Timeline: Track-header controls).
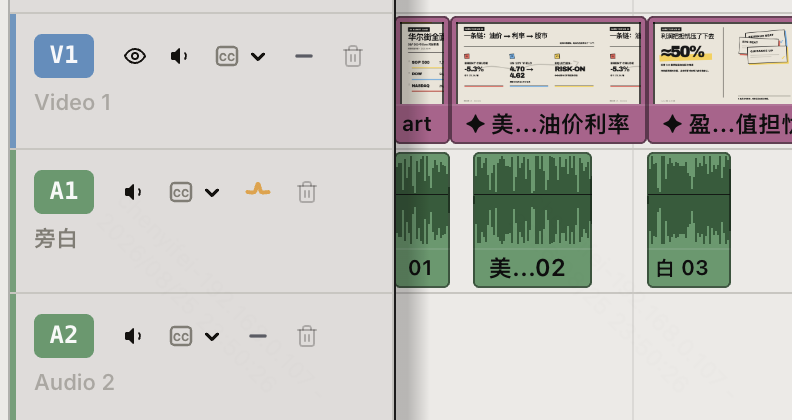
- A “transparent” PNG still shows a white or checkerboard box. A
.pngextension does not guarantee transparency; the file must contain an RGBA alpha channel rather than an opaque fill or baked-in checkerboard pixels (see the W3C PNG specification and MDN’s image format guide). In ChatCut, request a Transparent background with GPT Image 2.5 when generating cutouts (AI Image Generation). - The photo or screenshot looks blurry. Scaling a small image past
100%stretches its pixels. Export screenshots and logos at or above the pixel dimensions they will occupy in your1080por4Kframe, and crop tightly around the relevant UI detail. - The image disappears too quickly. Drag the right edge of the
V2image clip outward so it stays on screen long enough to read every label twice at normal playback speed. - Adding a full-screen photo cut off the speaker’s voice. Dropping a photo onto
V1splits the video clip and pushes later speech forward. Place the full-screen image onV2aboveV1soA1dialogue continues underneath; conversely, remember that aV2cutaway never pausesA1audio automatically unless you split bothV1andA1.
Creative extension: turn stills into a collage
A static V2 overlay or cutaway is the right choice whenever viewers need to inspect an exact product photo, interface screenshot or brand logo. When you are editing a narrated explainer and want supporting visuals to enter with motion, you have two creative extensions.
For editable lower thirds, animated callouts and transparent ProRes 4444 overlays, see our AI motion graphics generator guide. To turn narrated concepts into an animated paper-cutout B-roll sequence on your timeline, explore the Animated Explainer Paper Collage Skill (collage-b-roll redirects there). Treat the demo below as creative inspiration for explainer B-roll rather than a basic static image overlay: