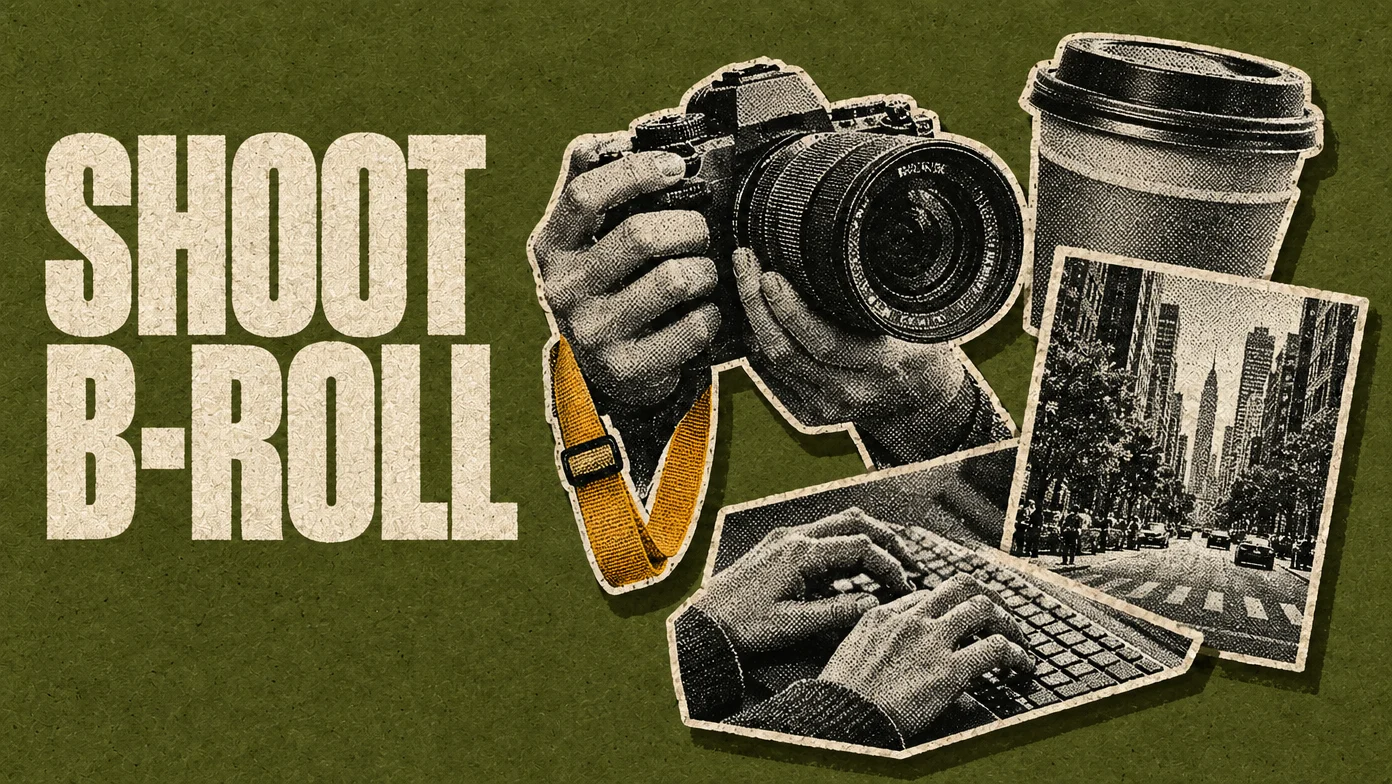
Clips that look attractive on your camera roll often fail in the timeline because they start mid-action, stop a second too early, or show the same medium angle five times. Shooting B-roll that actually edits together requires planning shots around specific spoken lines and jump cuts, capturing six distinct views of each scene with stationary two-second handles, locking your frame rate, exposure, and white balance before you roll, and naming files by scene before import. This guide walks through how to shoot B-roll with a phone or mirrorless camera using one continuous example: packing a customer order. Pairing your B-roll with a talking-head recording? Start with the Speech Cleanup Skill, then add your supporting shots.
1. Plan B-roll around the story
Most shooters run out of usable cutaways because they treat B-roll as leftover atmosphere to grab after the main shoot. As TillyBoard’s production guide puts it, B-roll is “the material that makes the main work cuttable.” Instead of collecting random background clips, build your plan backward from the edit you need to assemble.
This tutorial focuses on physical capture, camera settings, and on-set coverage. If you still need to plan and record the presenter track (your A-roll), start with how to make a talking head video. For the complete post-production pass from rough cut to upload, see how to edit a YouTube video. And if a sequence calls for a shot you cannot film on location, our AI video prompts guide covers generating synthetic clips to fill the gap.
Convert narration into visible actions
Start with your script, interview outline, or rough A-roll transcript and mark every sentence where the viewer needs to see something other than the speaker’s face. StudioBinder’s B-roll guide frames this through five planning questions: why the shot exists in the story, who performs the action, what object or environment carries the point, when the light or activity happens, and where you have permission and clean space to film.
In practice, every line on a B-roll plan solves one of four editing problems:
- Orienting the viewer: showing the workspace, storefront, or room before close-ups begin.
- Proving a spoken claim: showing the exact step, measurement, label, or result the voiceover describes.
- Hiding a jump cut: placing a tight detail or reaction shot over a trimmed pause or spliced retake in the talking-head track.
- Moving between scenes: giving the editor a visual exit from one topic and a clean entry into the next.
Take one continuous example we will use throughout this guide: a small ceramics studio filming a 24-second talking-head passage about how customer orders are packed:
“Every morning we pull the batch cards at the packing bench, wrap each ceramic mug in heavy kraft tissue, verify the SKU against the printed order slip, and seal the box for same-day pickup.”
If you only walk over to the bench and film one handheld clip of someone taping a box, you can cover about four seconds of that passage. To cover the whole beat and hide the jump cuts where you trimmed pauses in the speech, you need a structured shot list that breaks the physical process into distinct angles and focal lengths.
Fill out your B-roll shot list
A scene shot list for narrative film sorts shots by camera setup; a B-roll shot list maps each spoken cue or edit problem to a specific view, duration, and audio requirement (TillyBoard). Before you pick up the camera, fill in ten fields for each planned cutaway:
- Story beat and spoken cue: the exact phrase in your script or transcript the shot will sit over.
- Editorial purpose: establish location, carry main action, hide a jump cut, prove a claim, show a human reaction, or transition out.
- Shot size and camera angle: wide (
WS), medium (MS), close-up (CU), overhead insert (ECU), or eye-level medium close-up (MCU). - Visible action: the concrete physical motion from start to finish (for example, folding kraft tissue corners and pressing the sticker seal).
- Camera movement: locked tripod/stand (the default for most cutaways) or one deliberate move (slow push, pan, or frame exit).
- Intended edit duration: how long the clip will stay on screen in the finished cut, typically 2 to 4 seconds.
- Capture roll duration and handles: how long you actually record: at least 7 to 12 seconds, including 2 seconds of still frame before the action starts and 2 seconds after it ends.
- Location sound: whether to capture natural sound (paper crinkle, pen tick, tape dispenser) or room tone alongside the picture.
- Priority: must-have coverage for the edit versus secondary options if time allows.
- Take and filename: the descriptive name you will assign when offloading media, such as
packing_detail_fold_take01.mp4.
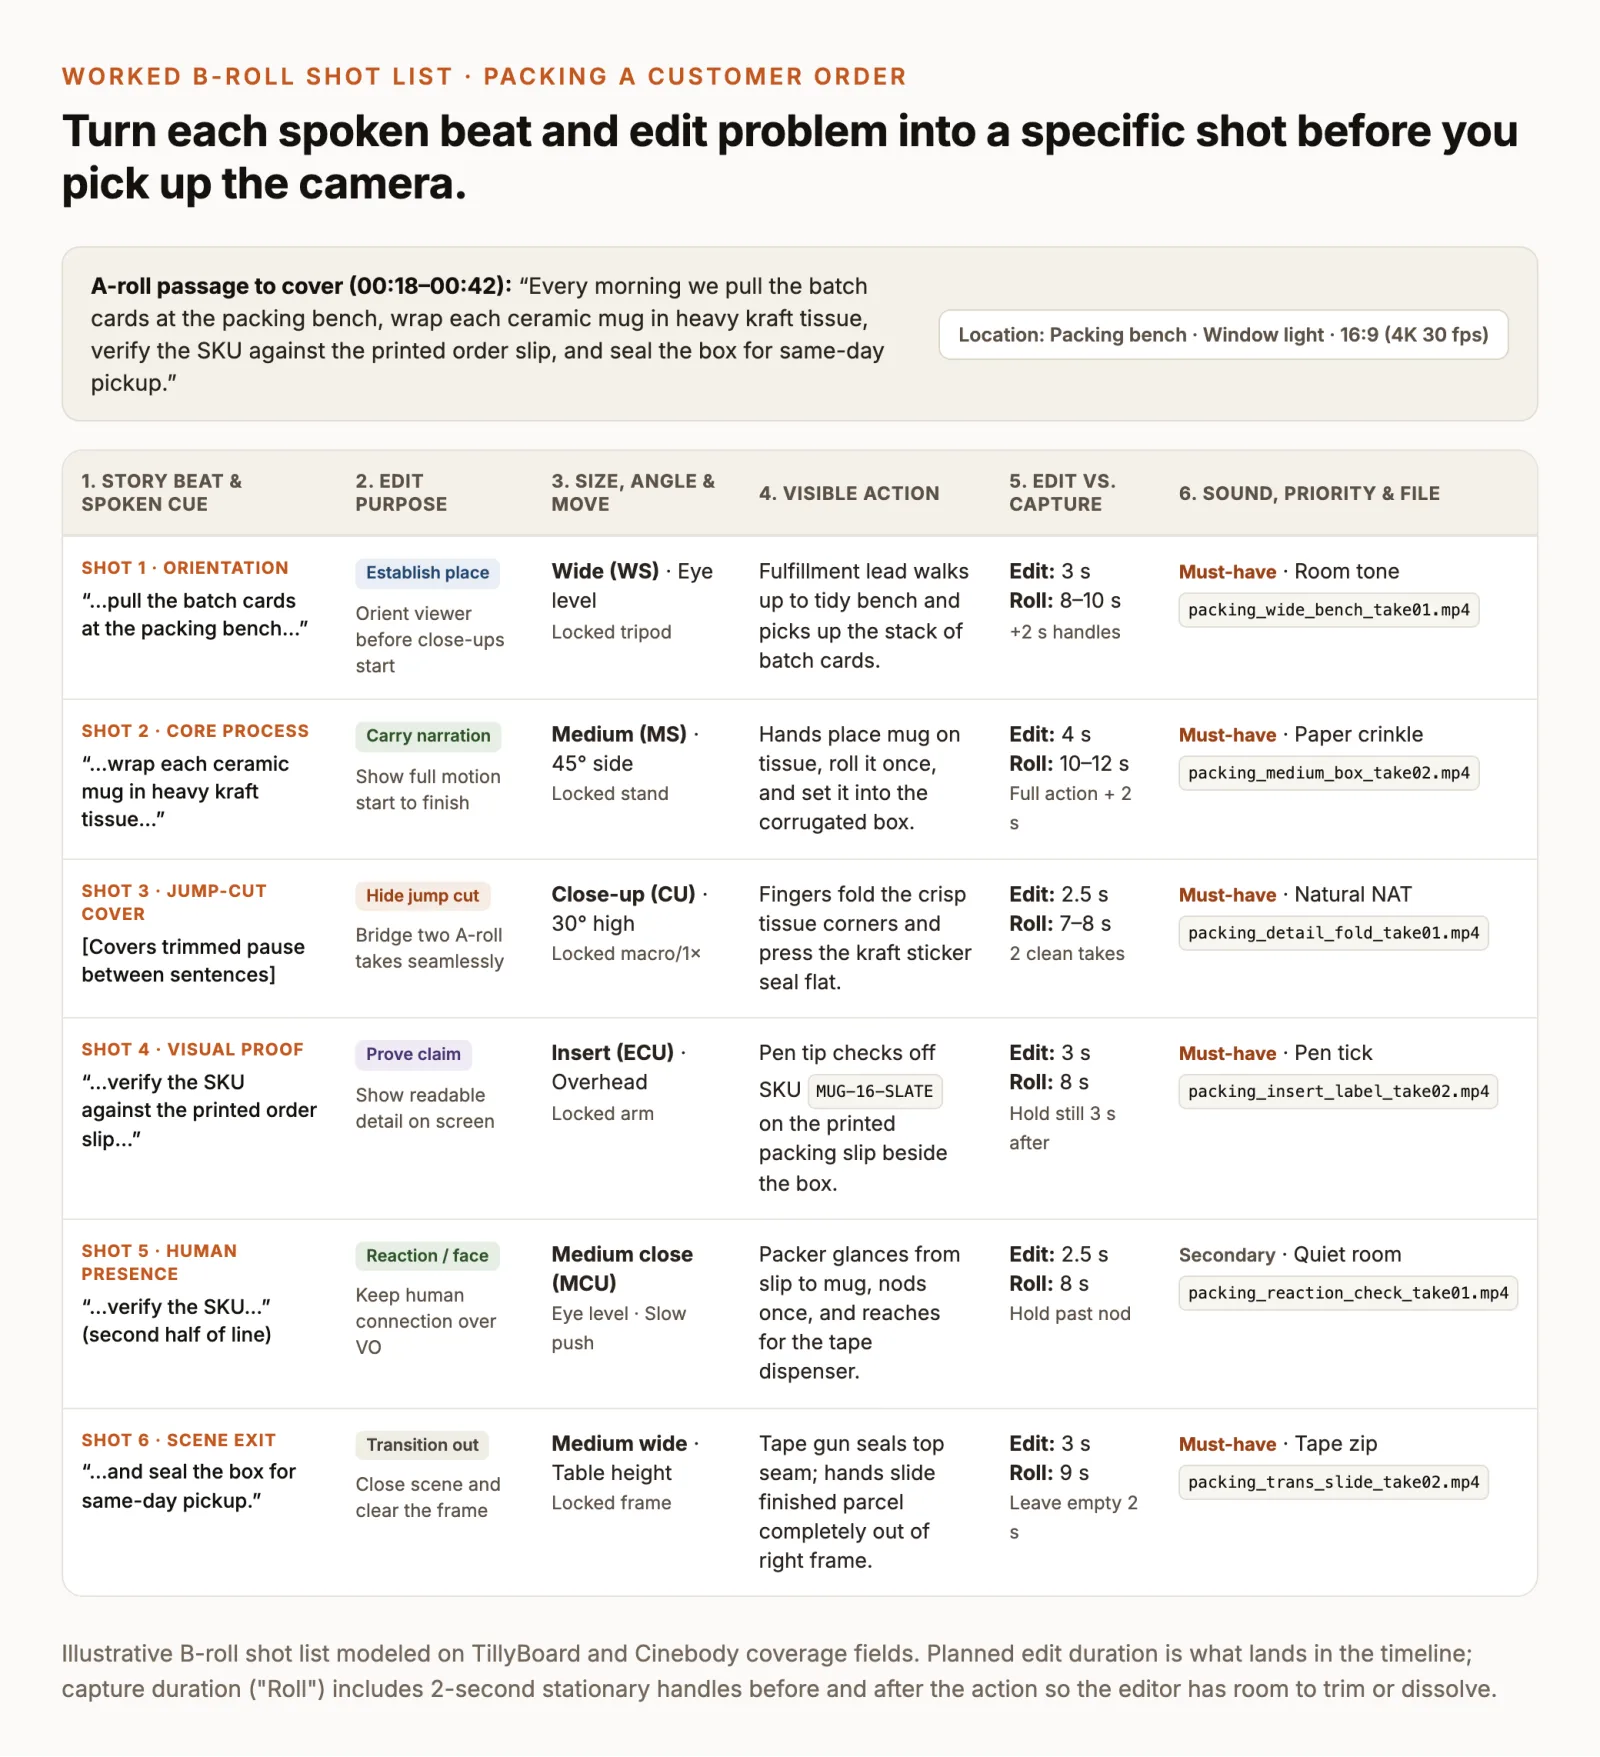
Write the list in the order you will shoot it at the location rather than the order of the script, grouping shots that share the same camera position and lighting setup so you do not move your stand six times for six clips.
2. Capture six views of one scene
When you arrive at the workspace, resist the habit of filming five variations of the same eye-level medium shot. Two clips filmed from nearly the same distance and angle cannot cut directly into each other without looking like a mistake.
To make one physical activity cuttable in any order, combine Cinebody’s five-shot coverage framework (establishing, detail, action, reaction, and transition) with CIESC Media Services’ multi-scale sequence rule (wide, medium, close-up, super close-up) and add a dedicated proof insert. That gives you six distinct views of the same order-packing scene:
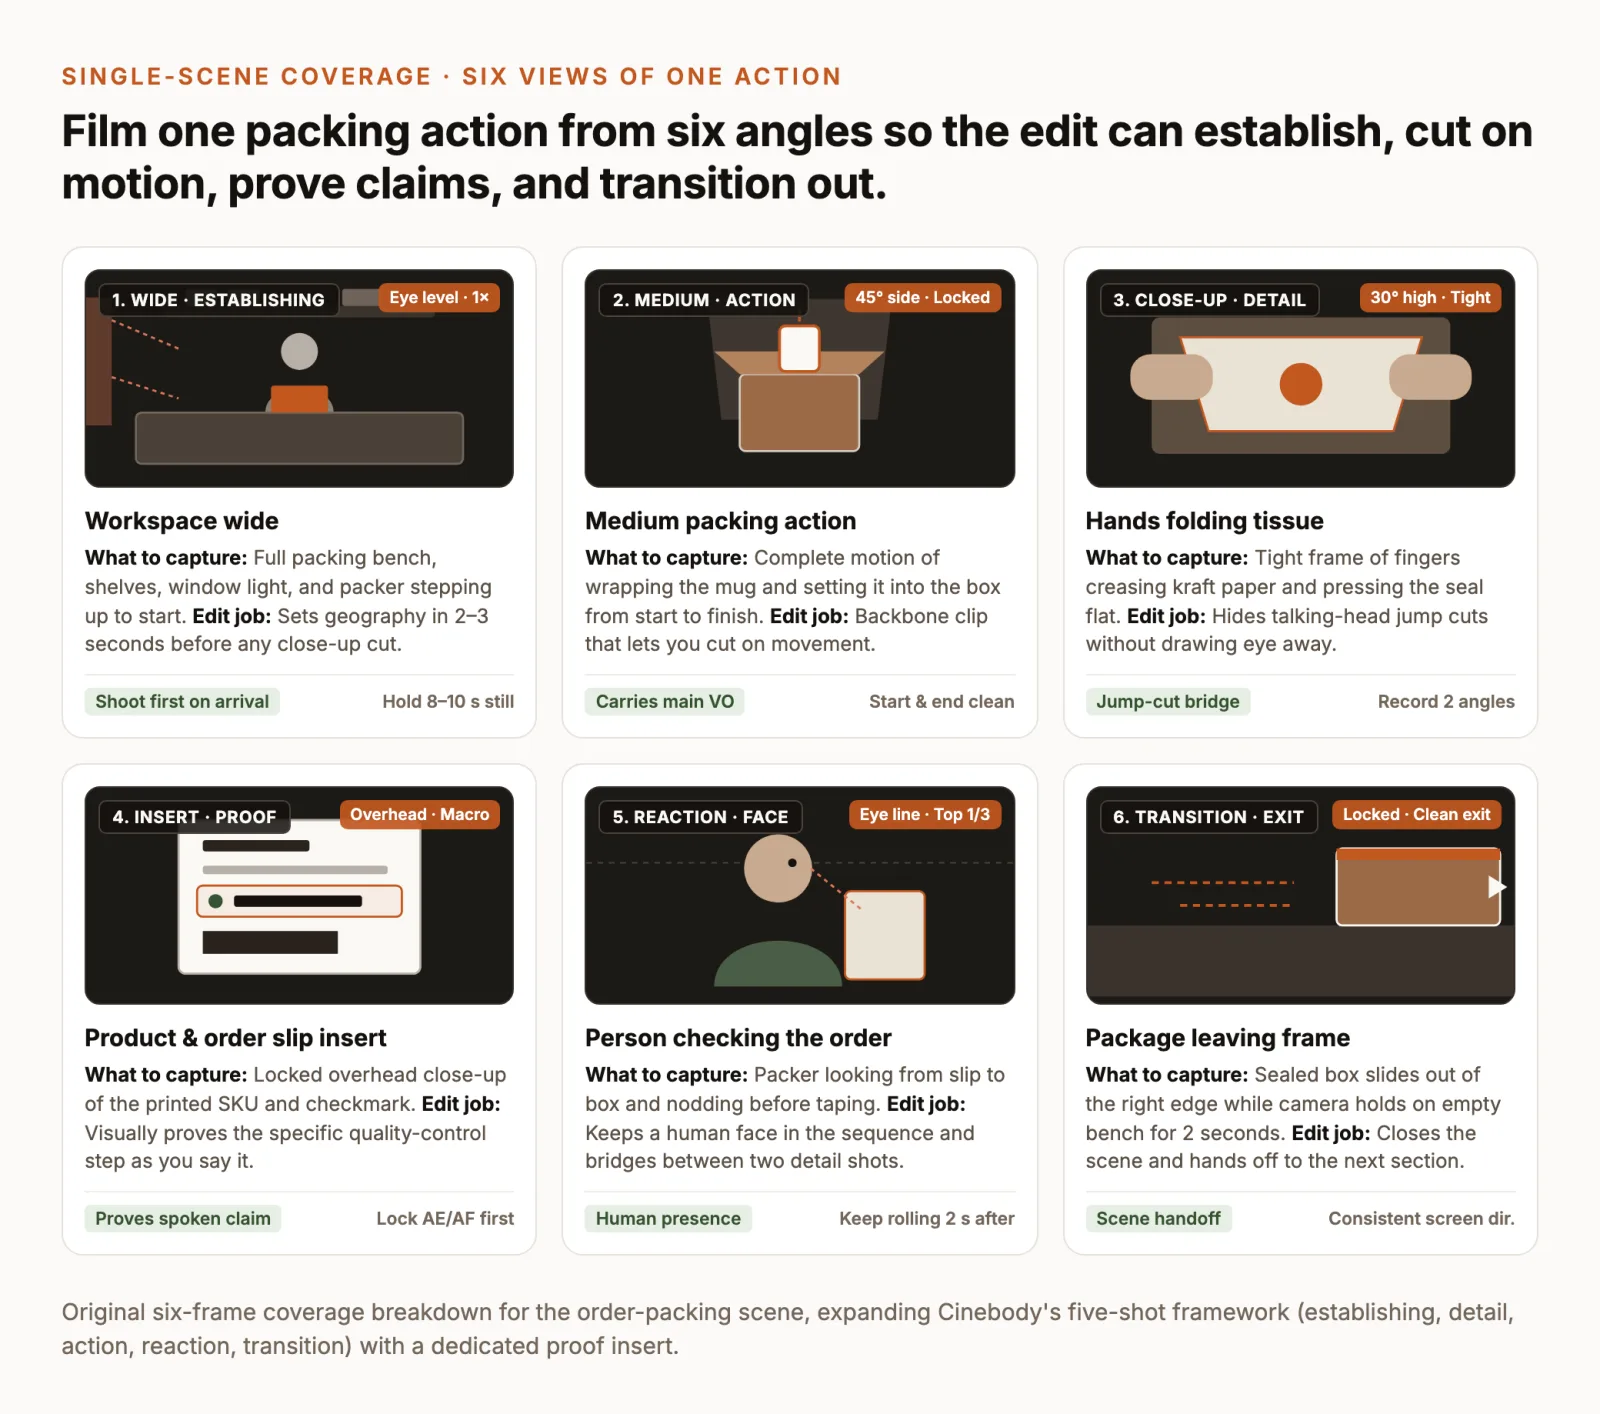
- Workspace wide (establishing view): Step back until the whole packing bench, background shelves, and side window light fit in the frame. Hold the camera still for 8 to 10 seconds as the person steps up to the table (Cinebody). Shoot this first when you arrive, before wrapping paper scraps and tools clutter the surface. In the edit, 2 to 3 seconds of this shot tells the viewer where the work happens before you jump in close.
- Medium packing action (complete motion): Move in to a waist-up, 45-degree angle on the bench. Keep the camera locked on a stand and record the entire action of wrapping the ceramic mug in tissue and setting it into the corrugated box from start to finish. Editors rely on complete actions (entering the frame, completing the task, and settling) so they can cut on movement at any point.
- Hands folding tissue (tight detail): Move in close at a 30-degree downward angle so the hands, kraft paper, and sticker seal fill the frame. Hold for 7 to 8 seconds, then shift 45 degrees and record a second angle. Tight hand details are your most reliable jump-cut bridges: because the speaker’s face is off screen, you can trim a pause or stitch two separate A-roll takes underneath without the viewer noticing a visual seam.
- Product and order slip (proof insert): Mount the phone or camera overhead (or use a macro lens setup) aimed straight down at the printed packing slip beside the box. Lock focus and exposure before a pen tip checks off
MUG-16-SLATE, then hold still for 3 full seconds after the hand leaves. While a detail shot adds texture, a proof insert verifies a specific factual claim in the narration. - Person checking the order (human reaction): Frame a medium close-up of the person’s face and shoulders with their eyes near the top third of the frame as they glance from the order slip to the box and nod. Keep rolling for two seconds after the nod finishes (Cinebody). Reaction views keep a human presence on screen during longer voiceover passages where showing only cardboard and hands would feel mechanical.
- Package leaving frame (scene transition): Lock the camera at table height, seal the top seam with the tape dispenser, and slide the finished parcel completely out of the right edge of the frame. Hold on the empty bench for two seconds after the box clears. Letting the subject exit a static frame, or filming a slow reveal from behind a foreground shelf, gives the editor a natural punctuation mark to transition into the next topic.
Because each of the six views changes both focal scale and camera angle by at least 30 to 45 degrees, you can cut from any shot in this set to any other without a jarring jump.
3. Set the camera for shooting B-roll
You do not need a cinema rig for shooting B-roll that cuts cleanly alongside your A-roll, but leaving a phone or mirrorless camera on full auto introduces three problems in post: mixed frame rates that stutter on the timeline, focus and brightness that pump whenever a hand crosses the frame, and color temperature that shifts from warm to cool between wide and close-up angles.
Before changing menu numbers, choose your orientation first. Shoot in 16:9 horizontal for long-form YouTube and website videos, or 9:16 vertical for Shorts, Reels, and TikTok. If one shoot has to supply both formats, record in 4K (3840 × 2160) horizontal and keep the core action inside the center third of the frame so a vertical crop retains crisp detail, or film your must-have detail and proof shots a second time upright (Cinebody).
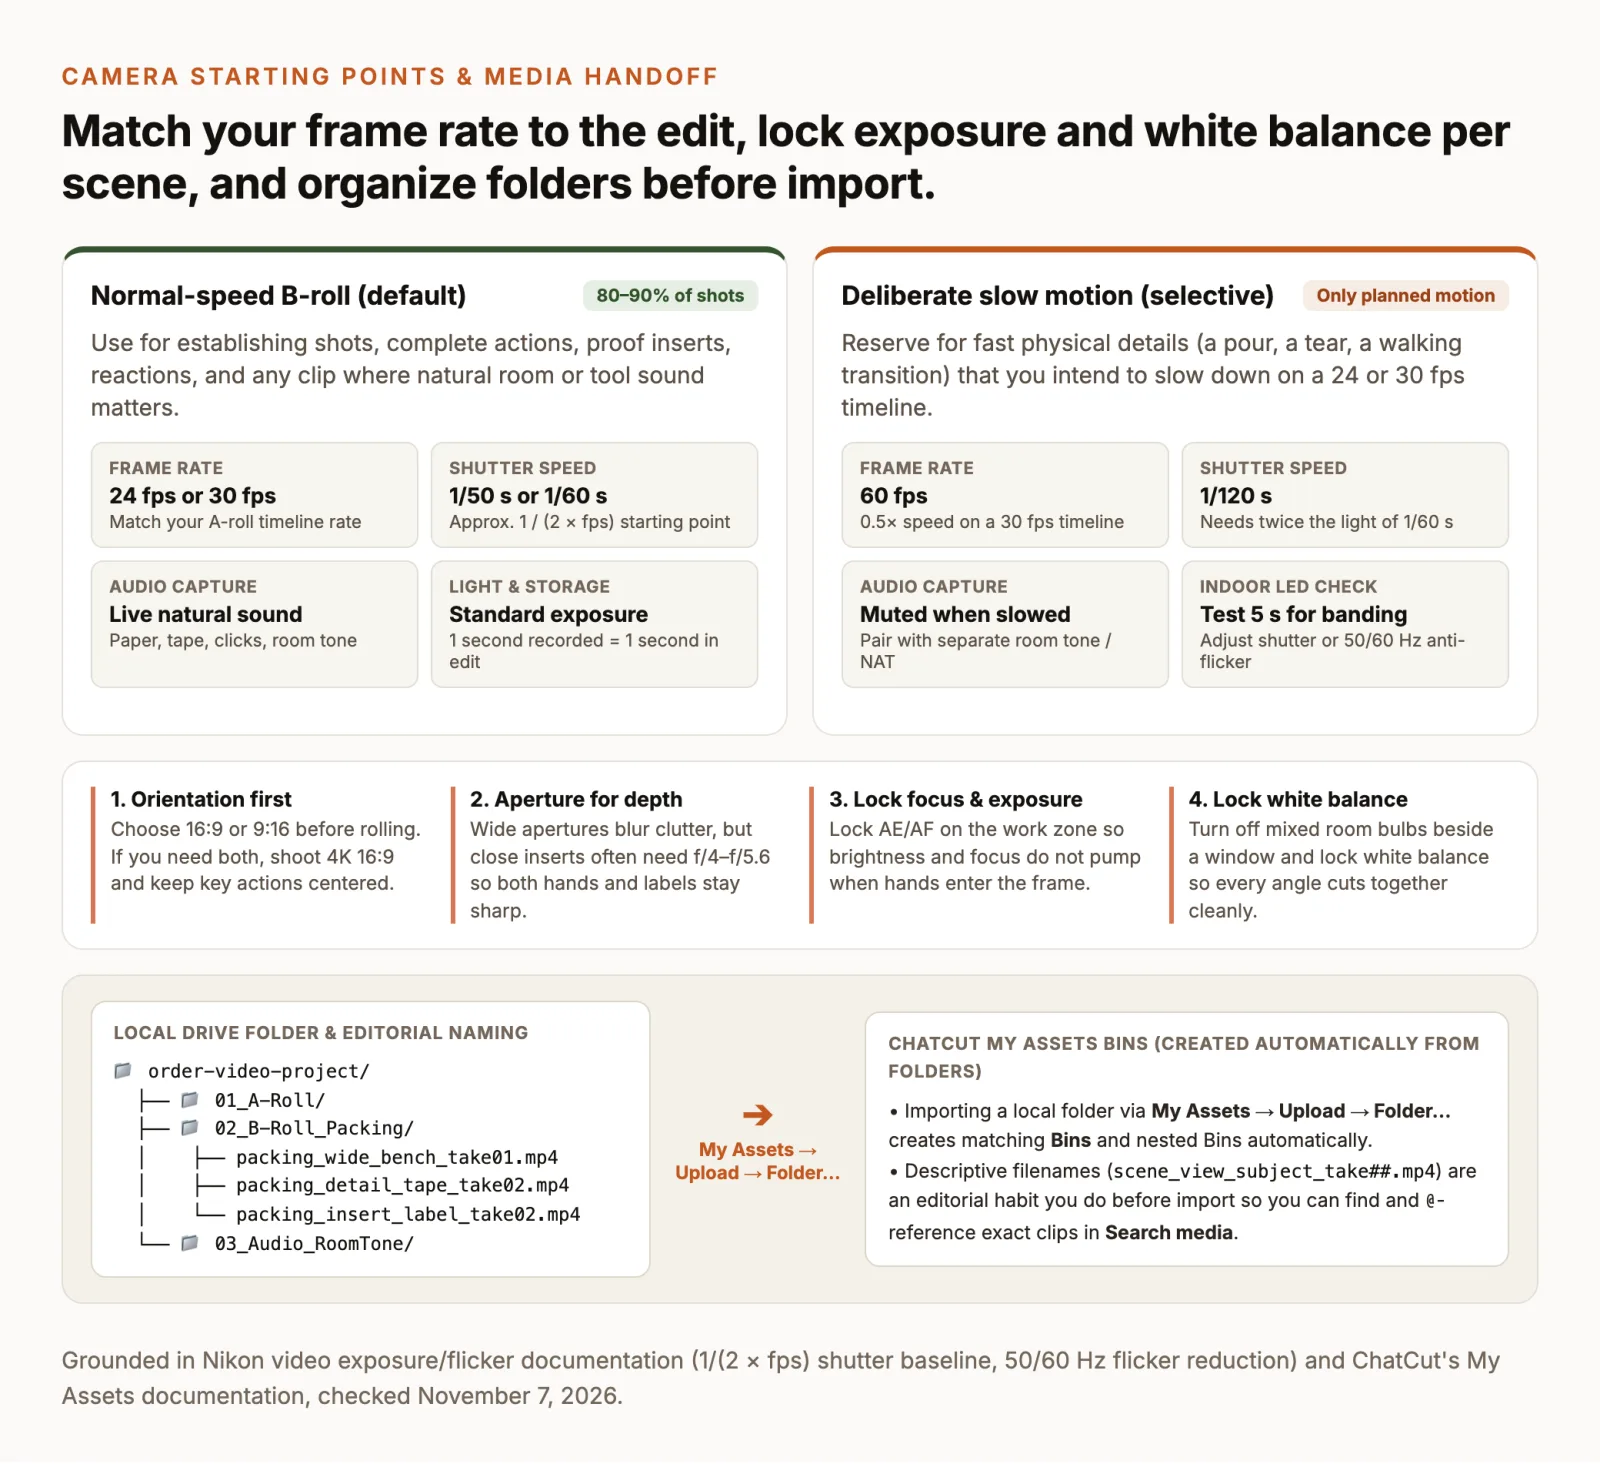
Normal speed versus deliberate slow motion
A common beginner mistake is filming every B-roll clip at 60 fps or 120 fps on the assumption that slow motion automatically looks more cinematic (StudioBinder). In a practical edit, slowing down routine tasks like checking a packing slip or folding a box flap makes an instructional video drag, mutes usable location audio, and requires twice as much light.
Match your default B-roll frame rate to your A-roll timeline (Nikon HDSLR video guide):
- 24 fps or 30 fps for normal-speed coverage (80–90% of your list): If your talking-head video is recorded at
24 fpsor30 fps, record your establishing shots, complete actions, proof inserts, and transitions at the exact same rate. One second of capture equals one second on the timeline, motion blur matches your A-roll, and the natural sounds of paper, tools, and footsteps stay synchronized. - 60 fps for deliberate slow motion (selective clips only): Switch to
60 fpsonly when slowing a fast physical motion (such as coffee pouring, dust rising, or a walking transition) helps the viewer see a detail that passes too quickly at real speed. When you place a60 fpsclip onto a30 fpstimeline and conform or play it back frame-for-frame, frame-rate arithmetic gives you smooth half-speed (0.5×) motion (Nikon HDSLR video guide). Note that slowing a60 fpsclip in your editor is a manual speed or frame-rate adjustment rather than an automatic preset, and some mirrorless slow-motion modes do not record an audio track at all (Nikon Z 30 settings guide).
If you shoot on an iPhone, check two frame-rate and stabilization details documented in Apple’s camera guides before you start:
- Turn off Auto FPS when light is uneven: Under Settings → Camera → Record Video, iPhone’s Auto FPS (or Auto Low Light FPS) automatically drops the frame rate to
24 fpsin dim scenes (Apple Support). Turn it off so your30 fpsor60 fpsB-roll stays at a fixed frame rate across the room. - Know Action mode’s resolution cap and light needs: On supported iPhones, Action mode stabilizes handheld walking shots, but it caps capture resolution at
2.8Kand works best in bright light unless Action Mode Lower Light is enabled (Apple Support). Menu paths on Android phones vary by manufacturer; check your camera app’s video settings for equivalent frame-rate locks and stabilization modes.
Exposure, focus and consistent color
Once your frame rate is set, lock down the four controls that keep all six views of a scene looking like they belong to the same video:
- Shutter speed starting point (
1 / (2 × fps)): For natural motion blur, set your shutter speed to approximately double your frame rate:1/50 swhen shooting at24 fps,1/60 sat30 fps, and1/120 sat60 fps(Nikon video primer, Nikon HDSLR video guide). Faster shutter speeds freeze fast action but make normal hand movements look staccato; slower shutter speeds smear motion. - Aperture and ISO for the shot’s job: A wide aperture such as
f/1.8orf/2.8softens a busy background behind a presenter or reaction shot, as StudioBinder notes. However, ultra-wide apertures are not universally better for B-roll: on close-up hand details or overhead order-slip inserts, a shallow depth of field can leave the SKU text blurry the moment a finger moves half an inch. Stop down tof/4orf/5.6when both the hands and the surface need to stay sharp, and add light before raising ISO, since pushing ISO higher increases visible video noise (Nikon HDSLR video guide). - Lock focus and exposure on the work zone: In auto mode, a camera refocuses and shifts brightness every time a pale hand or dark box enters the frame. On a mirrorless camera, use single-point autofocus on the active subject or manual focus for fixed overhead inserts (Nikon Z 30 settings guide). On an iPhone, frame your shot, then touch and hold the focus area until AE/AF Lock appears at the top of the screen (Apple Support). When filming tight details within 2 centimeters on supported iPhones, the camera automatically switches to the Ultra Wide lens for macro; if that lens jump changes your framing mid-take, tap the onscreen flower icon to control macro switching or enable Lock Camera under Settings → Camera → Record Video (Apple macro guide, Apple video settings guide).
- Lock white balance and test for indoor flicker: Switch off warm overhead bulbs if you are filming beside a daylight window so your product and skin tones do not pick up two competing color casts. Then lock white balance in your camera or enable Lock White Balance under Settings → Camera → Record Video on iPhone (Apple Support). Finally, record a 5-second test clip under the actual room fixtures and play it back: fluorescent and pulsed LED lights can produce rolling dark bands when their AC refresh rate clashes with your shutter speed. If you see flicker, enable your camera’s Flicker Reduction (
60 Hzin North America,50 Hzin Europe and much of Asia) or adjust your shutter speed (1/60 s,1/125 s, or1/50 s) until the preview is clean (Nikon Z 30 settings guide).
4. Check coverage before leaving the location
The most expensive B-roll mistake is packing up the bench, opening your editor the next morning, and realizing your best detail shot is two seconds long or out of focus. Run a quick coverage and sound check before you strike the setup.
Stable takes and purposeful movement
How long should you roll on each B-roll shot? Production guides give different rules of thumb because they target different shoots: Cinebody recommends holding still for at least five seconds with a few seconds of margin before and after the action, while CIESC Media Services advises a 20-second minimum per clip when covering live events or unscripted work.
Separate usable edit duration from recorded capture duration:
- For planned, repeatable actions (such as packing an order): A cutaway in the timeline rarely stays on screen for more than 2 to 4 seconds, unless it is an uncut proof demonstration. To get 3 clean seconds in the edit, record for 8 to 12 seconds: press Record, hold the camera completely still for 2 seconds (your head handle), let the complete physical action happen, and hold still for 2 more seconds after it finishes (your tail handle). Those stationary handles give you clean frames to trim on movement or apply a cross dissolve.
- For unscripted environments or candid subjects: Roll for 15 to 20 seconds (CIESC) so the camera settles after your finger leaves the record button and you capture at least one unhurried, shake-free segment inside the longer take.
Keep camera movement purposeful. A locked-off tripod or phone stand is not boring when the hands and objects inside the frame are moving (Cinebody). If you pan, push in, or slide past a foreground object for a transition, rehearse the start and end frames once, move more slowly than feels natural, and hold still for two seconds at both ends. Never wave the camera back and forth searching for a subject mid-recording.
Finally, shoot at least two clean takes of every must-have shot on your list (Cinebody). The first take is often a rehearsal where a hand hesitates or a box flap catches; the second take is usually the one that makes the cut.
Continuity and location sound
Before leaving the workspace, review your checklist and play back the last take of each setup with headphones or sound on:
- Screen direction and hand placement: If the packer’s right hand applies the sticker in the medium shot (
Shot 2), use the same hand in the tight close-up (Shot 3) so you can cut between them mid-motion. In your transition shot (Shot 6), note which side of the frame the package exits so the next scene does not accidentally reverse the direction. - Focus and reflections: Zoom in on the playback screen for your overhead insert (
Shot 4) to confirm the printed SKU is sharp and no overhead lamp or phone silhouette is reflecting off glossy tape or glass. - Natural sound (NAT) and room tone: B-roll recorded with clean location sound feels grounded in the edit; silent B-roll either sounds hollow under pauses in speech or forces you to hunt for replacement sound effects later (TillyBoard). Keep the microphone on while filming paper crinkles, pen checks, and tape pulls, and avoid talking over the action while the camera rolls. Before you leave the room, ask everyone to stay still and record 15 to 30 seconds of uninterrupted room tone so you can smooth audio gaps in post.
5. Organize footage before you edit
Offload your camera card or phone clips to your computer as soon as the shoot wraps, and copy the originals to a second drive or cloud backup before you delete anything from the device. Timeline edits never alter your source files, but an overwritten SD card cannot be recovered.
Camera filenames such as IMG_4812.MOV or C0043.MP4 slow down editing because you have to scrub through every thumbnail to find the second take of the overhead SKU insert. Before importing into your editor, organize your project folder on disk in two quick passes:
- Sort into role and scene subfolders: Create one project folder containing
01_A-Roll,02_B-Roll_Packing(plus a subfolder for any other scene), and03_Audio_RoomTone. Drop unusable false starts into a_Rejectsfolder rather than importing them into your project. - Rename keepers with
scene_view_subject_take##: Give your usable B-roll clips descriptive names that match your shot list, such aspacking_wide_bench_take01.mp4,packing_detail_tape_take02.mp4, andpacking_insert_label_take02.mp4(shown at the bottom of Figure 3). This naming convention is an editorial habit you perform on your files before import, not an automatic rename performed by your editing software.
Whether you edit in Final Cut Pro, Premiere Pro, DaVinci Resolve, or ChatCut, starting with named files inside scene folders means you can search by keyword (detail, insert, take02) and pull the exact cutaway you planned in seconds.
6. Use your B-roll in ChatCut
Once your A-roll and B-roll are organized, you can assemble the cut in any non-linear editor by placing the talking-head recording on the primary track (V1) and laying your B-roll cutaways on the track above it (V2) so the spoken audio continues uninterrupted underneath (check Adobe’s official B-roll page for its general overview).
If you use ChatCut, you can run this workflow in ChatCut Desktop (supported on macOS 13+ for Apple silicon or Intel and Windows 10+ x64; Linux and ChromeOS have no desktop app), in the ChatCut web app, or through the ChatCut plugin / MCP inside supported coding agents including Claude Code and Codex (it cannot be installed inside the ChatGPT or Claude websites; see the Desktop App guide and Product Facts).
Import and group into Bins
Open your project and find My Assets beside the Viewer (if the panel is hidden, open Workspace → My Assets in the editor header).
From the My Assets → Upload menu, choose the import path that matches where your footage lives (My Assets documentation):
- Upload → Folder…: Select your local
order-video-projectfolder. ChatCut automatically creates matching Bins and nested Bins from your folder structure and places each clip inside the corresponding Bin. - Upload → Files…: Select individual video or audio files to add them directly to the current Bin. You can also click New Bin in the toolbar to create a folder inside My Assets and drag asset cards into it.
- Upload → From phone…: If your B-roll is still on your phone, scan the QR code or open the upload link on your phone, select the clips, and keep the page open until the transfer completes.
Note the distinction between project media and chat attachments: files uploaded through My Assets → Upload stay in your project’s media pool so you can organize them in Bins and reuse them across timelines, whereas clicking + beside the prompt composer attaches a file only as context for that single message (My Assets documentation). Wait for each asset card to finish uploading and transcribing before starting your edit.
Match visuals to speech
Always edit your spoken A-roll before placing B-roll. Every retake or pause you cut from the dialogue shifts the timing of everything after it, so cutaways placed too early will slide off the words they were meant to illustrate.
Drag your main talking-head clip onto the Timeline and open Workspace → Transcript (Talking Head Edit guide). You can select unwanted false starts, repeated sentences, or long pauses in the transcript and press Delete to cut that time range from the timeline, or start with the Speech Cleanup Skill to clean up the talking-head pass first.
Once the speech plays cleanly from start to finish, add your B-roll over the passage in one of two ways:
- By hand on the timeline: Open your
02_B-Roll_PackingBin in My Assets, drag the matching cutaway (packing_wide_bench_take01.mp4,packing_detail_fold_take01.mp4,packing_insert_label_take02.mp4) onto the video track above your A-roll (V2), and trim the 2-second head and tail handles so the clip starts on the exact word it illustrates and spans any visible jump cut inV1. - By prompt with the Agent: Turn on Selection Mode (or type
@in the composer) to select your imported packing clips and the target passage on the timeline, then paste a specific placement request. Select your actual assets first; the prompt below is a starting template to adapt to your clips:
Asking the Agent to list missing coverage at the end of the prompt turns your edit pass into feedback for your next shoot: if a jump cut has no matching cutaway in your Bin, you get a timestamped note instead of an unwanted stock or generated clip. For more ways to structure timeline requests, see our collection of 26 video editing prompts.
What costs nothing versus what uses credits: The Free plan includes the core editor, so uploading footage, organizing Bins, transcribing speech, manual timeline editing, and standard caption editing never use ChatCut credits. If you run your edit through Claude Code or Codex via the ChatCut plugin / MCP, the agent’s editing work (cutting pauses, reordering clips, and placing your B-roll) is covered by your existing Claude or ChatGPT subscription and uses no ChatCut credits. ChatCut credits are consumed when you send messages to the built-in ChatCut Agent (variable) or when a workflow calls a ChatCut-hosted AI generation service (such as generating AI video, images, music, sound effects, or voiceover).
Review and export locally
Play the assembled sequence from start to finish with sound on before you export (Talking Head Edit guide):
- Visual timing: Does each B-roll shot appear on the word it illustrates, rather than half a sentence late?
- Jump-cut coverage: Are all distracting jumps in the speaker’s head position hidden underneath a cutaway or a clean framing change?
- Audio continuity: Is the spoken dialogue continuous across every cut, and is the natural packing sound on
V2balanced low enough that it supports the voice instead of competing with it? - Color match: Do the wide, medium, and overhead insert clips match the brightness and warmth of the A-roll?
When the cut is ready, select Export → Video, choose MP4 (H.264), and keep the frame rate (24 fps or 30 fps) you recorded at, which matches YouTube’s recommended upload encoding settings. Exporting MP4/WebM video, MP3 audio, subtitles, and XML never uses credits. On the Free plan, web and cloud exports go up to 1080p and share a cumulative 60-minute account quota; ChatCut Desktop renders video locally on your computer at resolutions up to 4K. Keep Desktop open until the render completes, then open the saved file in your system player to verify picture and sound. If you supplemented your filmed footage with realistic AI-generated B-roll, remember to disclose altered or synthetic content during upload per YouTube’s GenAI disclosure rules (and check the YouTube Audio Library rules if you add background music).