If you are asking “how do I make a tutorial video?” for a software product, build it around one reproducible task rather than a tour of every menu. To learn how to make a tutorial video viewers can follow on the first try, work through five stages: scope one operation and its finish line, script actions beside narration and expected screen results, record in a prepared demo account, edit out mistakes while keeping required loading waits and readable controls, and export an MP4 with verified captions. You need a test account with sample data, a screen recorder or editor, and a microphone if you narrate.
How to make a tutorial video
- Plan one software task and its finish line. Fix the starting screen, required account permissions, synthetic sample data, and the final confirmation state the viewer must see.
- Script what viewers see and hear. Pair every spoken line with the exact interface control and the screen change that proves the action worked.
- Prepare and record a clean demonstration. Sign in to a clean demo workspace, grant capture permissions, and let an agent record the workflow on a Mac or capture the screen yourself.
- Edit the tutorial so viewers can follow. Cut misclicks and dead air, preserve the brief system waits where counters or statuses update, zoom in on dense controls, and proofread captions against on-screen labels.
- Export, publish and test the result. Render an H.264 MP4 and a subtitle file, then check resolution, audio sync, privacy, and task completion in the destination player.
This guide follows one hypothetical software walkthrough from plan to export: exporting a filtered billing report (paid-last-30-days.csv) from a web dashboard. It covers how to make a software tutorial video for product onboarding, customer help docs, or public YouTube walkthroughs, and shows when a screen walkthrough beats a static screenshot article. It does not cover general video-editing courses (which often surface under broad edit video tutorial or video creation tutorial searches) or invented UI animations.
If you are building internal workforce lessons that require manager sign-off, policy compliance checks, learner review passes, or LMS tracking, read our companion guide on how to make a training video. Those stages look similar on paper, but a software tutorial succeeds or fails on three technical details: whether the viewer starts with the same permissions and data, whether every click produces a visible state change on screen, and whether small interface controls remain legible when played back in a browser or on a phone.
Before you start creating a tutorial video, decide which recording and editing setup fits your operating system and budget. You can record and edit inside ChatCut (available in the browser and in ChatCut Desktop for macOS 13+ on Apple silicon or Intel and Windows 10+ x64), capture raw footage with the recorder built into macOS or Windows, or use a dedicated capture tool from our comparison of screen recording software.
1. Plan one software task and its finish line
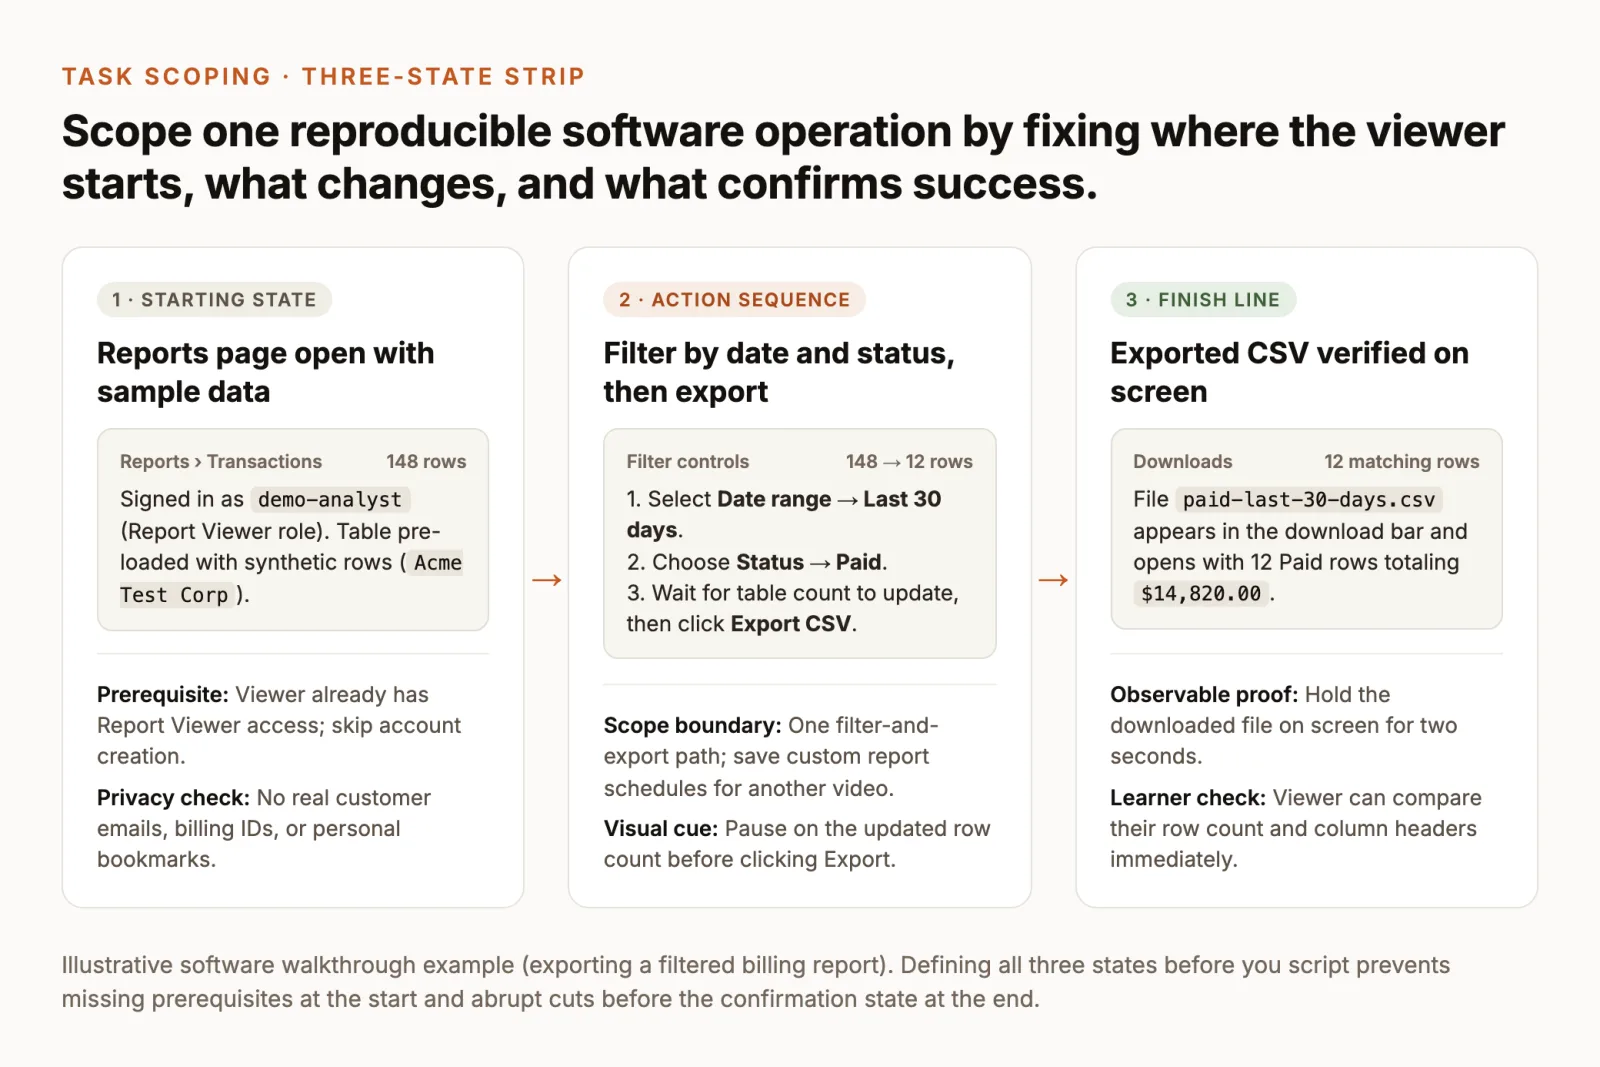
Most abandoned software tutorials fail before recording starts because they try to explain an entire workspace instead of completing one job. “How the Reports dashboard works” forces you to tour every tab and leaves the viewer unsure which buttons matter. “Export a CSV of paid transactions from the last 30 days” gives the viewer a concrete reason to watch and an unmistakable stopping point.
Define the starting state, permissions and sample data
A viewer following your tutorial on a second monitor will stop immediately if their screen does not match yours at 0:00. Lock down three prerequisites before you write a word of script:
- Starting location. Open the recording on the exact screen where the decision begins. In the report example, start inside Reports › Transactions, not on the marketing homepage or login screen, unless signing in is the task you are teaching.
- Account role and permissions. Admin accounts often display toolbar buttons, billing menus, and debug toggles that standard users never see. Check which role your target viewer holds (such as
Report ViewerorMember) and log in with a test account assigned to that exact role. If a button requires elevated access, state that requirement in the first sentence so viewers without permission know why their button is disabled. - Synthetic sample data. An empty test account that returns
0 rowswhen filtered cannot prove that a filter works. A production database exposes real customer names, email addresses, invoice numbers, and internal URLs. Populate a staging or demo workspace with realistic fake records (such asAcme Test Corp,148 rowstotal, and12 rowsmarkedPaid) so every filter and export action produces a believable, repeatable change.
Set an observable finish line on screen
Decide what frame proves the operation succeeded and plan to hold that frame for two to three seconds at the end of the video. Clicking Export CSV is an action, not a finish line. The finish line is the downloaded file (paid-last-30-days.csv) appearing in the browser download bar and opening to show the 12 filtered rows and matching $14,820.00 total.
When you know the exact starting screen and the exact confirmation screen, every step in between is either required to get from State 1 to State 3 or safe to leave out. Custom report schedules, webhook exports, and PDF formatting belong in separate tutorials.
2. Script what viewers see and hear
When you learn how to create tutorial video walkthroughs for software, avoid writing a continuous essay and trying to click along while reading it. Spoken paragraphs drift ahead of the cursor, use vague pointers like “click over here,” and skip the moment where the interface confirms a change.
Action, narration, expected result
Write your script in three columns: 1. On-screen action, 2. Spoken narration, and 3. Expected screen result. Every row represents one step. If a row has narration in Column 2 but no observable action or result in Columns 1 and 3, either cut the line or shorten it into a five-word bridge.
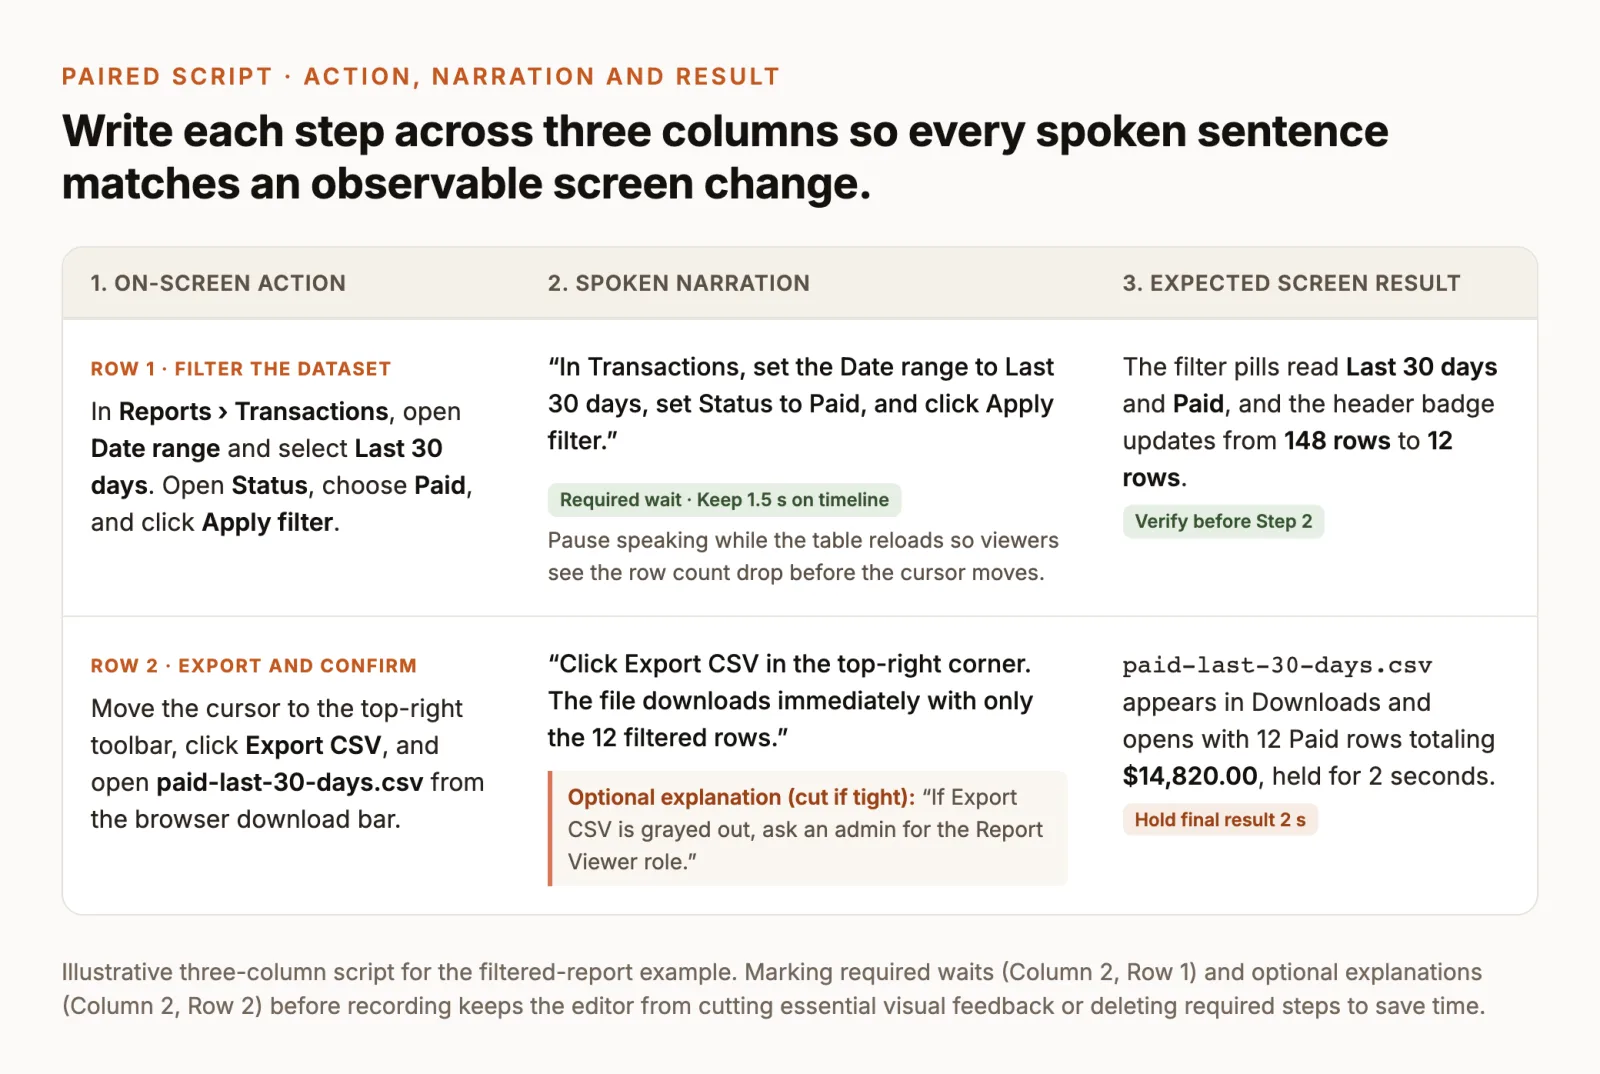
Follow four scripting rules in the three-column table:
- Name controls exactly as the UI spells them. Write “In Reports › Transactions, open Date range and select Last 30 days,” not “go to the top left and pick the monthly filter.” Viewers scan the interface for the literal text you say aloud.
- Put location before action. Tell the viewer where to look before telling them what to click: “In the top-right toolbar, click Export CSV.” That order lets the viewer’s eyes reach the button at the same time as your cursor.
- Mark required waits explicitly. When clicking Apply filter triggers a table refresh that changes
148 rowsto12 rows, mark a 1.5-second pause in the script (Required wait · Keep 1.5 s). Without that note, an editor or an automated silence trimmer can cut straight from the click to the next menu and hide the visual confirmation that the filter worked. - Bracket optional explanations. Note secondary context, such as “If Export CSV is grayed out, ask an admin for the
Report Viewerrole,” as optional. If the rough cut feels slow, you can drop optional notes without breaking the step sequence.
If you plan to publish a silent walkthrough that relies on step callouts instead of spoken narration, keep Column 2 as your on-screen callout copy. As the W3C Web Accessibility Initiative notes in its captions and subtitles guidance, captions represent spoken dialogue and meaningful non-speech audio; silent instructional videos need clear text instructions in the video or surrounding page rather than fabricated audio captions.
Rehearse before capture
Before you open a recorder, run through the three-column script twice in your prepared demo account while reading the narration aloud:
- Verify every state transition. Check whether clicking Apply filter updates the table immediately or opens a confirmation banner, and whether clicking Export CSV downloads the file straight to the browser bar or opens a native macOS or Windows file-save dialog. A native save dialog is a separate operating-system window, which affects whether you record a single window or the full display.
- Reset sticky UI states. Many web apps remember the last filter you applied, the last folder you exported to, or a dismissed onboarding banner. After your rehearsal run, clear the filter back to
All dates(148 rows) and delete the rehearsal CSV from your Downloads bar so the real take starts cleanly. - Pace your cursor and voice. Practise moving the pointer directly from one control to the next, pausing on each button for half a second before clicking, and staying silent during the moments you plan to cut or speed up later.
3. Prepare and record a clean demonstration
A clean capture saves more time than any post-production fix. Before you start recording, run through this workspace preparation checklist:
- Account and sample data: signed in as the target user role (
demo-analyst), sample rows loaded (148 rows), no real customer emails, API keys, or billing identifiers anywhere in the table or URL bar. - Browser and desktop hygiene: use a dedicated browser profile with the bookmarks bar hidden, password-manager autofill pop-ups turned off, and no unrelated tabs open. Quit chat apps, email clients, and calendar alerts, and turn on Do Not Disturb.
- Interface scale: set browser zoom to
110%or125%so menu labels and table numbers are large enough to read without heavy cropping. - Window vs display capture: if the entire workflow stays inside one browser tab or application window, a single-window capture keeps the frame tidy. If a step opens a separate pop-up window, an extension menu, or a native OS file picker, use a display capture so the dialog is not invisible in the recording.
Agent-recorded on Mac
If you work on a Mac, ChatCut Desktop’s Auto Screen Recorder Skill (screen-demo-editing) can record the software demonstration for you, help you record it yourself, or edit screen footage you already have. As shown in the Skill demo video at the top of this guide, it frames the recorded session on a clean background, cuts out dead time, and places every element on an editable timeline.
Check the platform and permission requirements against ChatCut’s product facts and Auto Screen Recorder documentation before starting:
- Platform boundary: ChatCut Desktop runs on macOS 13 or later (Apple silicon and Intel) and Windows 10 or later (x64); Linux and ChromeOS are not supported. However, Auto Screen Recorder runs in ChatCut Desktop on a Mac, and computer-use control where the Agent operates apps on your screen requires macOS 14 or later (ChatCut Desktop docs).
- App readiness: you sign in and prepare the sample data first. Do not use Auto Screen Recorder to invent a product screen; the Agent records what the application actually displays.
- macOS permissions: when an agent-recorded demo starts, macOS asks you to grant Screen Recording and Accessibility access, and only you can approve them. To review or enable Screen Recording manually, open Apple menu › System Settings › Privacy & Security › Screen & System Audio Recording (called Screen Recording before macOS 15) and turn ChatCut on (Apple Support). For computer control, open Apple menu › System Settings › Privacy & Security › Accessibility and enable ChatCut (Apple Support). If you denied Screen Recording once, macOS will not ask again: enable it in System Settings, reopen ChatCut if prompted, and tell the Agent to continue.
To run Auto Screen Recorder in ChatCut Desktop on a Mac:
- Open Skills in the AI composer (or type
/to search) and select Auto Screen Recorder. Selecting the Skill attaches it to your draft; it does not start recording by itself. - Fill in the Skill’s two-tab form or describe your choices in the prompt:
- General tab: enter What to demonstrate (the steps in your own words), choose the Aspect ratio (
16:9,4:3,9:16, or1:1, with window shape, padding, and corner radius under More settings), pick a Background (a wallpaper, solid color, or blurred copy of the recording), and select AI extras (None,AI voiceover,MG step callouts, or both). - Cursor tab: choose the pointer style (system pointer, or a smooth, halo, or spotlight pointer on current Desktop releases), optional click effect and click sound, and cursor zoom (off by default, or
1.25x,1.5x, or1.8x).
- General tab: enter What to demonstrate (the steps in your own words), choose the Aspect ratio (
- Select Create tutorial (or send your prompt) and keep your desktop still while the Agent brings the target window to the front, rehearses uncertain actions off-camera, and records the workflow. You can click Stop in the chat at any time to cancel desktop actions and release control (ChatCut Desktop docs).
Paste this example prompt into ChatCut Desktop on a Mac after opening your prepared demo app on the starting screen:
What to check after it runs: play the resulting timeline from start to finish. Confirm that no pop-up or download bar escaped the capture frame (a window capture records only that window, so if a native dialog was missed, switch to display capture or re-record that step), verify that the 148 → 12 rows filter update is visible, and check that the final exported CSV stays on screen long enough to read.
Record it yourself or use existing footage
You do not need an agent to operate your mouse to make a clean software tutorial. You can perform the steps yourself on Mac or Windows, either directly inside ChatCut or with a separate screen recorder, and then edit the recording on the timeline. If you record your own voice, position a dedicated USB or XLR microphone a hand’s width from your mouth in a quiet room and record a 15-second test take on headphones before capturing the full walkthrough.
Record directly onto the ChatCut timeline (Web or Desktop on Mac and Windows):
- Move the timeline playhead to where the take should begin.
- Click the chevron on the Record control in the timeline playback toolbar, open Recording settings, and choose Screen (or Camera for a presenter intro, or Voiceover to narrate over an existing screen clip). Pick your microphone and toggle the 3-second countdown if you want a moment to position your cursor (recording docs).
- Click the left side of the Record button, choose the window or display in the system picker, perform the steps from your script, and click Stop recording when finished. ChatCut saves the clip to My Assets and places it on a video track at the playhead.
- On a Mac inside Auto Screen Recorder, you can also tell the Agent that you will record the demo yourself: it displays a record button in the chat and edits your take once you finish (Auto Screen Recorder guide).
Record with built-in OS tools or third-party recorders, then import:
- On a Mac: press Shift-Command-5 to open the Screenshot toolbar, choose Record Entire Screen, Record Selected Portion, or Record Selected Window (available in macOS Tahoe 26 or later), and open Options to pick a microphone, turn on Show Mouse Clicks, or select Include System Audio (macOS 27 Golden Gate or later) (Apple Support). For version differences, audio setup, and file locations, see our guide on how to screen record on Mac.
- On Windows 11 and 10: on Windows 11, press Windows logo key + Shift + R to open the video snip overlay in Snipping Tool, drag a rectangle over the target app, check the microphone and PC audio toggles, and click Start (Microsoft Support). For Windows 10 Xbox Game Bar (
Win + Alt + R), Clipchamp, PowerPoint, and audio troubleshooting, follow how to screen record on Windows. - Dedicated recorders: if you need multi-source scene switching or Linux capture, OBS Studio is free and open source for Windows 10 and 11, macOS 13.0 or newer, and Linux. If you only need a quick browser share link rather than an edited video file, Loom offers a free Starter plan ($0 for up to 25 videos per person, 5-minute screen recordings, up to 720p) and a Business plan at $18 per user per month. Our best screen recording software guide compares nine options by output and cost.
Once you have a recording file, import it into ChatCut via My Assets › Upload › Files…. On the Free plan, recording in ChatCut, uploading footage, manual timeline editing, transcription, and standard caption editing never use ChatCut credits (Credits Policy). If you connect ChatCut to Claude Code or Codex (via the plugin or Desktop’s local MCP server), the agent’s editing work (cutting mistakes, removing pauses, placing captions, and writing motion graphics) is covered by your existing Claude or ChatGPT subscription rather than ChatCut credits; ChatCut credits are used only if you call a ChatCut-hosted generation service such as AI voiceover. When you use the built-in ChatCut Agent inside the app, agent messages and generated voiceover use ChatCut credits.
4. Edit the tutorial so viewers can follow
Editing a software tutorial is an exercise in preserving causality. A promotional video cuts for rhythm; a tutorial cuts so the viewer can see every required input and verify every system response. Whether an AI agent makes the first pass or you cut by hand on the timeline, separate what automation can strip out from what you must inspect yourself.
Cut errors without losing required steps
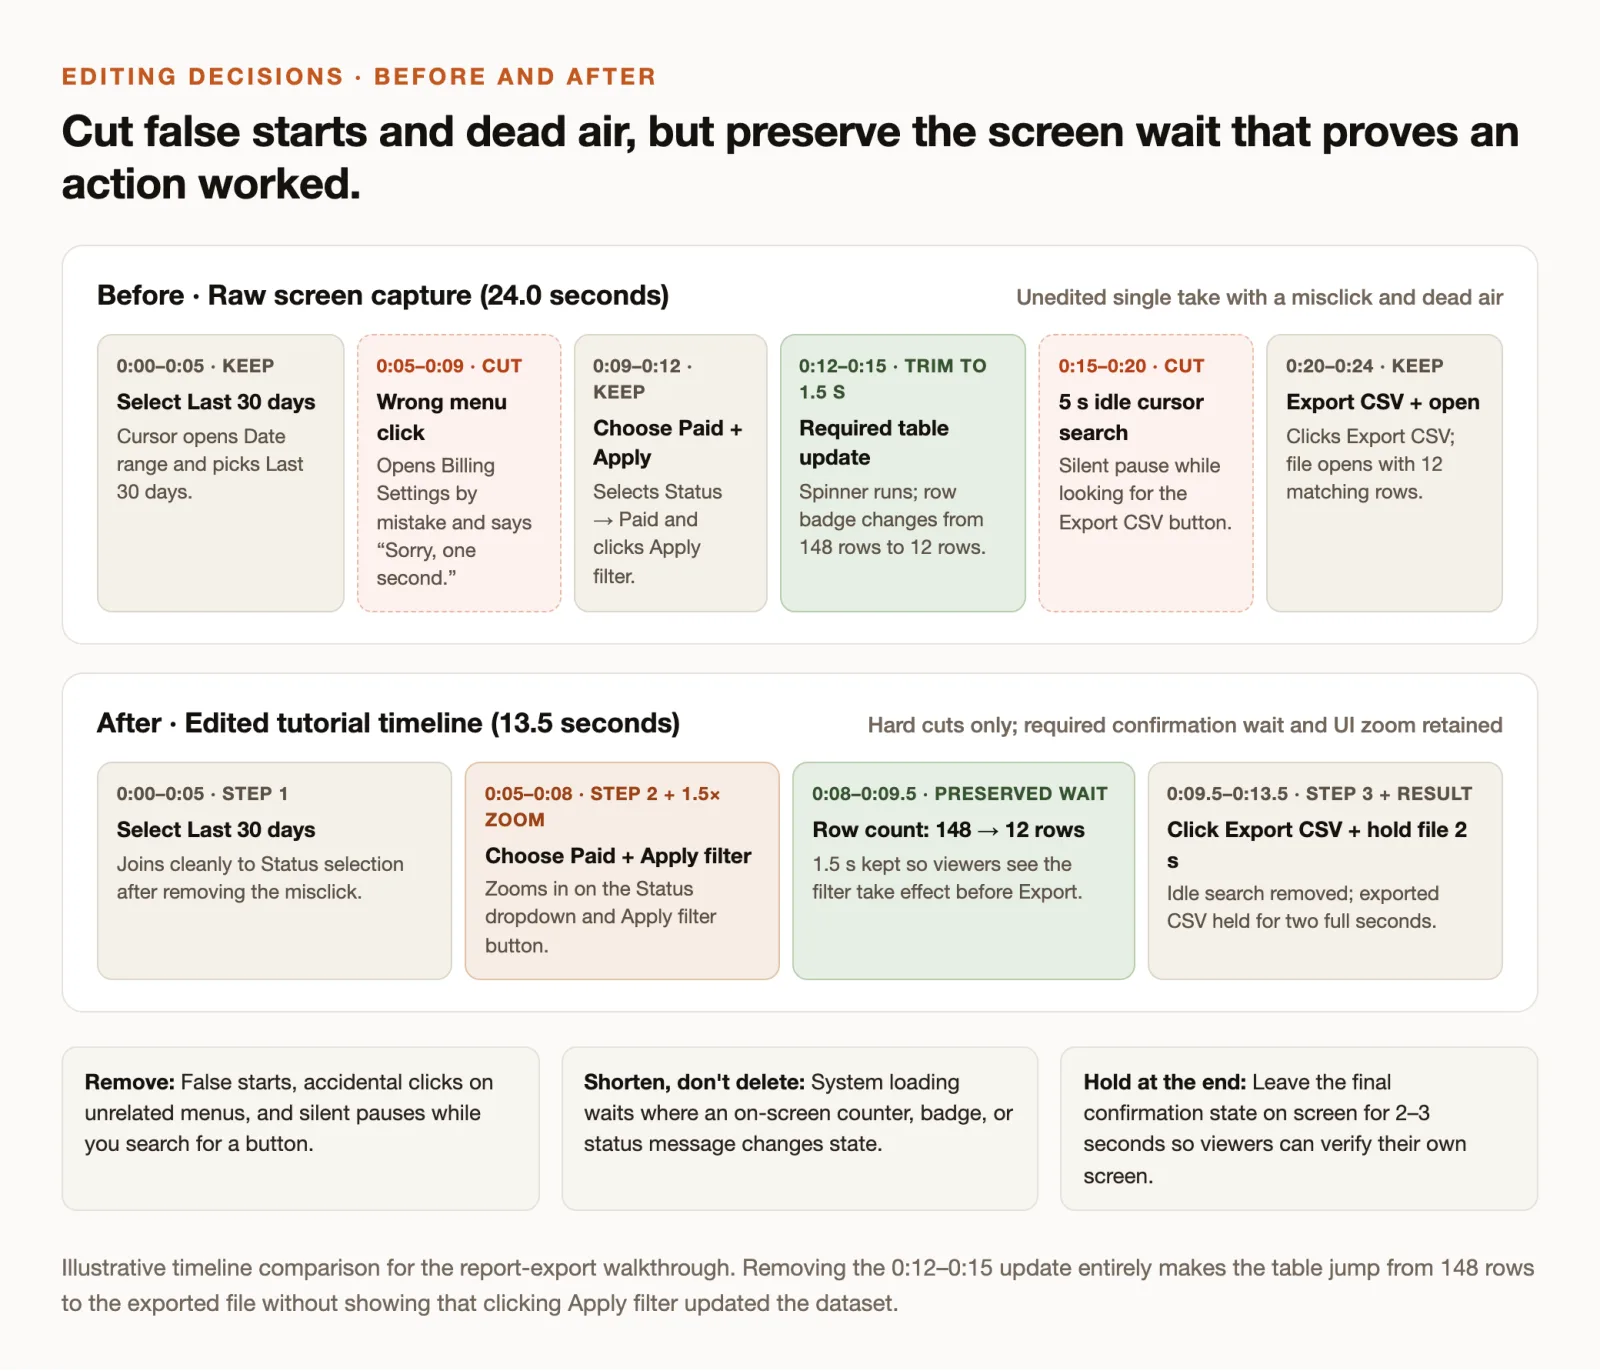
Start by removing three things that confuse learners: false starts where you clicked the wrong menu, repeated spoken takes, and dead air where the pointer sits still while you look for the next control.
Keep three things that aggressive editors often delete by mistake:
- Every intermediate click that opens a menu or state. If you cut the click that opens the Status dropdown and jump straight from Date range to the selected Paid pill, a new user has to pause and hunt for how that pill appeared.
- Shortened confirmation waits. When an action triggers a loading spinner, progress bar, or row-count update, trim a long wait down to 1 to 1.5 seconds (or speed up the silent loading segment) rather than deleting the state change completely. Viewers need to see
148 rowsbecome12 rowsso they know what to wait for in their own app. - Two to three seconds on the final result. Hold the downloaded file or confirmation banner at the end of the timeline so viewers can compare their screen without scrubbing backward.
In ChatCut’s Auto Screen Recorder workflow, the Agent edits with hard cuts only (it adds no transitions) to remove failed attempts and idle time and speed up long loading waits, while keeping your original raw take untouched. To edit an existing screen recording with the Agent in ChatCut, select the clip and run this prompt (for more prompt patterns across rough cuts, audio, and captions, see our video editing prompts guide):
What to check after it runs: review the proposed narration before approving any voiceover generation (since generated voiceover uses ChatCut credits), and scrub across every hard cut on the timeline to confirm that no required click or confirmation badge was trimmed away. If you recorded spoken narration during capture, you can also open Workspace › Transcript, switch between Paragraph view and Clip view, and delete stumbled phrases directly in the text; clicking any word moves the playhead to that exact frame (Transcript and Captions docs).
Align narration, cursor and callouts
A software tutorial is much easier to follow when the visual cue, the cursor click, and the spoken label happen together. Because Auto Screen Recorder places the background, screen recording, motion-graphic step callouts, pointer effects, click sound, zooms, voiceover, and captions on separate tracks, you can adjust each layer independently on the timeline (Auto Screen Recorder guide):
- Match speech to action one step at a time. When you use AI voiceover in Auto Screen Recorder, the Agent writes one voiceover clip per step and aligns it to the on-screen action, allowing the picture to wait up to about three seconds per step so the narration finishes before the next screen change. If you record your own voiceover via the timeline’s Record › Voiceover mode, split the audio into one clip per step and slide each phrase so the control’s name lands as the cursor reaches it.
- Zoom in on dense interface controls, then return to context. Full-screen 16:9 captures shrink 12-pixel table headers and dropdown pills until they are unreadable on mobile browsers. In Auto Screen Recorder, you can choose a
1.25x,1.5x, or1.8xcursor zoom; in the manual timeline editor, drag a zoom effect from Library › Zoom over the filter controls. Zoom in before the click, hold while the dropdown selection changes, and zoom back out before moving to the opposite corner of the screen so the viewer never loses their spatial bearings. - Keep step callouts clear of active menus. A short callout (such as
Step 2 · Filter by Paid status) helps viewers who scrub through the timeline without sound. Place callouts over empty dashboard whitespace, never over the dropdown menu, the download bar, or the bottom caption zone.
Proofread captions and check small UI
Viewers frequently watch software tutorials with the sound off in an open office or side-by-side with the application they are learning. Synchronized captions are also the core requirement of WCAG 2.2 Success Criterion 1.2.2 (Captions, Prerecorded, Level A), which requires captions for prerecorded audio content in synchronized media (W3C WCAG 2.2).
Automatic speech recognition is fast, but as W3C’s captions and subtitles guide emphasizes, automatic captions must always be reviewed and corrected for accuracy. In software tutorials, speech-to-text models routinely misspell camelCase product names, CLI flags, keyboard shortcuts, and column headers (turning CSV into see SV or Acme Test Corp into acme text core).
In ChatCut, turn captions on and proofread them without disturbing your video cuts (Transcript and Captions docs):
- Click the left side of the split Captions control below the Viewer to show captions, then click its chevron to open the Caption style menu and choose a clean, unobtrusive preset such as Plain.
- Open the active caption track’s Content panel (available on Web and in ChatCut Desktop 0.2.25 or later) and use search and replace to make every product name, menu path, and number match the spelling on screen character for character.
- Edit text in the caption track’s Content panel, not by deleting words in the Transcript panel: deleting words in Transcript cuts that time range out of the underlying video and audio track, whereas editing or hiding a caption card in Content changes only the displayed text.
- On Desktop, Auto pagination defaults to a single line; switch to an explicit two-line setting if a step explanation needs more room, and drag the caption position if it covers a bottom status bar or browser download tray.
5. Export, publish and test the result
A tutorial is not finished when the timeline looks right inside the editor; it is finished when a viewer can read the interface and complete the task from the published player.
Export MP4 and subtitle file
Open Export in the top-right header of the ChatCut editor to render your finished video and caption files (Export Video, Audio, and Subtitles docs):
- Choose the video settings. Select Export › Video. On the web app, choose H.264/MP4 (default 1080p) or VP8/WebM, pick the resolution and frame rate, and choose the full Timeline or a marked Zone. In ChatCut Desktop, select Export › Video and choose Dynamic Range (SDR, or HDR when supported by your computer), Resolution (
480p,720p,1080p, or4K), Frame Rate, Video Bitrate, and export Range. - Understand local vs cloud rendering and quotas. Exporting never uses ChatCut credits (Credits Policy). Cloud video exports render up to
1080p(480p,720p,1080p), and on the Free plan web and cloud exports share a cumulative 60-minute account quota (Web vs Desktop Export). ChatCut Desktop renders video locally on your computer at up to4Kand saves directly to the folder you pick. For dense software interfaces, exporting at1080por4Kat your original recording frame rate keeps thin UI fonts crisp. - Decide between burned-in captions and an
.srtfile. Video export renders whatever captions are currently visible in the Viewer directly into the video image. If you are uploading to a player with its own closed-caption toggle (such as YouTube, Vimeo, or a help-center player), hide the caption track before exporting the MP4 so viewers do not see double subtitles. Then turn captions back on, wait for transcription to finish, open Export › Subtitles, and export a SubRip (.srt) file for timed closed captions and a Plain text (.txt) file if you want to paste a written step list beneath the video.
Check the destination player
How you upload and verify the file depends on where viewers watch it. If you publish on YouTube, follow the verified path in YouTube Studio:
- Upload and encoding: sign in to YouTube Studio, click CREATE › Upload videos in the top-right corner, and select your MP4. YouTube’s recommended upload encoding settings specify an MP4 container with the H.264 video codec, AAC-LC stereo audio at a
48 kHzsample rate, and the same progressive frame rate (24,25,30, or60fps) at which the footage was recorded. - Closed captions: upload your exported
.srtfile in plain UTF-8 under the video’s subtitle settings (YouTube supported subtitle files) so viewers can toggle captions on or off and search the transcript. - Video Chapters for step navigation: software tutorial viewers frequently return to re-watch a single step. Add YouTube Video Chapters in the video description by starting the first timestamp at
00:00and listing at least three timestamps in ascending order, with each chapter lasting at least 10 seconds (for example:00:00 Starting report state,00:12 Filter by Last 30 days and Paid,00:26 Export CSV and verify rows).
Before you mark the video public or embed it in your documentation, open the published page from a standard viewer account and run this five-point quality check:
- Resolution and small UI legibility: switch the player to its default embed size and to a phone screen. Confirm that every menu label, filter pill (
Last 30 days,Paid), and row count (148 → 12 rows) can be read without squinting. - Audio level and click synchronization: listen on both headphones and a laptop or phone speaker. Each spoken instruction should match the moment the cursor clicks the control, with no clipped words across hard cuts.
- Captions and on-screen text: turn closed captions on and confirm that product terms, numbers, and file names (
paid-last-30-days.csv) are spelled accurately and do not cover the bottom download bar or status controls. - Privacy and credential hygiene: pause on every browser URL bar, table view, autofill dropdown, and file-save dialog to verify that no real customer records, email addresses, internal hostnames, or API tokens slipped into frame.
- Completion of the demonstrated task: watch the final five seconds to confirm the video ends on the observable finish line, with the exported file opened and verified, so a viewer following along knows with certainty that their own run succeeded.