A training video teaches one group of people to do one task, so plan it around what they must be able to do afterwards, not around the software you record it with. To make a training video, write a one-sentence objective, turn the approved process into a script that pairs each line with what’s on screen, and record your screen or a presenter in short sections. Then edit out the mistakes while keeping every required step, and have the process owner and a new learner review it before you publish it with a date and an owner. You need a computer, a microphone and access to someone who knows the process.
This guide carries one invented lesson through every step: a new employee submitting a client-meal expense. The recording and editing steps are shown in ChatCut, which records your screen straight onto its timeline, and each one is described so you can repeat it in another editor. If you’re still choosing a recorder, our comparison of screen recording software covers that question. ChatCut makes the video; assigning it, quizzing people and tracking who finished it stay with your LMS or intranet.
How to make a training video
- Define the audience and one result. Who is watching, and what they can do afterwards that someone could check.
- Script from the approved process. Each line of narration paired with what’s on screen, plus the most common mistake and its fix.
- Record in short sections. A test account, a tested microphone, one step per take.
- Edit for instruction. Cut false starts and waiting, keep every required action, point to small controls, add captions.
- Review twice. The process owner checks accuracy; a new learner tries the task after watching.
- Publish and maintain. Put it where learners already work, with a version date and an owner.
Define the audience and one observable result
Write the objective as something you could check
Start with the people, not the topic. “Employees” is too broad to plan for. “New hires in their first two weeks who have never opened the expense tool” tells you what they already know, what you can skip and how fast you can go.
Then finish the sentence “After this video, they can…” with a verb someone could watch them do: submit, find, correct, set up. “Understand the expense policy” fails the test, because nobody can see you understand something. For the running example:
After this video, a new employee can submit a client-meal expense with the receipt attached and the right cost center, so it isn’t sent back.
Keep to one objective per video. If the sentence needs an “and also”, you have two videos. Short, single-task videos are easier to find at the moment someone needs them and easier to update when the process changes. In a study of 6.9 million video sessions on edX, median viewing time topped out at about six minutes however long the video was, and the authors recommend lessons shorter than that (Guo, Kim and Rubin, 2014). That was online-course video rather than workplace training, but it points the same way.
Check that video is the right format at all. Reference material that people look up, such as a list of cost centers or a policy table, works better as a document. Video earns its place when people need to see something happen: clicks in software, a physical procedure, a judgment call acted out.
Choose screen, presenter or both
- Screen recording with narration for software tasks. It’s the cheapest format to make and to update, and viewers see exactly where to click.
- A presenter on camera for policies, safety and anything where who is speaking matters, such as a manager explaining why a rule exists. Our talking head guide covers light, sound and framing.
- Slides with narration when the material already lives in a deck. PowerPoint can export a narrated presentation as a video (Microsoft’s guide).
- Filmed hands for a physical task. Show the real action, close up, at the speed someone would do it.
Mixing works well: a short presenter introduction, then the screen recording. In ChatCut, Camera and Screen are separate recording modes, so you record them as separate takes and arrange them on the timeline. If you need your face and your screen captured together in one take, record with a tool that does both and import the file.
Turn the approved process into a script
Start from the source of truth
Get the current process from whoever owns it: the policy page, the help article, the finance team. Then do the task yourself in the current version of the tool and write down every click, field and screen, spelled exactly as the interface spells it. A script written from memory teaches last year’s menu names.
Ask the owner one question most scripts skip: what do people get wrong? The answer becomes the most useful fifteen seconds of the video. In the expense example, it’s the cost center field, and an expense without one is sent back.
Pair each line with what’s on screen
A training script has two halves: what you say, and what the viewer sees while you say it. Writing them side by side keeps the narration tied to the picture and doubles as your recording plan.
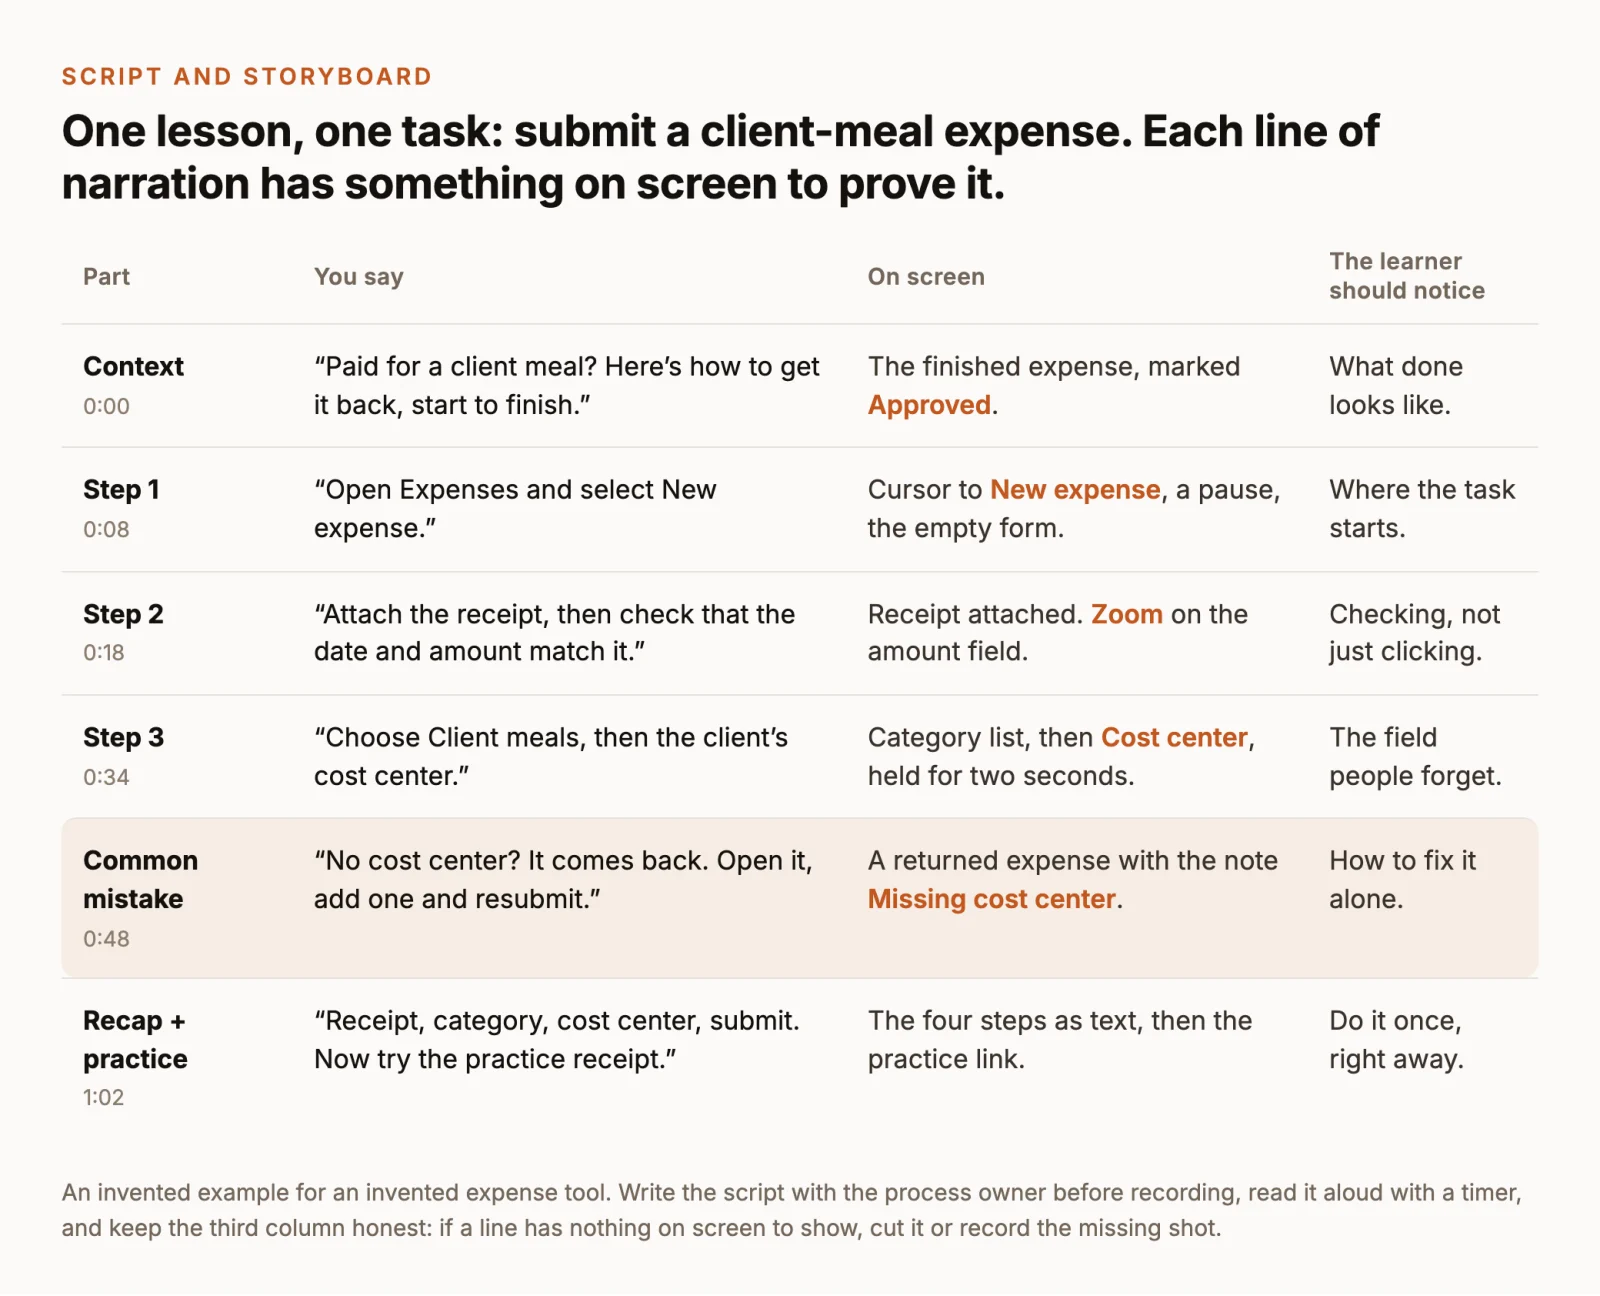
The structure in that table works for most single-task lessons:
- Context and result first. Say when the viewer needs this, and show the finished state so they know what done looks like.
- The steps in order. One action per line, with the control named as it appears on screen: “select New expense”, not “click here”.
- The common mistake and its fix. Show what it looks like when it goes wrong and how to recover without asking for help.
- A recap and a practice task. Repeat the steps in a few words, then give the viewer something to do with them straight away.
Write for the ear. Use short sentences, everyday words and the exact on-screen labels. Say what the picture shows, so the narration still works for someone who looks away for a second.
Read it aloud, then get sign-off
Read the script aloud with a timer; that’s its real length. Rewrite any line you stumble on, and cut any line that has nothing on screen to show. Then send it to the process owner before you record. Fixing a wrong field name in a script takes a minute; fixing it in a finished video means another take.
Record your screen or presenter in short sections
Prepare the screen and the sound
- Use a test account with invented data. No real names, email addresses, salaries or customer records on screen.
- Silence notifications. Turn on Do Not Disturb, and quit chat and email.
- Clean up the browser. A separate profile without personal bookmarks or extensions, with only the tabs the lesson needs.
- Make the interface readable. Enlarge the page with browser zoom, record one window or screen, and keep the same size for every take so the clips match.
- Test the microphone. Put it close to your mouth, record fifteen seconds, and listen back on headphones for echo, hum and distortion.
Record in ChatCut
The Record control sits in the timeline’s playback controls, and recording itself uses no credits (recording docs):
- Move the playhead to where the take should start.
- Open the chevron on Record, then Recording settings, and choose Screen. Choose Camera for a presenter section, or Voiceover to narrate over footage that’s already on the timeline. Pick a microphone and, if you like, the 3-second countdown.
- Select the left side of the Record control, then choose the screen or window in the system picker. For Camera, the first click opens a preview; confirm the frame and click again.
- Select Stop recording when the step is done.
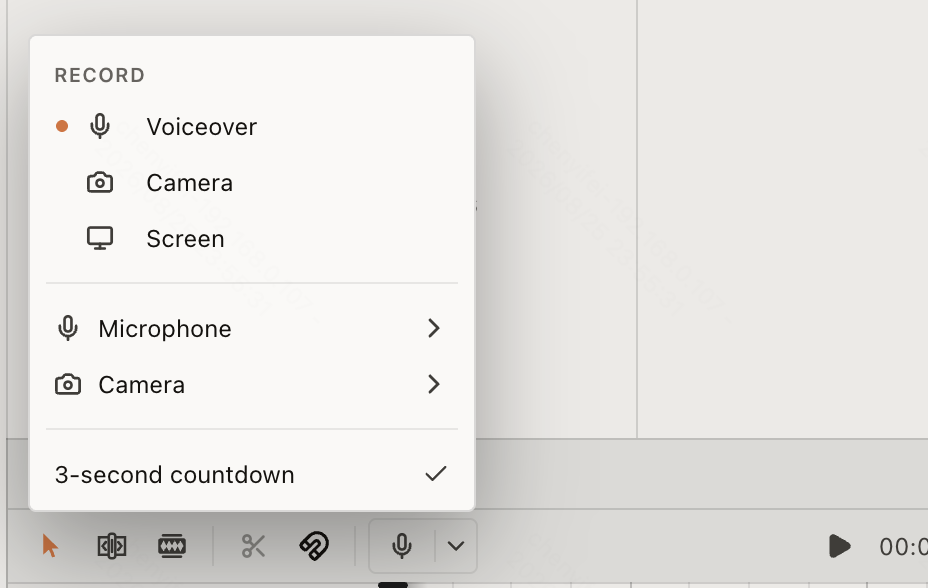
The take is saved to My Assets and placed on a video track at the playhead where it began. The controls are the same in the web app and ChatCut Desktop; only the permission prompts differ. You can’t switch modes during a take. If you recorded with another tool, bring the file in with My Assets → Upload → Files….
Record one step per take
- Start a beat early, stop a beat late. Begin each take a second before the first click and end it a second after the result appears.
- Move slowly. Pause on a control before you click it, so the viewer’s eyes get there first.
- Hold the result. Leave the confirmation screen up for two or three seconds. Learners need to see what success looks like.
- Restart the whole step. When you stumble, stop, pause and start the step again from its first word. The pause gives you an obvious place to cut.
- Split voice and clicks if you need to. If talking while clicking keeps tripping you up, record the screen silently, then record a Voiceover take while you watch it back.
Edit for instruction, then add captions
Editing a training video is different from editing a promo. The goal is to remove what doesn’t teach while keeping every action the learner has to perform, and enough time to see each one. A cut that saves three seconds but skips the click that opens the form makes the video shorter and the task impossible.
Cut mistakes and waiting, keep every step
In ChatCut, open Transcript (use Workspace → Transcript if it’s hidden). Deleting words in the transcript removes the matching stretch of video, and clicking a word moves the playhead there, so you can check each cut as you go. Use it to drop false starts, repeated explanations and the “okay, so” before each step.
Silent waits, such as a page loading or a progress bar, need a different fix. Split the clip on either side of the wait and delete it, or right-click the clip and choose Speed. Only speed up stretches where nobody is talking, because a faster clip makes the voice faster too. The Pauses control sets one pause length across the track. Keep it generous in training, because viewers need time to look at the screen. Our guide to removing silences and filler words covers the trade-offs in more detail.
On a long recording, ask the agent for the first pass and review its cut:
The built-in agent uses ChatCut credits when it edits your footage, even when it generates nothing new; manual editing, transcription and export don’t. Play the result from start to finish and tick off each step from your script. If one is missing, the cut is wrong, however tidy it looks.
Point to the right place on screen
Software screens are dense, and a new user doesn’t know where to look. A few treatments help, used sparingly:
- Zoom in on small controls. Drag a Zoom from Library → Zoom onto the clip and set its magnification. Zoom in on the field, hold, then return to the full screen so viewers keep their bearings.
- Call out the field people miss. Ask for a callout as a Motion Graphic, for example: “Add a three-second callout at 0:36 that labels the Cost center field ‘Required’. Keep it clear of the form.” Generated graphics can use credits; check any confirmation before it runs.
- Hide anything private that slipped into a take. The Local Mosaic effect in Library pixelates a rectangle that you can move and resize over the detail.
- Mark the steps in longer videos. If a lesson runs past a couple of minutes, add a short title card before each step so viewers can scrub to the one they need.
Add captions and check every word
Captions help anyone watching without sound at a desk or on a shared floor, and they’re an accessibility requirement: WCAG 2.2 success criterion 1.2.2 asks for captions on prerecorded audio in video, at Level A (W3C). Whether that is a legal obligation for your organization depends on your sector and country.
In ChatCut, select the left side of the Captions control below the Viewer to turn captions on, then the chevron to choose a style. Pick a plain one, such as Plain: people are reading instructions, not watching a social clip. Correct mistakes in the caption track’s Content panel, which has search and replace (transcript and captions docs). Speech recognition slips most on product names, field labels and numbers, and in a training video each caption has to match the label on screen exactly.
Review with an expert and a learner
A training video can be accurate and still fail to teach, or easy to follow and still wrong. Two short reviews catch both problems.
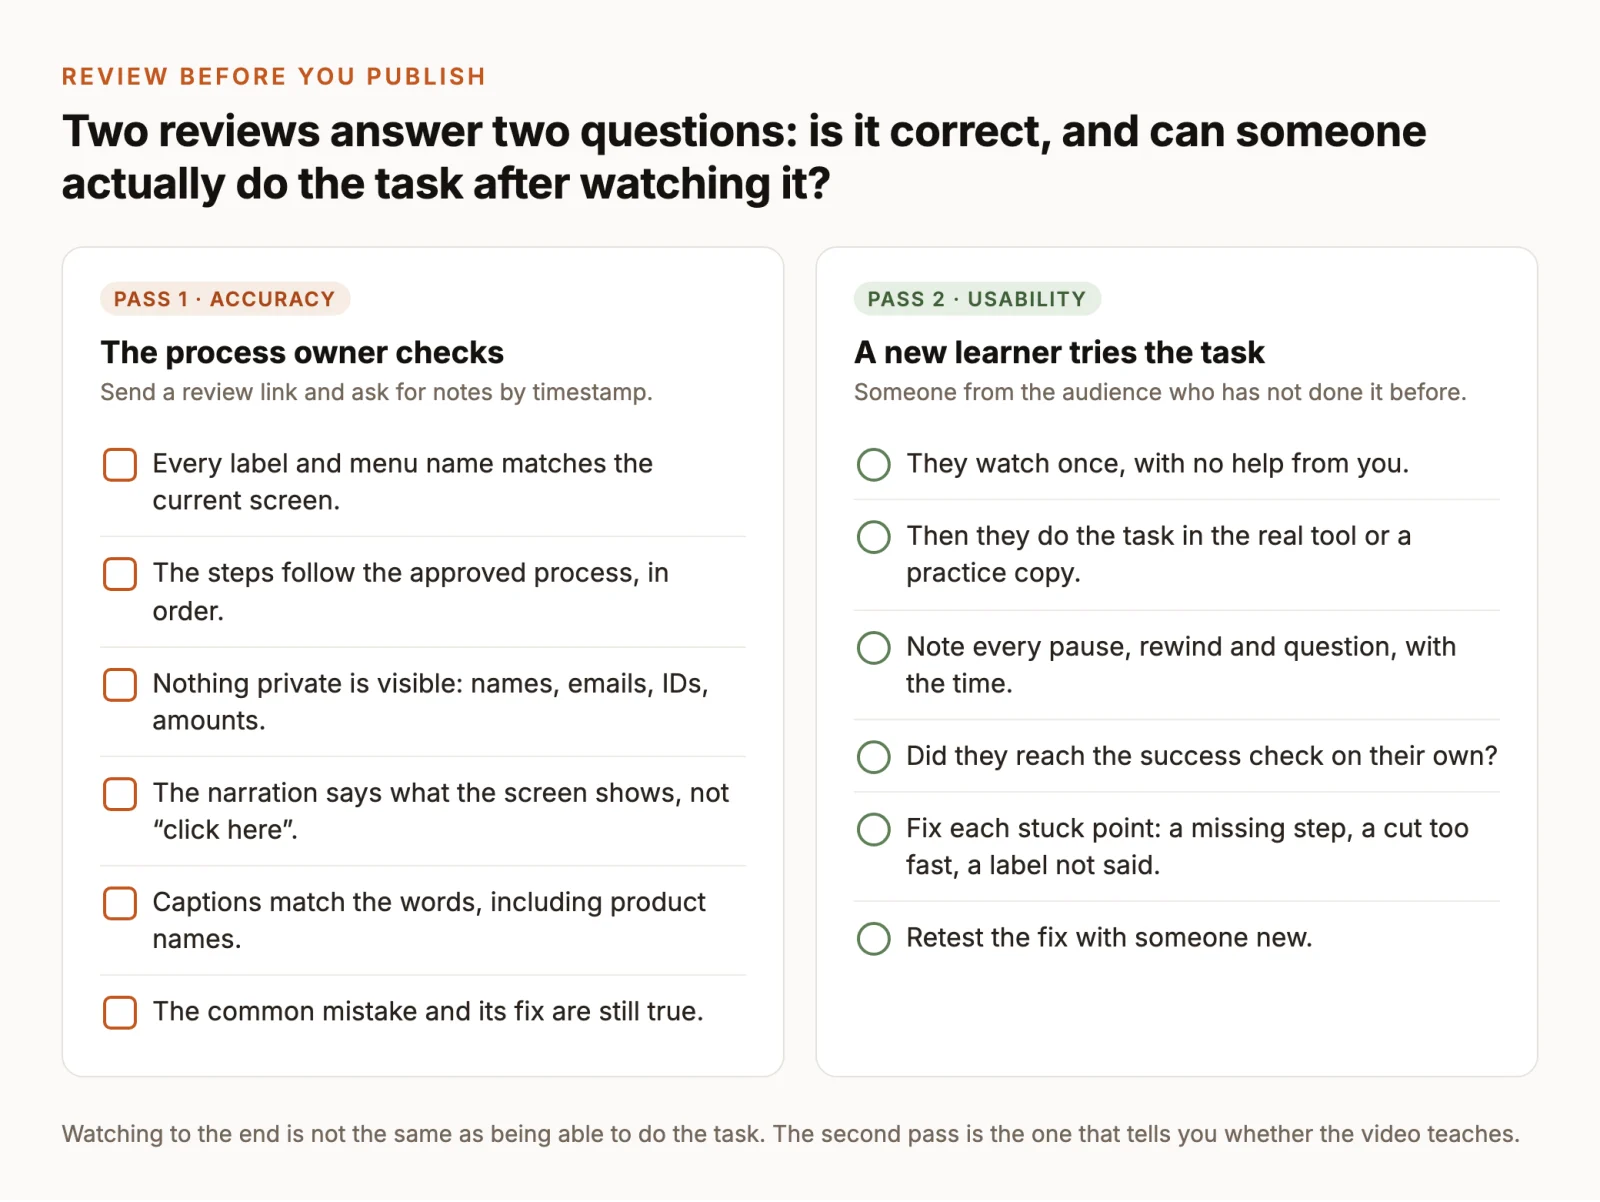
The process owner checks accuracy. Send the cut and ask for notes by timestamp, such as “at 0:41 the field is called Cost centre, not Department”. In ChatCut, turn on Create share link under Share in Export → Video to get a watch link that opens without a ChatCut account. Its video is kept for one day, so treat it as a review link, not hosting.
A new learner tries the task. Find someone from the audience who hasn’t done it before. They watch once, without help from you, then do the task in the real tool or a practice copy. Watch quietly and note each pause, rewind and question. Every one of them is a fix: a missing step, a cut that’s too fast, a label you didn’t say aloud. Watching to the end is not the same as being able to do the task, and only this pass tells you whether the video works.
Before the revision pass, save a restore point with Versions → Save Current Version in case you want the earlier cut back. Then fix what the two reviews found and, if the changes were large, try the new cut on a second learner.
Export, publish and keep it current
Export the video and the captions
Open Export → Video and choose H.264/MP4. Visible captions are burned into the picture. ChatCut Desktop renders on your computer at up to 4K; exports from the web editor that render in the cloud go up to 1080p. Exporting doesn’t use credits, though free accounts have a cumulative 60-minute allowance for web and cloud exports (export docs).
Decide how captions should travel. Burned-in captions work everywhere. If your LMS or video host lets viewers switch captions on and off, turn captions off before exporting the video and export Export → Subtitles → SubRip (.srt) to upload alongside it. Doing both gives viewers two sets of captions on screen.
Publish where learners already are
Upload the video wherever your team already looks for this process: the LMS course, the intranet page for expenses, the help center, the onboarding checklist. Then open it from an ordinary employee account, not your admin login, and check that it plays, that captions work and that it’s readable on a phone.
Next to the video, add the objective, the steps in writing and the practice task. Export → Subtitles → Plain text (.txt) gives you the transcript as a starting point for the written version, which also helps anyone who wants to check one step without replaying the video.
Give it a date and an owner
Every training video goes out of date when the tool or the policy changes. Record three things wherever you track your training material: the version date, the process owner, and what should trigger an update, such as “when the expense form changes”. Keep the editable project. When one screen changes, re-record that step at the playhead and replace the old section instead of starting from scratch.