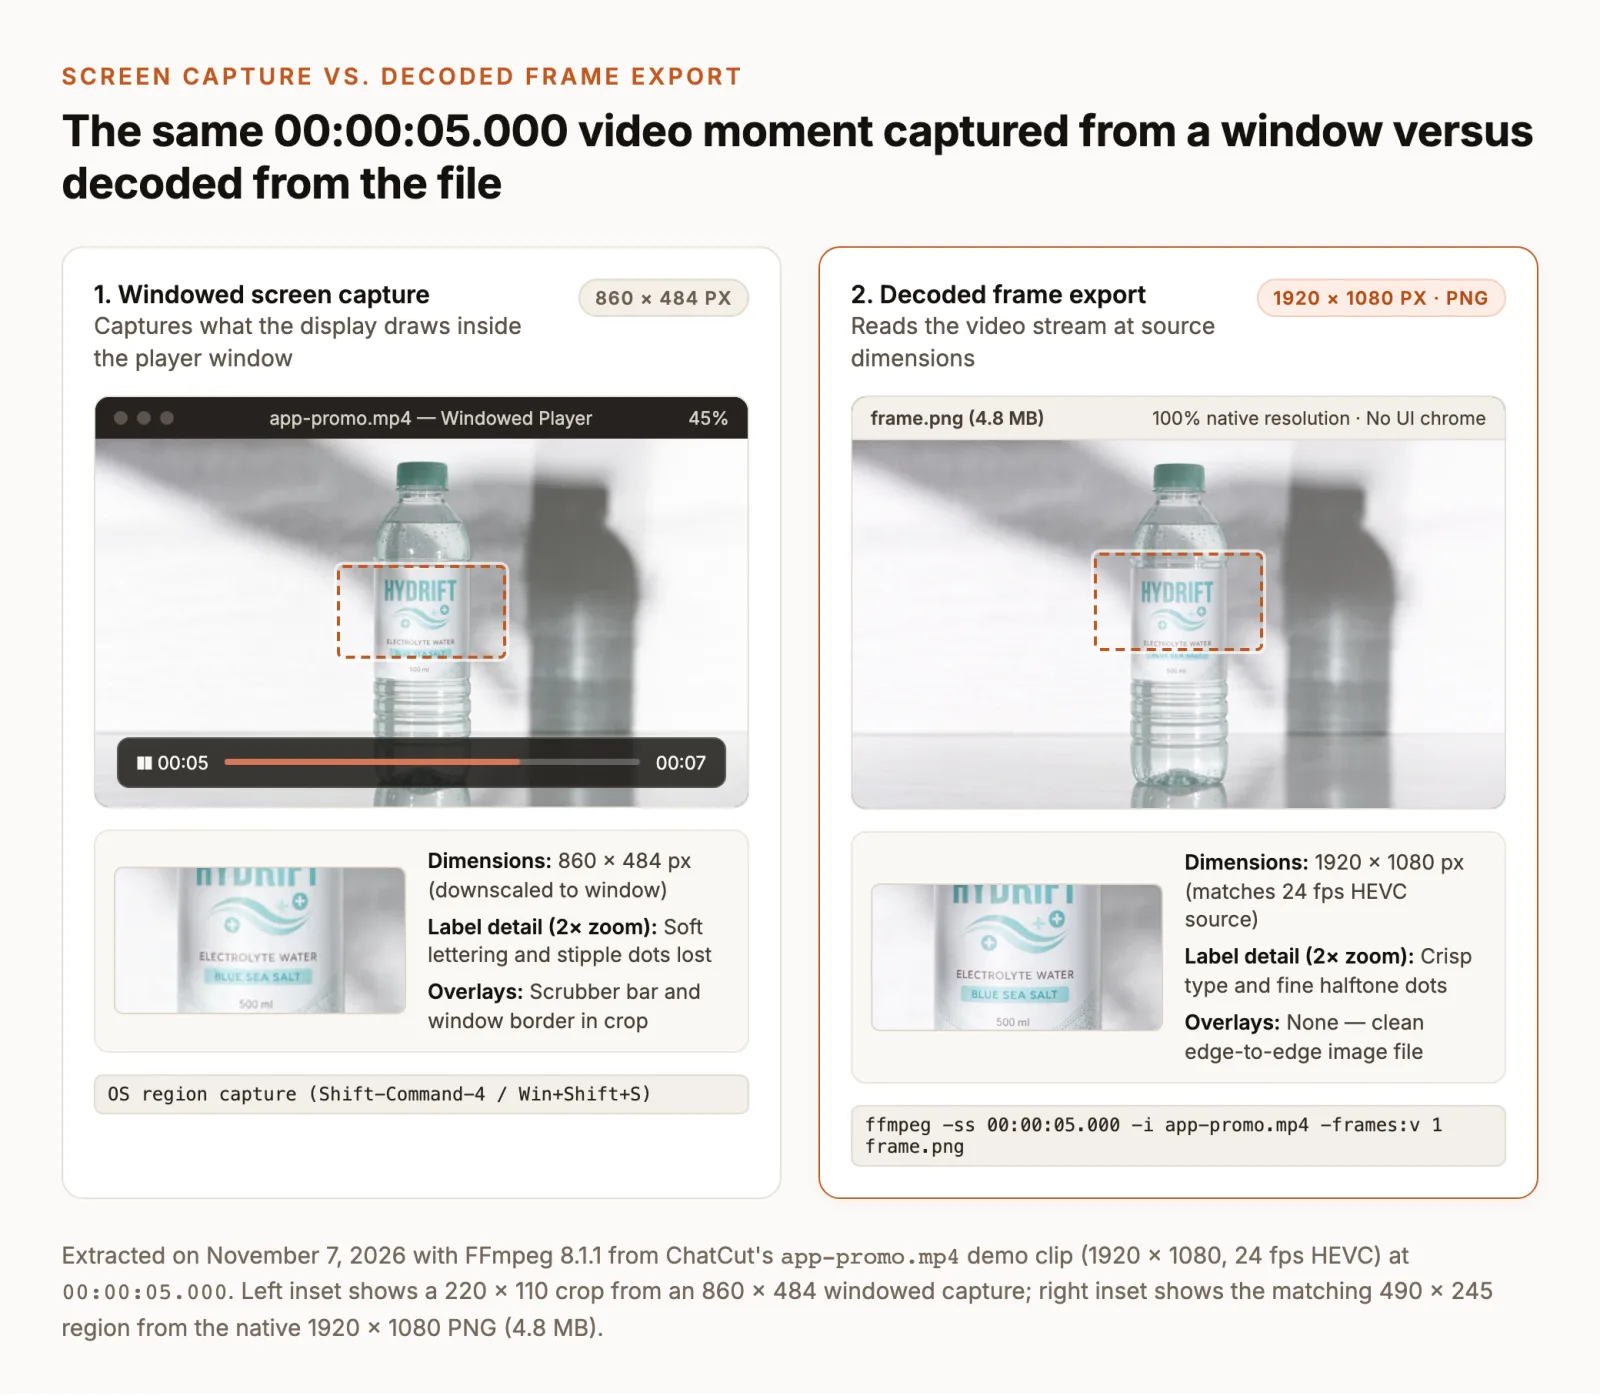
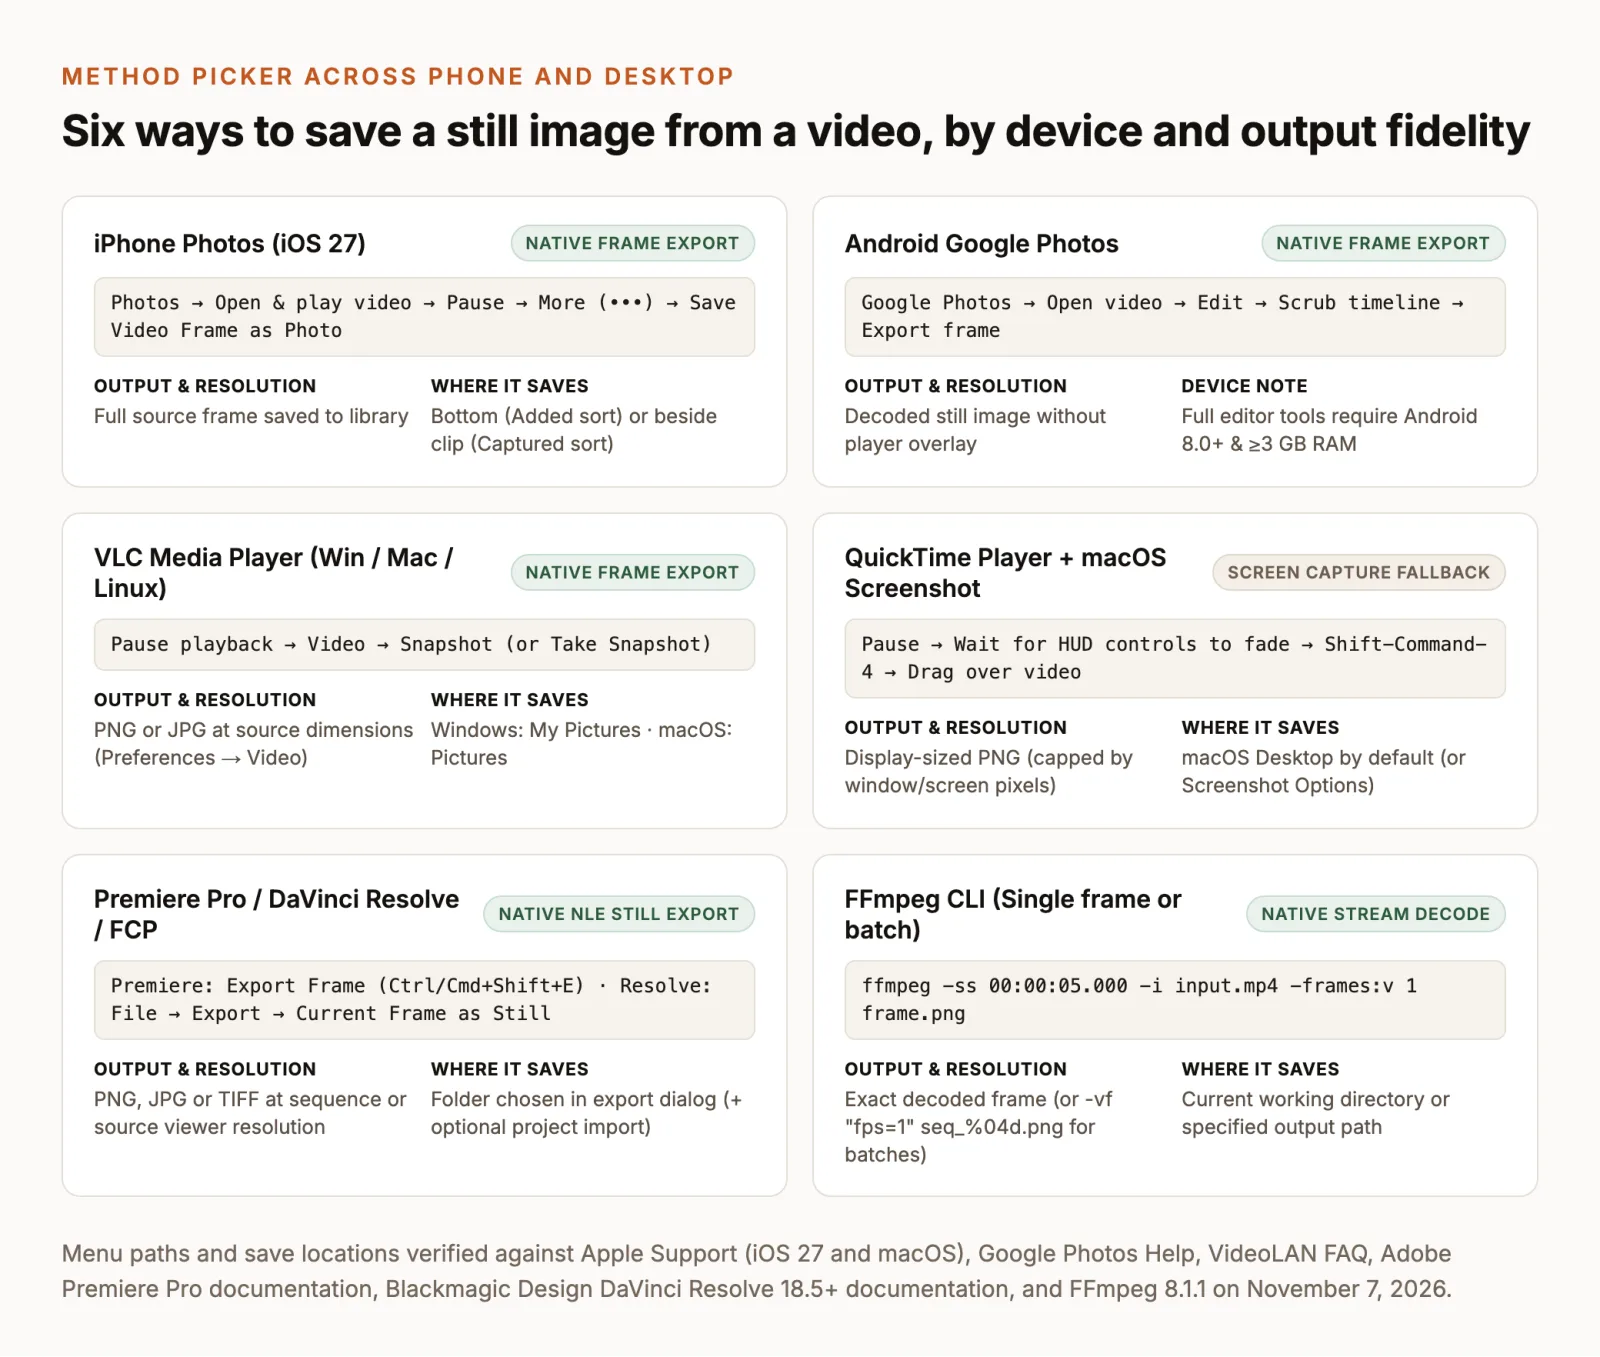
Knowing how to get image from video files without blurry edges or playback bars comes down to one distinction: a decoded frame export reads the video file directly at its native pixel dimensions, while a screen capture photographs whatever your display is currently drawing inside the player window. On iPhone (iOS 27), Android (Google Photos), VLC, Premiere Pro, DaVinci Resolve, Final Cut Pro, or FFmpeg, use the built-in frame export command first; reserve macOS QuickTime or Windows screenshots for clips you cannot open in an exporter. This guide covers the exact menus, save locations, and quality checks verified against official documentation on November 7, 2026.
Choose how to get image from video
Pick the tool that matches where the video file lives and whether you need a single still or a batch of frames. Whenever possible, choose a decoded frame export over an OS screenshot so a 4K (3840 × 2160) or 1080p (1920 × 1080) clip is not shrunk to the size of a small player window.
| Method & device | Capture type | Use case & output |
|---|---|---|
| iPhone Photos (iOS 27) | Decoded frame export | Camera roll clips; saves a full-frame photo to your library |
| Android Google Photos | Decoded frame export | Phone clips on Android 8.0+ (≥3 GB RAM); saves via Export frame |
| VLC (Win / Mac / Linux) | Decoded frame export | Local MP4, MOV, MKV or WebM files; saves PNG or JPG to Pictures |
| QuickTime + Mac / Win screenshot | Screen capture fallback | Quick visual notes when a player has no snapshot button |
| Premiere / Resolve / Final Cut | Decoded NLE export | Frame-accurate thumbnails or graded stills in PNG, JPG or TIFF |
| FFmpeg CLI | Decoded stream export | Exact timestamps or automated multi-frame sequences |
If you want to pause the action inside a video timeline for two or three seconds rather than saving a standalone JPG or PNG file, that is a different job; see our guide on how to freeze frame a video.
Save frame as image on iPhone or Android
Modern mobile photo libraries include a native command to save frame as image without capturing the battery icon, scrub bar, or home indicator.
iPhone on iOS 27
Apple’s iPhone User Guide for iOS 27 documents a built-in Photos command that saves the decoded video frame directly to your library:
- Open the Photos app on your iPhone and tap the video you want to use.
- Play the video, then pause on the exact frame you want to save. Drag the frame viewer at the bottom slowly to settle on the sharpest moment.
- Tap the More button (•••), then tap Save Video Frame as Photo.
Where to find the file: Apple notes that the saved photo’s position in your library depends on how you sort Photos. If your library is sorted by Added, the new still appears at the very bottom of the library. If your library is sorted by Captured, the still appears right next to the original video because it inherits the recording’s capture timestamp. This menu path is documented specifically for iOS 27; older iOS releases without Save Video Frame as Photo require either hiding the interface for a screen capture or opening the clip in a frame-export app.
Android with Google Photos
Google’s Edit your videos with Google Photos help page includes a dedicated Export frame tool inside the mobile video editor:
- Open the Google Photos app on your Android phone or tablet and tap the video.
- Tap Edit at the bottom of the screen to open the video timeline and scrollable action bar.
- Drag the white playhead handle across the frame strip until the preview shows the exact moment you need.
- Tap Export frame. Google Photos saves that frame as a separate still image without altering the original video.
Device boundaries to check: According to Google Photos Help, the refreshed video editor layout varies slightly by device, and full video editing features require Android 8.0 or later with at least 3 GB of RAM (basic crop/straighten requires Android 6.0+ and 1 GB RAM, while non-Pixel devices running Android 9 do not support Google Photos video editing). We verified these requirements in Google’s documentation on November 7, 2026, rather than across physical Android handsets.
Extract frame from video in VLC
On Windows, macOS, and Linux, VLC media player gives you a direct, free desktop way to extract frame from video files locally because it decodes the video stream directly instead of photographing your monitor.
- Open the video in VLC and pause playback just before the moment you want.
- Step forward one frame at a time using the Frame by Frame button in the advanced transport bar (or press E in standard desktop setups) until the subject and any on-screen text are sharp.
- From the top menu bar, select Video → Snapshot (labeled Video → Take Snapshot in some Windows and macOS releases), as documented in the VideoLAN Official FAQ.
- VLC flashes a small thumbnail preview and timestamp in the corner of the player window to confirm the file was written.
Where VLC saves snapshots by default: According to the VideoLAN FAQ, untouched installations save stills to:
- Windows:
My Documents\My Pictures\(orPicturesin your user profile) - macOS:
Pictures - Linux / Unix:
$(HOME)/.vlc/(or your homePicturesdirectory on newer builds)
To switch between PNG and JPG or choose a custom folder, open Preferences → Video (Tools → Preferences → Video on Windows, VLC → Settings → Video on macOS) and update Video snapshot directory and Video snapshot format. VideoLAN’s older FAQ lists Ctrl + Alt + S (Windows/Linux) and Command + Alt + S (macOS) as snapshot hotkeys, while newer builds sometimes map Shift + S; check Preferences → Interface → Hotkeys settings (Take video snapshot) on your installed version before relying on a keyboard shortcut.
Take a screenshot from video on desktop
When you only have a clip open in QuickTime Player, a browser tab, or Windows Media Player and need a quick visual reference, an operating-system screenshot is a practical fallback. Treat it as a screen capture, not a native frame export: the saved image matches the pixel area of the player on your screen, not necessarily the source video’s resolution.
QuickTime Player on Mac (macOS screenshot fallback)
Apple’s current QuickTime Player User Guide does not document a dedicated “Export Still Frame” menu command. Instead, combine QuickTime playback with the built-in macOS screenshot controls documented in Take a screenshot on Mac:
- Open the video in QuickTime Player, pause on the target frame, and use the Left and Right arrow keys to step to the cleanest frame.
- Move your pointer completely outside the QuickTime window and wait a second for the floating playback controller and title bar to fade out.
- Press Shift-Command-4, drag the crosshair across the video image (excluding the window border), and release the mouse button to take the shot. For timer or save-folder controls, press Shift-Command-5 to open the macOS Screenshot app (US Apple Support guide).
- By default, macOS saves the screenshot to your Desktop as
Screen Shot [date] at [time].png. Select the file in Finder and press Command-I (Get Info) to verify its dimensions under More Info → Dimensions.
Some older Mac tips suggest pressing Command-C on a paused QuickTime frame and choosing File → New from Clipboard in Preview. Because Apple’s current QuickTime documentation does not specify whether clipboard copy preserves full source resolution or color space across codecs, verify the resulting pixel dimensions in Preview’s Inspector (Command-I) if you test that route.
Snipping Tool on Windows 10 and 11
On Windows, Microsoft’s Snipping Tool guide covers the built-in region capture workflow:
- Pause the video at the largest window size your monitor allows and let the player’s scrub bar disappear.
- Press Windows logo key + Shift + S to freeze the screen and open the Snipping Tool overlay.
- Keep Rectangular mode selected, drag across the video frame, and open the notification or
Pictures\Screenshotsfolder to inspect and save the still.
Export frames in Premiere, Resolve or Final Cut
If the footage is already on a non-linear editor (NLE) timeline, use the editor’s native still export. You get frame-accurate stepping, clean output without interface chrome, and your choice of uncompressed or lossless formats.
Adobe Premiere Pro
In Premiere Pro, the Export Frame command captures either the raw clip in the Source Monitor or the graded, composited sequence in the Program Monitor (check Adobe’s Export a still frame page in a browser for version-specific screenshots; Adobe’s server returned HTTP 403 to automated checks on November 7, 2026):
- Click inside the Source Monitor (for the original clip without timeline effects) or Program Monitor (for the rendered sequence frame) and position the playhead on the frame.
- Click the Export Frame camera icon beneath the monitor, or press Ctrl + Shift + E (Windows) / Command + Shift + E (macOS).
- If the camera icon is not visible on the monitor bar, click the + (Button Editor) in the bottom-right corner of the panel, drag Export Frame onto your transport bar, and click OK.
- Enter a Name, select a Format (PNG, JPEG, or TIFF), choose the destination Path via Browse, and click OK. Leave Import into project unchecked if you only want the file on disk.
DaVinci Resolve
Starting in DaVinci Resolve 18.5, Blackmagic Design added a direct menu command so you do not have to grab a still in the Color page Gallery first (DaVinci Resolve 18.5 New Features Guide, page 24):
- Open the Media, Cut, or Edit page and click inside the viewer showing your clip or timeline so that viewer has focus.
- Scrub or step with the Left and Right arrow keys to the exact frame.
- Choose File → Export → Current Frame as Still from the top menu bar.
- Choose a file name, destination folder, and image format (such as PNG, JPEG, or TIFF), then click Export.
If you are already grading on the Color page, documented in Blackmagic’s DaVinci Resolve 20 Editor’s Guide, you can also right-click the viewer, choose Grab Still, then right-click the thumbnail in the Gallery panel and choose Export.
Final Cut Pro for Mac
Apple’s Final Cut Pro User Guide for Mac (verified for Final Cut Pro 12.4 on November 7, 2026) exports single frames through the Share menu:
- If you have never exported a still in Final Cut Pro before, enable the destination first: choose File → Share → Add Destination, then double-click Save Current Frame to add it to your Share menu. Apple notes that Save Current Frame does not appear by default.
- Position the skimmer or playhead on the target frame in the timeline or browser.
- Choose File → Share → Save Current Frame (or click the Share button in the toolbar and select Save Current Frame).
- In the settings tab, set Export to PNG, JPEG, TIFF, or Photoshop, check whether Scale image to preserve aspect ratio is needed, click Next, and choose a save folder.
Convert video to JPG or PNG with FFmpeg
When you know the exact timestamp or need to pull dozens of images without opening a GUI, FFmpeg decodes the video stream from the command line and writes frames through its image2 muxer (check the official FFmpeg documentation and image2 muxer page, or run man ffmpeg and man ffmpeg-formats locally, which we used on November 7, 2026 when ffmpeg.org timed out to automated checks). We tested the three commands below on November 7, 2026 using FFmpeg 8.1.1 on macOS against both a 3840 × 2160 H.264 clip and the 1920 × 1080 HEVC clip shown in Figure 1.
1. Extract a single lossless PNG at an exact timestamp:
ffmpeg -ss 00:00:05.000 -i input.mp4 -frames:v 1 frame.png-ss 00:00:05.000seeks to 5.000 seconds (HH:MM:SS.MILLISECONDS). In current FFmpeg, placing-ssbefore-iduring transcoding performs fast, frame-accurate seeking by default.-frames:v 1instructs FFmpeg to stop after writing exactly one video frame.frame.pngselects lossless PNG encoding at the source stream’s pixel dimensions (1920 × 1080or3840 × 2160).
2. Convert video to JPG with high quality:
ffmpeg -ss 00:00:05.000 -i input.mp4 -frames:v 1 -q:v 2 frame.jpg-q:v 2sets the JPEG quantizer scale (lower numbers mean higher quality inside the2–31normal range). On our3840 × 2160test frame,-q:v 2produced a405 KBJPEG compared with1.1 MBfor the PNG at identical3840 × 2160dimensions.
3. Extract a sequence of frames at fixed intervals (1 frame per second):
ffmpeg -i input.mp4 -vf "fps=1" seq_%04d.png-vf "fps=1"samples one frame per second (use fps=1/5for one frame every five seconds) and writesseq_0001.png,seq_0002.png, and so on into the current folder.
Keep the extracted image sharp
Even a native frame export can look disappointing if the underlying video frame has motion blur or color-space mismatches. Run through six checks before using the still in a thumbnail or document:
- Start from the original camera or master file. Re-downloading a video from a messaging app or social feed gives you a re-compressed lower-bitrate stream. Pull the still from the source
.MOVor.MP4before upload compression touches it. - Step 2 to 5 frames forward or back. At
24or30 fps, normal camera shutter speeds (1/48sor1/60s) bake motion blur into fast hand gestures and head turns. Playback hides that blur; a still exposes it. Step frame by frame to the pause at the peak of an expression or gesture. - Verify pixel dimensions after saving. As Figure 1 shows, an
860 × 484windowed capture loses fine typography that the native1920 × 1080export keeps. Check the saved file in Finder (Command-I) or Windows File Explorer (Properties → Details) to confirm it matches your video’s full width and height. - Pick PNG for editing and text, JPG for upload size limits. PNG uses lossless compression, so it adds no new compression artifacts to interface text, graphics, or frames you plan to mask and color-grade (though PNG cannot recover detail that was never in the compressed video). JPEG is lossy and much smaller, which helps when a platform enforces a file-size cap: YouTube Help recommends custom thumbnails at
1280 × 720minimum (16:9aspect ratio, minimum width640 px) inJPG,GIF, orPNGunder 2 MB for videos (9:16for Shorts thumbnails added in YouTube Studio on a computer). - Watch for HDR-to-SDR color shifts. Videos recorded in 10-bit HDR (Dolby Vision or HLG on iPhone) often look overly bright, flat, or desaturated when saved to an 8-bit SDR image by command-line tools or older players that skip tone mapping. On iPhone, using iOS 27’s native Save Video Frame as Photo preserves Apple’s display color management; in NLEs, check that your timeline color space matches your intended delivery.
- Understand why protected streams turn black. If a screenshot of a streaming movie or protected course player comes out completely black, the browser or app is using hardware-enforced DRM (such as Widevine or FairPlay). Switching screenshot apps will not bypass DRM; only videos you have permission and local file access to decode can be exported cleanly.
Turn the selected frame into a thumbnail
Before opening ChatCut, know what its exporter does and does not do today. ChatCut’s documented Export panel exports finished video (MP4/WebM), audio (MP3/AAC/FLAC/WAV), transparent ProRes 4444 motion graphics (.mov), subtitles (.srt/.txt), Premiere/DaVinci XML, and editable CapCut/Jianying drafts; it does not include a single-frame JPG or PNG export button. Use one of the phone, VLC, NLE, or FFmpeg methods above when your only goal is extracting a raw frame from a clip.
Where ChatCut helps is the next step: turning that extracted frame (or a moment you select in your project) into a finished thumbnail, cover image, or product poster alongside your video edit.
- Import your media. In a ChatCut project, choose My Assets → Upload → Files… (or My Assets → Import → Files…) to add your video or the still image you extracted.
- Point at the frame or asset. Open the AI panel in Agent mode. Turn on Selection Mode below the prompt box (or type
@) to reference the uploaded still or a specific clip and timestamp on the timeline. - Attach a workflow Skill or prompt the Agent. Inside the editor, click the Skills book icon, choose Browse all skills, and attach Video Thumbnail Generator (note that its public catalog URL currently redirects to
/skills, so open it from the in-editor Skill Marketplace). If your frame shows a physical product and you want a ready-made poster form in the browser, check out the Product Images & Posters Skill and its Product Photos and Listing Images guide. - Send a clear brief and check the estimate. Paste one of the prompts below into the Agent composer. We wrote these two prompts as starting templates for this guide rather than from a published test run, so review any generation confirmation card and credit estimate before selecting Allow, then inspect the lettering and subject likeness at full size.
Once you pick the headline and layout direction, ask the Agent to generate the cover image using your extracted frame as the reference:
What costs nothing vs. what uses credits: On ChatCut, the Free plan includes the core editor: manual timeline editing, media uploads, transcription, and standard caption editing never use credits. Exporting finished MP4/WebM video, MP3 audio, subtitles, and XML also uses no credits (on Free, web and cloud exports share a cumulative 60-minute account quota, while ChatCut Desktop renders video locally on your computer). If you connect ChatCut through Claude Code or Codex (plugin / MCP), the agent’s editing work is covered by your existing Claude or ChatGPT subscription rather than ChatCut credits. ChatCut credits are used only when a workflow calls the built-in ChatCut Agent’s messages or a ChatCut-hosted generation service (such as AI image generation for a thumbnail or poster, which requires an active Pro plan and uses credits).
For deeper help on the surrounding workflow, see our guide on how to edit a YouTube video and our 15 Nano Banana prompts for thumbnails and product stills.