
To freeze frame a video, put the playhead on the frame you want to hold and use your editor’s freeze command: Clip → Video Options → Frame Hold Options in Premiere Pro, Retime Controls → Freeze Frame in DaVinci Resolve, Edit → Add Freeze Frame in Final Cut Pro, Layer → Time → Freeze Frame in After Effects, Modify → Add Freeze Frame in iMovie, and the freeze icon above the timeline in CapCut. Then set how long the hold lasts and decide what the audio does. This guide gives the exact steps for each editor from its official documentation, checked on November 5, 2026, with version notes. The last section covers the viral “time freeze” look, which is a different effect.
Key Takeaways
- Decide the type of pause first: pause and resume, hold to the end, or hold the whole clip. The editors handle each one differently.
- Default hold lengths differ: 2 seconds in Resolve and Final Cut Pro’s Hold, 3 seconds in iMovie, 4 seconds for a Final Cut Pro freeze-frame clip. All are adjustable.
- Audio is the step people forget. iMovie’s freeze frame has no sound; elsewhere, decide whether the soundtrack keeps playing.
- The time-freeze look, where a person hangs mid-action while the world keeps moving, can’t be made from a single held frame. It’s generated footage; see the last section.
What is a freeze frame?
A freeze frame holds one frame of video on screen for a set time, so the action appears to stop. Editors use it to land a joke, introduce a character with a name on screen, point at a detail in a tutorial, or end on a still. The frame comes from your own footage; nothing new is created.
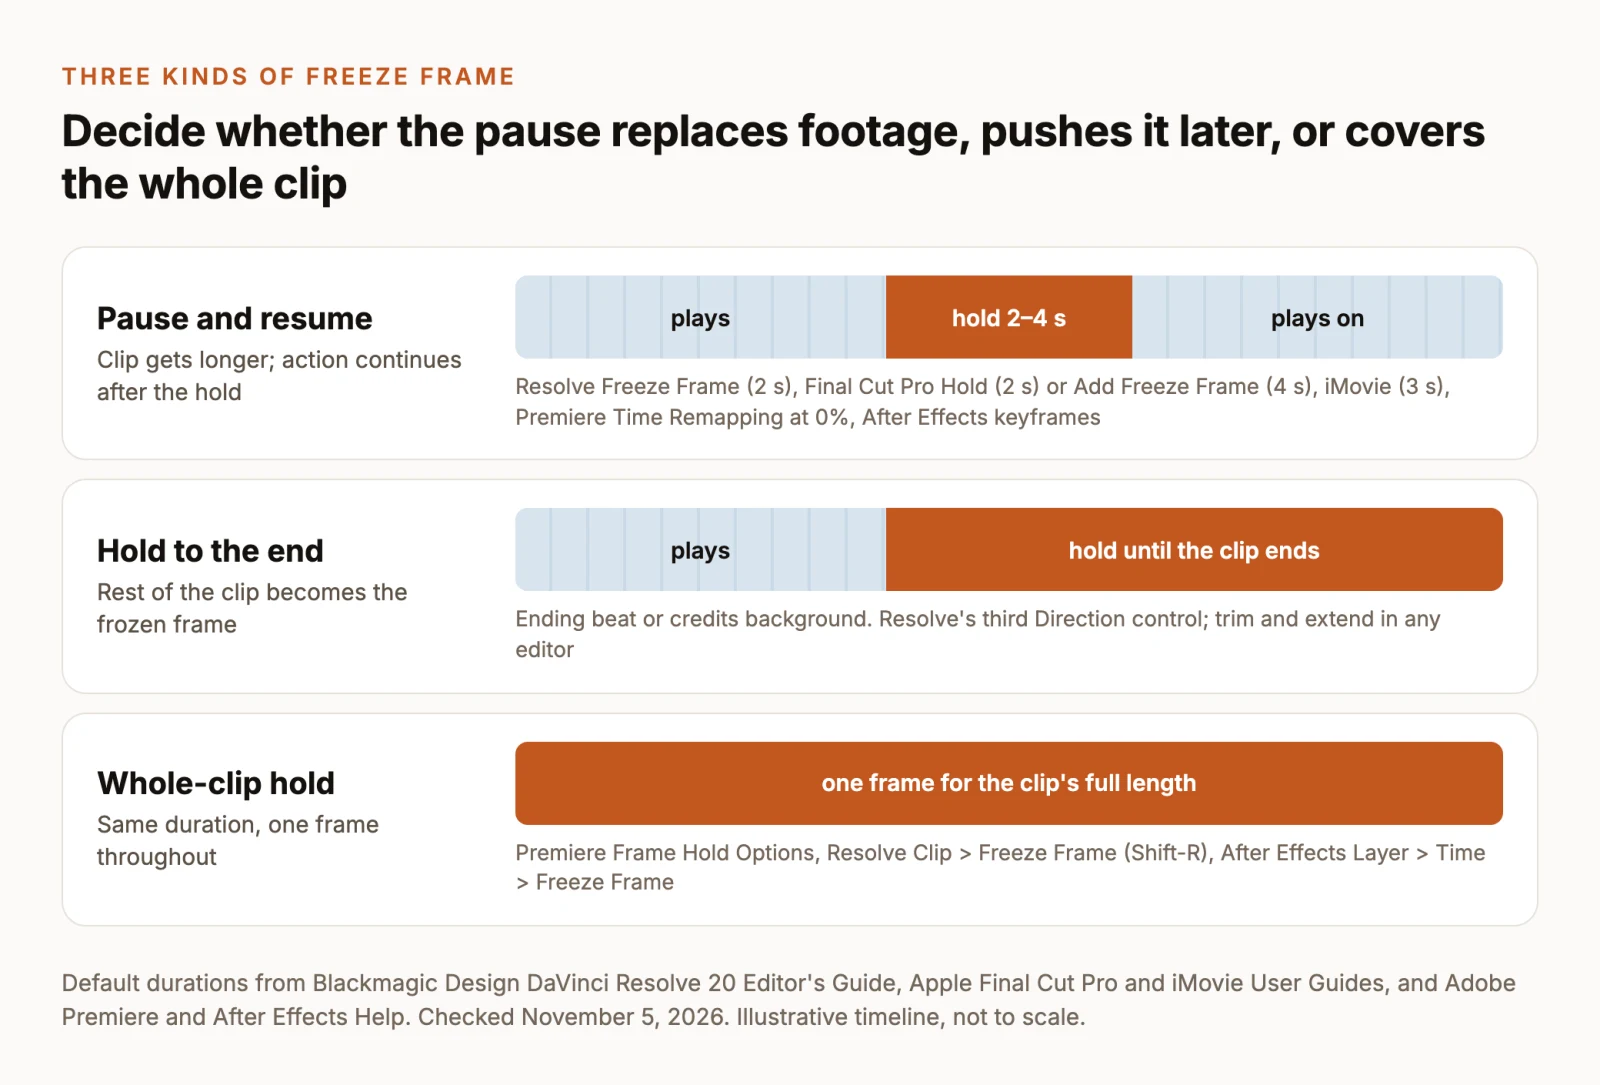
The three kinds behave differently on the timeline:
- Pause and resume inserts a hold in the middle of a clip. The clip gets longer and the action continues afterwards. This is what most people mean by a freeze frame.
- Hold to the end turns the rest of the clip into the frozen frame. It suits an ending, a credits background or a shot you want to extend.
- Whole-clip hold shows one frame for the clip’s full duration. The timeline doesn’t change length, which is useful when the clip is already cut to music.
Choose your editor and pause type
Find your editor below and use the method that matches the pause you want. Every step comes from the vendor’s own documentation, not from screenshots of an installed copy, so labels can shift slightly between versions.
- Premiere Pro: Time Remapping for pause and resume; Frame Hold Options for a whole-clip hold.
- DaVinci Resolve: Retime Controls → Freeze Frame for pause and resume; Clip → Freeze Frame for the whole clip.
- CapCut: the freeze icon above the timeline creates a separate still segment.
- Final Cut Pro: Hold for a pause inside the clip; Add Freeze Frame for a separate still clip.
- After Effects: Freeze Frame for the whole layer; Time Remapping keyframes for a pause in the middle.
- iMovie: Add Freeze Frame on Mac, or Speed → Freeze on iPhone.
How to freeze frame in your editor
Premiere Pro
Adobe’s help covers two methods: a hold for part of a clip with Time Remapping (updated April 8, 2026), and a hold for the whole clip with Frame Hold.
Pause and resume:
- In the Timeline, select the Show Clip Keyframes badge on the clip and choose Time Remapping → Speed.
- Move the playhead to the frame where the freeze should start.
- Ctrl-click (Windows) or Command-click (macOS) the speed line to add a keyframe.
- Drag the keyframe down until the speed reads 0%.
- Ctrl+Alt-drag (Windows) or Option+Command-drag (macOS) the keyframe sideways to lengthen the hold. The flat 0% section is the frozen part.
Whole-clip hold (Adobe help):
- Select the clip. To freeze a frame other than the first or last, open the clip in the Source Monitor and press M at that frame to set Marker 0.
- Choose Clip → Video Options → Frame Hold Options.
- Turn on Hold On and pick In Point, Out Point, Marker 0 or a specific timecode, then click OK.
The clip keeps its length and shows the chosen frame throughout. If you used Marker 0, moving the marker changes the frozen frame. Older tutorials, such as PremiumBeat’s 2016 guide, also use Insert Frame Hold Segment and Add Frame Hold; Adobe’s current help pages don’t document those commands, so check your version’s Video Options menu before relying on them.
DaVinci Resolve
Blackmagic’s DaVinci Resolve 20 Editor’s Guide (pages 412 and 429–430) documents three ways, all on the Edit page.
Pause and resume:
- Put the playhead on the frame to freeze and select the clip.
- Press Command-R (macOS) or Ctrl-R (Windows) to show the Retime Controls.
- Open the Clip Speed menu and choose Freeze Frame. Resolve adds two speed points with a 2-second freeze between them, marked by red speed indicators.
- The hold lasts for the distance between the two speed points, so move them apart or together to change it.
To ease into the hold instead of stopping dead, open the Retime Speed curve and add Bézier handles to both speed points; the clip then slows from 100% to 0% and speeds back up. If that ramp stutters, change the clip’s Retime Process in the Inspector from Nearest to Frame Blend or Optical Flow. The guide notes Optical Flow is processor-intensive.
Whole-clip hold: choose Clip → Freeze Frame or press Shift-R. Hold to the end: the third Direction control in the speed change controls freezes from the playhead to the end of the clip. The guide is for Resolve 20; we didn’t verify these menus in a later release.
CapCut desktop
CapCut doesn’t publish a help-center procedure for this, but its own iMovie freeze-frame guide gives the desktop steps:
- Drag your clip to the timeline.
- Select the clip and move the playhead to the moment you want to hold.
- Click the freeze icon that appears in the toolbar above the timeline. CapCut turns that frame into a separate still segment.
- Drag the segment’s edge to change how long it lasts, then add text or effects to it if you want.
CapCut’s page doesn’t state a default length or a version number. If you can’t find the icon, hover over the toolbar icons above the timeline for their names.
Final Cut Pro for Mac
Apple’s Final Cut Pro 12.4 guide describes two methods.
Hold segment (Apple guide): click the clip and put the skimmer or playhead on the frame, then choose Hold from the Retime pop-up menu below the viewer (or press Shift-H). Final Cut Pro adds a 2-second hold inside the clip; drag its retiming handle to change the length. If you select a range first, the hold lasts for the range and uses its first frame. Adding a hold makes the clip longer.
Freeze-frame clip (Apple guide): put the skimmer or playhead on the frame, or play the clip, and choose Edit → Add Freeze Frame (Option-F). From the timeline, a new 4-second clip is inserted at the playhead; from the browser, it’s attached as a connected clip. Effects on the source are rendered into the still. To change the default length, open Final Cut Pro → Settings → Editing and adjust Still Images.
Use a hold segment when you may want to retime the clip later; use a freeze-frame clip when you want a still you can move around. If you need the frame as an image file rather than on the timeline, Apple documents that separately under Export still images.
After Effects
Adobe’s time-remapping help covers both cases.
Whole layer: select the layer, put the current-time indicator on the frame and choose Layer → Time → Freeze Frame. After Effects turns on time remapping with a Hold keyframe. Any time-remap keyframes you made earlier on that layer are deleted.
Pause in the middle:
- Select the layer and choose Layer → Time → Enable Time Remapping. Keyframes appear at the start and end.
- Move to the frame to freeze and add a Time Remap keyframe with the keyframe navigator.
- Select the last two keyframes and drag them right to make room for the hold.
- Press F2 to deselect, select the middle keyframe, copy it (Ctrl+C or Command+C) and paste it (Ctrl+V or Command+V) without moving the current-time indicator.
- To lengthen the layer to fit, press K twice to go to the last keyframe, then Alt+] (Windows) or Option+] (macOS).
The two identical keyframes hold one frame between them; the footage plays at normal speed before and after.
iMovie on Mac and iPhone
Mac (iMovie 10.4.4 guide): move the playhead over the frame in the timeline and choose Modify → Add Freeze Frame. iMovie holds that frame for 3 seconds, attached to the clip on both sides. Click the hand icon in the middle of the freeze to show the speed controls, then type a Duration or drag the freeze’s edges. Modify → Remove Freeze Frame restores the clip.
iPhone (iMovie 3.0.6 guide): touch and hold the clip and swipe to the frame, tap the clip, tap the Speed button, then tap Freeze in the inspector. Drag the yellow range handles to set the length. Tap Freeze again inside the range to remove it.
On both, Apple notes the freeze-frame portion has no audio.
Make the pause feel intentional
A freeze frame that looks like a glitch usually fails on one of four things.
Pick a sharp frame. Step through frame by frame around the moment, rather than stopping playback by eye. Fast motion leaves blur that playback hides and a held frame exposes. If every frame of the action is blurred, hold a frame just before or after the peak of the movement.
Set the length for what the viewer has to take in. The defaults of 2 to 4 seconds suit a beat or a punchline. If you put text over the freeze, a name and title for example, hold it long enough to read the text twice at normal speed. Short-form edits often use a shorter hold; test it on a phone.
Decide what the sound does. You have three honest options: let the music or ambience keep playing under the still, cut to silence for emphasis, or mark the freeze with a sound effect such as a camera shutter or a record scratch. What you don’t want is a voice stopping mid-word. If someone is talking at the frozen moment, cut the freeze in at the end of a word, or move it to a pause in the sentence. iMovie removes the audio from the freeze for you; in the other editors, play the section back and check.
Resume cleanly. A pause-and-resume hold should restart on the next frame of the same shot, so the action looks interrupted rather than cut. In Resolve and After Effects, easing the speed into and out of the hold makes the stop feel deliberate. Export a short section and watch it at full speed before exporting the whole video; the timeline preview may skip frames. For a structured pass over the rest of the edit, our AI video editing tips cover pacing and export checks.
Go beyond a still: the time-freeze look
The “time freeze” trend on TikTok and Reels looks different from a freeze frame. One person hangs in mid-air, or holds a pose, while traffic, people and the camera keep moving around them. You can’t make that by holding one frame, because a held frame stops everything. It needs either a careful live-action shoot with a still subject and compositing, or new footage from a video generation model. Our explainer on AI video editors and AI video generators covers the difference between the two jobs.
ChatCut doesn’t have a one-click freeze-frame command for an ordinary hold today, so use the editors above for that. Where ChatCut helps is the generated look, through the Time Pause Skill. You give it a photo of your character, or choose one of its characters, and it generates a short vertical clip of that character suspended mid-action in a street scene.
To try the look, check out the Time Pause Skill, or start it from inside a project (Skills docs):
- Open a project and select the book icon labeled Skills below the AI composer’s message field.
- Select Browse all skills, find Time Pause and select Use this Skill.
- Check that the Skill is attached to your message, add your photo, and describe the moment you want frozen.
- Review the cost shown before generation, then generate and check the clip before you place it on the timeline.
A request along these lines works as a starting point once the Skill is attached; we haven’t run this exact wording, so treat it as a template. Replace @my-photo with your image.
Time Pause runs on a Seedance video model, so it needs a paid plan and uses credits for each generation (pricing). Generated faces can drift from the photo; check the result closely before you publish, and use photos only of people who agreed to it. For writing your own prompts for this kind of shot, see our Seedance 2.0 prompt examples; for edits to footage you already shot, our video editing prompts are the better fit.
ChatCut Desktop runs on macOS 13 or later (Apple silicon or Intel) and Windows 10 or later (x64), and there’s a web app. Local exports go up to 4K; cloud exports up to 1080p.