
Knowing how to remove text in a video starts with checking whether the words are still an editable layer or already baked into the image. If you have the original project file or a video with a soft subtitle track, you can delete the title layer or turn off the subtitle stream and export a clean master with zero pixel loss. Once text is burned into exported video pixels, the original background behind the letters is gone from the file. You then have to choose the least damaging workaround (cropping an outer edge, tracking a blur or solid cover, or rebuilding the background with content-aware fill or AI object removal) on footage you own or have permission to alter.
Check if text is editable or burned in
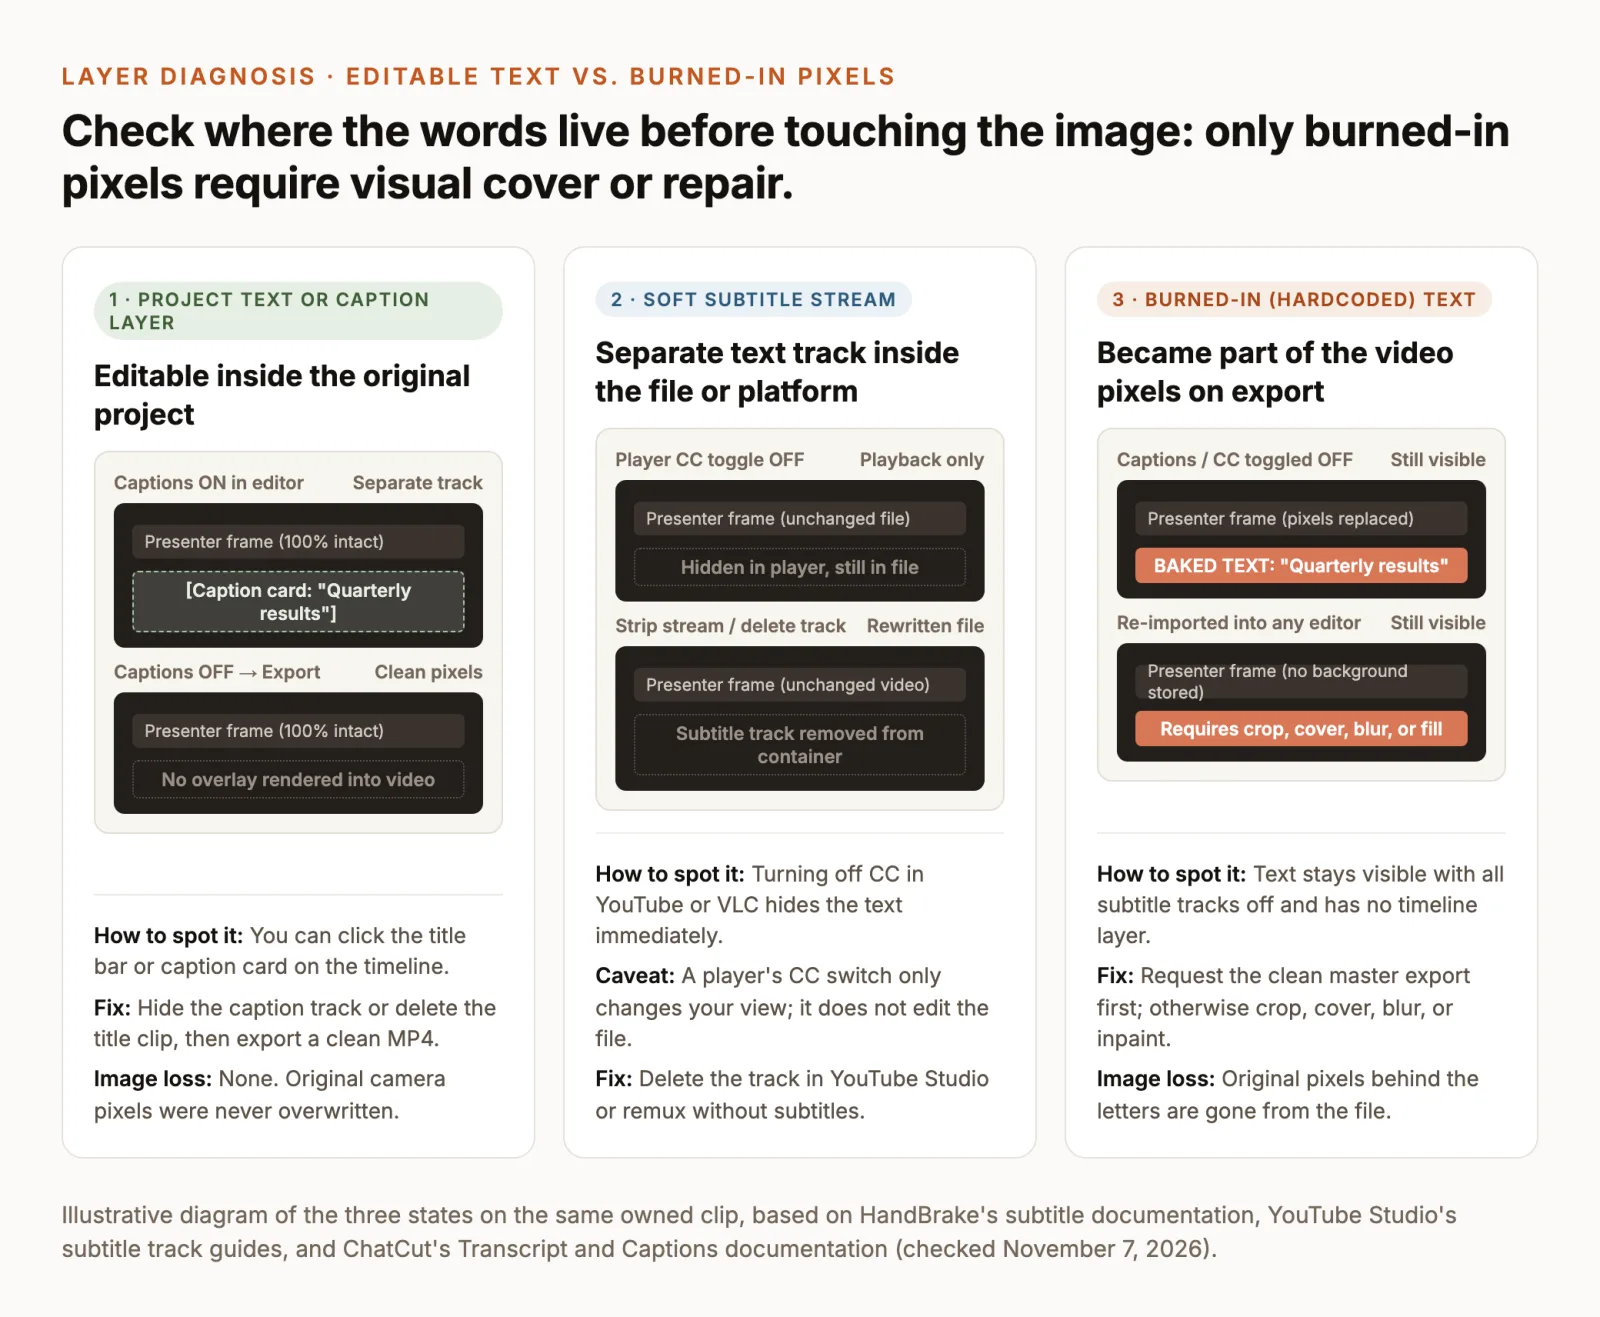
Before you apply a visual filter to remove text from video footage, verify where the letters actually live. Video editors, media containers, and streaming platforms store words in three distinct ways, and only one of them requires altering the picture.
Delete a live project layer
If you still have access to the timeline where the video was edited, open that project first. Titles, lower thirds, stickers, and auto-captions sit on their own track or clip lane above the camera footage.
- In Apple iMovie on Mac: open the project, select the title bar in the timeline, and press the Delete key (Apple iMovie title guide).
- In Descript: select the Captions layer on the timeline or in the layer list and toggle it off or delete it before exporting (Descript Captions documentation).
- In ChatCut: click the left side of the split Captions control in the playback bar to hide the caption track, or delete an individual caption card in Desktop 0.2.28 or later, then run Export → Video.
Deleting a project layer leaves the underlying camera frame untouched. If you are dealing with a stock preview watermark or a third-party brand mark, licensing the clean clip or asking the editor for an uncaptioned master export is always cleaner than attempting pixel repair.
Turn off or strip soft subtitles
When a finished MP4 or MKV file displays captions in a media player, those words may be stored as a separate text stream rather than painted onto the video frames. As HandBrake’s subtitle documentation explains, soft subtitles are saved as independent selectable tracks in the output container, whereas burned-in (hardburned) subtitles are written permanently on top of the image.
Test the file by playing it and toggling the subtitle or CC control off:
- On a YouTube video you manage: turning off the viewer CC button (YouTube subtitle settings help) only hides captions on your screen. To remove a soft subtitle track for everyone, sign in to YouTube Studio, select Subtitles from the left menu, click the video, and edit or delete the language track (YouTube Studio subtitle guide).
- On a local video file with soft subtitles: disabling subtitles in VLC or QuickTime does not rewrite the file on disk. To save a new copy of the file without the subtitle stream and without re-encoding the video image, remux the container using a tool such as MKVToolNix with the
-S(--no-subtitles) flag (MKVToolNixmkvmergemanual).
Spot burned-in pixels in the frame
If the words stay on screen when every subtitle track is disabled, and importing the MP4 into an editor shows only a single flattened video track, the text is burned in (also called hardcoded or open captions). When the file was exported, the encoder replaced the camera pixels behind every letter with the color of the font, stroke, or background box.
No manual or AI tool can look “under” burned-in text to retrieve the original recording, because that information is no longer in the file. Every method below works by cutting away the affected edge, covering the letters with new pixels, or estimating a replacement background from surrounding frames.
How to remove text in a video
When you must remove burned-in captions, timestamps, or your own outdated watermark text from an exported video, pick the method that damages the shot the least. We compared official vendor documentation across Apple iMovie, Final Cut Pro, Adobe Premiere Pro, Adobe After Effects, CapCut, Wondershare Filmora, and ChatCut on November 7, 2026; the steps in this guide are documentation-verified rather than a hands-on export benchmark.
| Method | Best text position | What happens to the picture |
|---|---|---|
| Delete layer or soft track | Any position (in project or container) | Preserves 100% of original camera pixels |
| Crop the frame edge | Top, bottom, or corner margin | Loses outer framing and effective resolution |
| Tracked blur or mosaic | Small labels, timestamps, moving plates | Softens or pixelates the area visibly |
| Opaque cover or freeze patch | Lower thirds or static-background text | Replaces the area with a graphic or still patch |
| Content-aware fill / AI | Small text over steady textures | Synthesizes new pixels; can shimmer on motion |
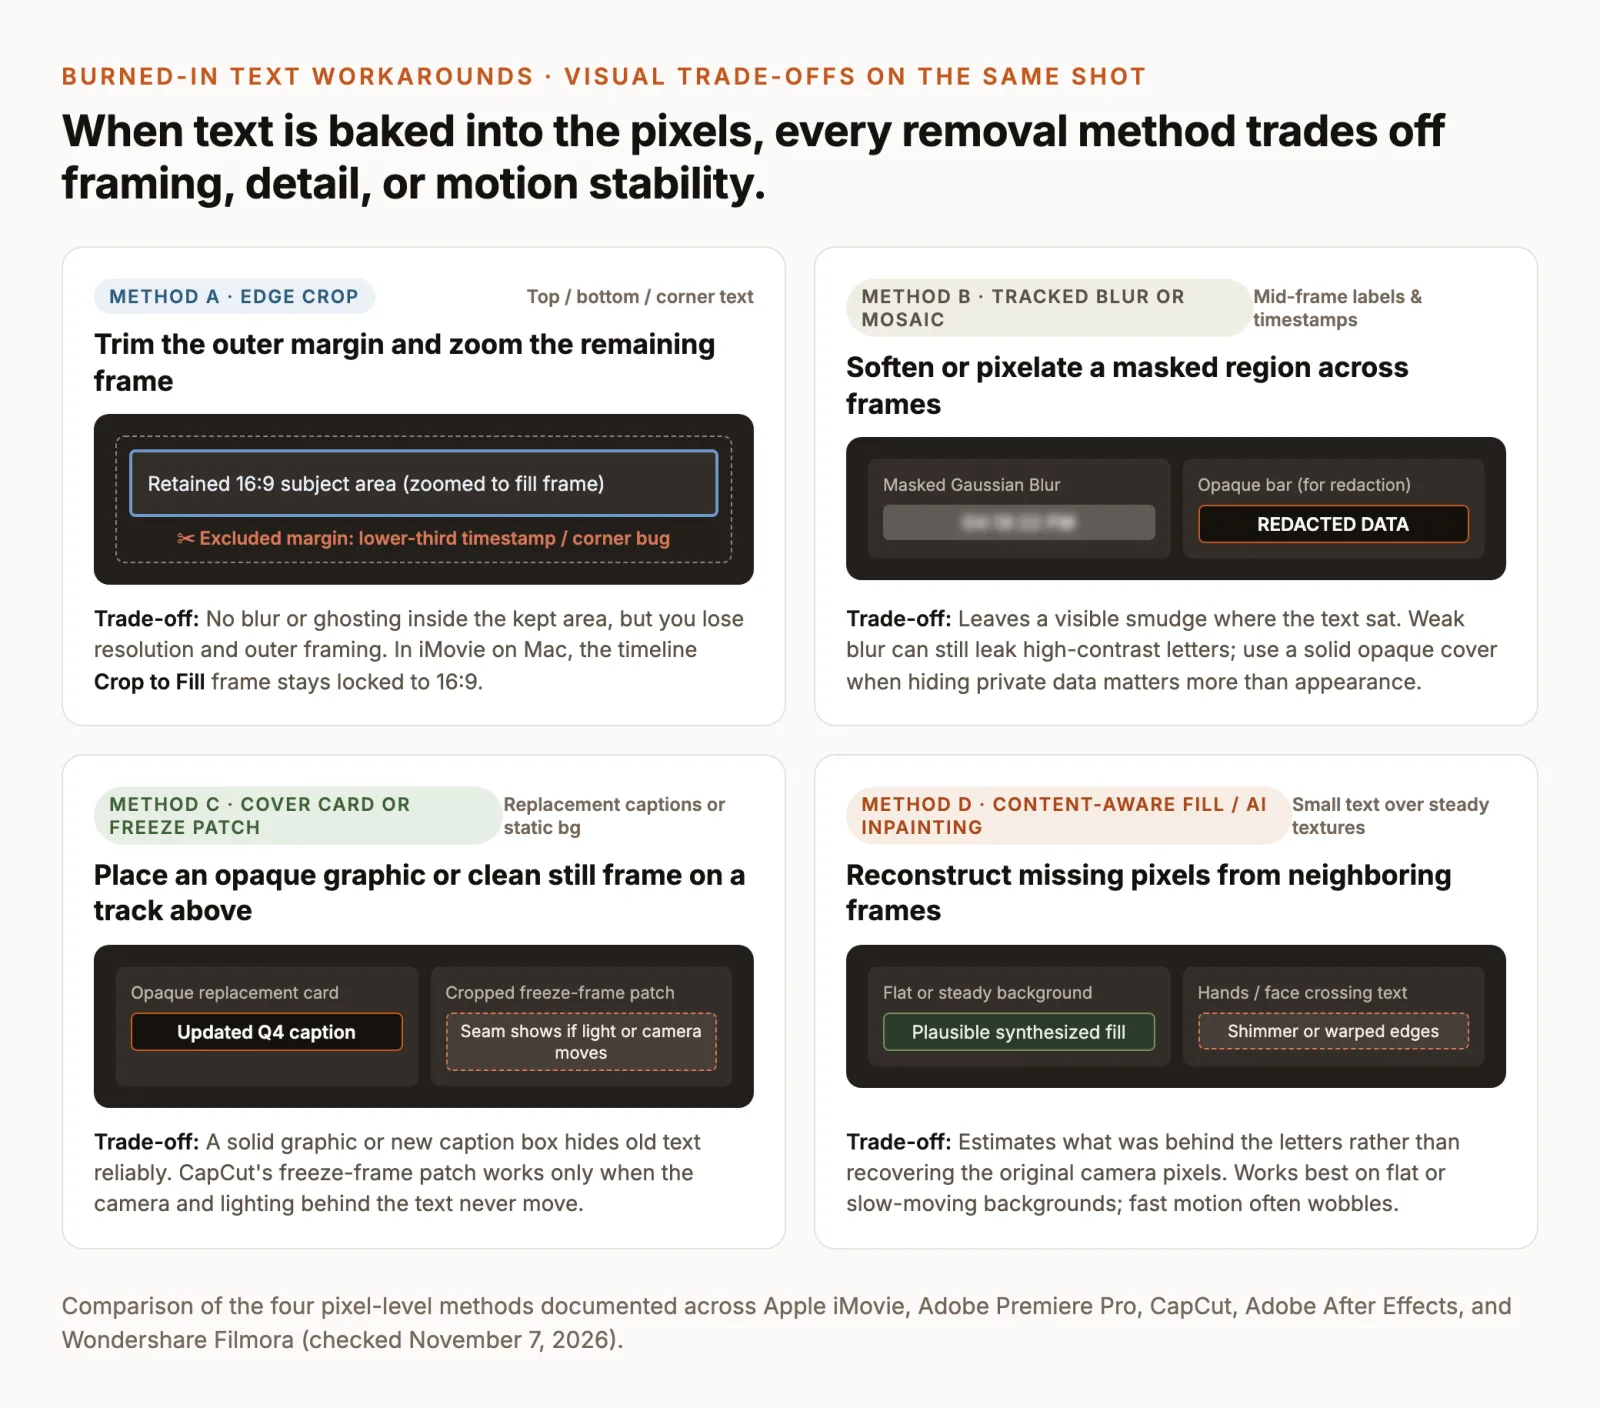
Use four criteria from your footage to narrow the choice:
- Position in the frame. Text sitting inside the top or bottom 10 to 15 percent of the image (such as a date stamp, corner bug, or letterbox subtitle) can often be cropped out cleanly. Text across the center of the frame or over a speaker’s chin cannot be cropped without ruining the composition.
- Camera and subject motion. If the camera is locked on a tripod and nothing passes behind the letters, a cropped freeze frame from a clean moment can patch the area. If the camera pans, lighting shifts, or a speaker waves a hand behind the subtitles, a static patch will leave an obvious floating rectangle.
- Background complexity. Flat walls, sky, gradients, and out-of-focus studio backdrops give content-aware fill and AI object removers clean neighboring pixels to sample. Detailed foliage, brick, plaids, or faces directly behind the letters frequently produce blurry smudges or frame-to-frame wobble.
- Purpose of removal. If you are going to place translated or updated subtitles in the same lower-third zone, covering the old text with an opaque caption background box is faster and cleaner than inpainting. If you are redacting private information such as an email address or account number, never rely on a light blur or AI fill; use a solid opaque cover.
Crop out text near an edge
Cropping is the only pixel workaround that never introduces blur, ghosting, or synthesized artifacts inside the remaining image. It works by trimming the outer margin where the text sits and scaling the rest of the frame to fill the canvas.
Before cropping, play the entire clip and watch the edges opposite the text: zooming in by 12 percent to cut off a bottom subtitle line also trims 12 percent from the top and sides when you keep the same aspect ratio. Check that the speaker’s forehead, hand gestures, and product details stay comfortably inside the new boundary, and start from a 4K file when possible so a 1080p export stays sharp.
Crop a clip in iMovie on Mac
Apple’s iMovie for Mac cropping guide documents the built-in timeline crop workflow:
- Open your project in iMovie on Mac and click the video clip in the timeline to select it.
- Click the Cropping button in the browser toolbar above the viewer to reveal the cropping controls.
- Click Crop to Fill. An adjustable frame appears on top of the clip in the viewer.
- Drag and resize the frame so the unwanted edge text sits outside the rectangle while your main subject stays inside. Note that in iMovie on Mac, this timeline crop frame is constrained to a 16:9 aspect ratio.
- Click the Apply button (the blue checkmark) in the cropping controls, then scrub through the clip to confirm the text never enters the cropped area.
Do not generalize those exact Mac toolbar labels to iMovie on iPhone or iPad, which uses a pinch-to-zoom viewer gesture instead. If you edit in Final Cut Pro on Mac, Apple’s Final Cut Pro crop documentation provides separate Trim, Crop, and Ken Burns modes in the viewer’s pop-up menu, allowing you to trim a single edge or reposition the crop rectangle with on-screen handles.
Blur, mosaic, or cover the text
When text sits too close to the middle of the frame to crop, concealing it in place is more predictable than trying to invent background pixels, especially on long recordings or moving shots.
Track a Gaussian Blur in Premiere Pro
Adobe Premiere Pro includes effect masks that can restrict a blur or mosaic effect to a specific rectangle and track that shape across frames. Because Adobe’s help pages block automated script checks, verify the exact panel labels for your version on the official Adobe Premiere Pro tracked mask blur tutorial and Adobe’s mask tracking reference:
- Select the video clip on your Premiere Pro timeline.
- Open Window → Effects, search for Gaussian Blur (or Mosaic), and drag the effect onto the clip.
- Open Effect Controls and find the Gaussian Blur section. Click the Create 4-Point Polygon Mask or Create Ellipse Mask icon directly under the effect’s name, not under the clip’s Opacity heading, which would cut a hole in the video instead of blurring it.
- Drag the mask handles in the Program Monitor so the shape covers the text with a small margin, and increase Blurriness until the characters break up.
- If the text or camera moves, keep the mask selected in Effect Controls and click the Track selected mask forward button (the play-right arrow next to Mask Path). Contrary to older tutorials that claim Premiere requires manual frame-by-frame keyframing for every mask, Adobe documents automatic forward and backward mask tracking; however, you still need to watch the tracked path and nudge the mask manually at scene cuts or when contrast drops.
On macOS in Final Cut Pro, the built-in Censor effect (Effects browser → Stylized → Censor) offers Pixelate, Blur, and Darken modes with an on-screen radius control that can be keyframed or matched to an object track (Apple Final Cut Pro Censor guide).
Place an opaque cover over the text
Blurring and pixelating have two practical drawbacks: they draw the viewer’s eye to a blurry smudge when nothing replaces the text, and a light blur or large mosaic block can leave high-contrast letters or numbers decipherable across multiple frames.
Use a solid opaque cover in two situations:
- When hiding confidential data. If a screen recording shows a real customer email, API key, billing address, or phone number, place a 100-percent opaque shape layer or black bar over the region rather than a gentle blur.
- When replacing old captions or lower thirds. If you are updating a localized video or fixing a misspelled speaker card, place a new lower-third graphic or a caption preset with an opaque background box directly over the burned-in words. Make the new background box wide and tall enough to cover the longest line of the old text, so old ascenders and descenders never peek out from behind the new words.
Use a CapCut freeze patch carefully
Many short-form tutorials recommend using a cropped still frame from the same video to hide text without a visible blur. CapCut’s guide to removing text in video outlines this workflow:
- Import the video into CapCut and drag it onto the timeline.
- Scrub the playhead to a clean frame in the same shot where the text has not appeared yet (or has already disappeared), and click the Freeze tool above the timeline.
- Drag the resulting freeze-frame clip onto a video track directly above the original footage, and trim its start and end times to match the duration of the unwanted text.
- Use Crop on the freeze-frame clip to isolate the clean background patch from that still frame, then position it over the burned-in letters in the preview window.
Treat this method as a static cover patch, not inpainting. It works only when the camera is completely locked off, the lighting does not flicker, and no person, hand, or shadow crosses the patched zone. The moment the background behind the text shifts in brightness or position, the frozen rectangle stands out as a stuck patch.
Rebuild backgrounds with content-aware fill or AI
When you cannot crop the frame and do not want a visible blur or cover card, content-aware fill and AI video object removers attempt to erase the letters and synthesize the missing background. These tools examine pixels around the mask and across earlier and later frames in the shot to estimate what was behind the text.
Set realistic expectations before running a long render: generative and optical-flow fills work well on small corner watermarks you own, static timestamps over a wall or sky, and brief titles where the background moves past the letters and reveals clean pixels a few frames later. They struggle with wide, multi-line subtitles burned across moving hands, patterned clothing, or rapid cuts, where the filled area can shimmer, smear, or warp.
Generate a fill layer in After Effects
Adobe After Effects provides Content-Aware Fill for removing unwanted objects and text overlays from video compositions. Check the official Adobe After Effects Content-Aware Fill documentation for full parameters and version notes:
- Import the clip into an After Effects composition and draw a mask around the text using the Pen or Rectangle tool.
- In the timeline’s Masks properties for that layer, change the mask mode from Add to Subtract so the masked text area becomes a transparent hole.
- If the text moves, or if you want a tighter mask around changing subtitle lines, keyframe the Mask Path or right-click the mask and choose Track Mask so the hole stays over the letters on every frame.
- Open Window → Content-Aware Fill to display the panel.
- Choose a Fill Method:
- Object when removing an element that moves independently of the background.
- Surface for flat, perspective-consistent surfaces (such as a poster, screen, or wall where a label sits).
- Edge Blend for static, low-texture areas such as sky or a smooth backdrop, which renders fastest.
- Set Range to Work Area (to test a short section first) or Entire Duration, then click Generate Fill Layer. After Effects analyzes the frames and places a rendered PNG sequence on a new layer above your clip. If the automatic fill struggles on a tricky shot, you can click Create Reference Frame to clean up a key frame in Photoshop and guide the remaining frames.
Brush over text in Wondershare Filmora
If you want a brush-based desktop workflow without building a subtracting mask in After Effects, Wondershare’s Filmora AI Object Remover guide documents a three-step process:
- Import the video into Filmora, drag it onto the timeline, select the clip, and click AI Object Remover in the timeline toolbar.
- Adjust the Smart Brush size and paint over the burned-in text or object in the preview window. Use the Eraser tool if you accidentally brush over a nearby face or subject edge.
- Click Remove to run the automatic content fill, preview the cleaned clip on the timeline before exporting, and click Export when satisfied.
Wondershare’s support guide notes that AI Object Remover requires a stable internet connection and does not specify current plan pricing or free-tier credit allowances on that page, so check Filmora’s pricing page and export preview before processing a long project. If your edit is already in DaVinci Resolve, the paid DaVinci Resolve Studio also includes Object Removal and Patch Replacer effects in its Resolve FX Revival category.
What ChatCut can and cannot do
If you are evaluating ChatCut for text removal, start with an explicit boundary: ChatCut’s documentation doesn’t describe a tool that paints text out of video, and its AI Effects docs don’t list a dedicated blur or mosaic text-removal option. While ChatCut Desktop 0.3.13+ includes a Linear Mask and Desktop 0.4.21+ allows dragging local-mosaic and mask geometry in the Viewer, do not choose ChatCut expecting an AI eraser that reconstructs missing camera pixels behind burned-in subtitles.
Where ChatCut does help is in preventing burned-in mistakes on your own projects, hiding or deleting individual editable captions without cutting your footage, covering old text with an imported graphic, and adding clean replacement captions after cleanup.
Hide captions or delete a single caption card without cutting speech
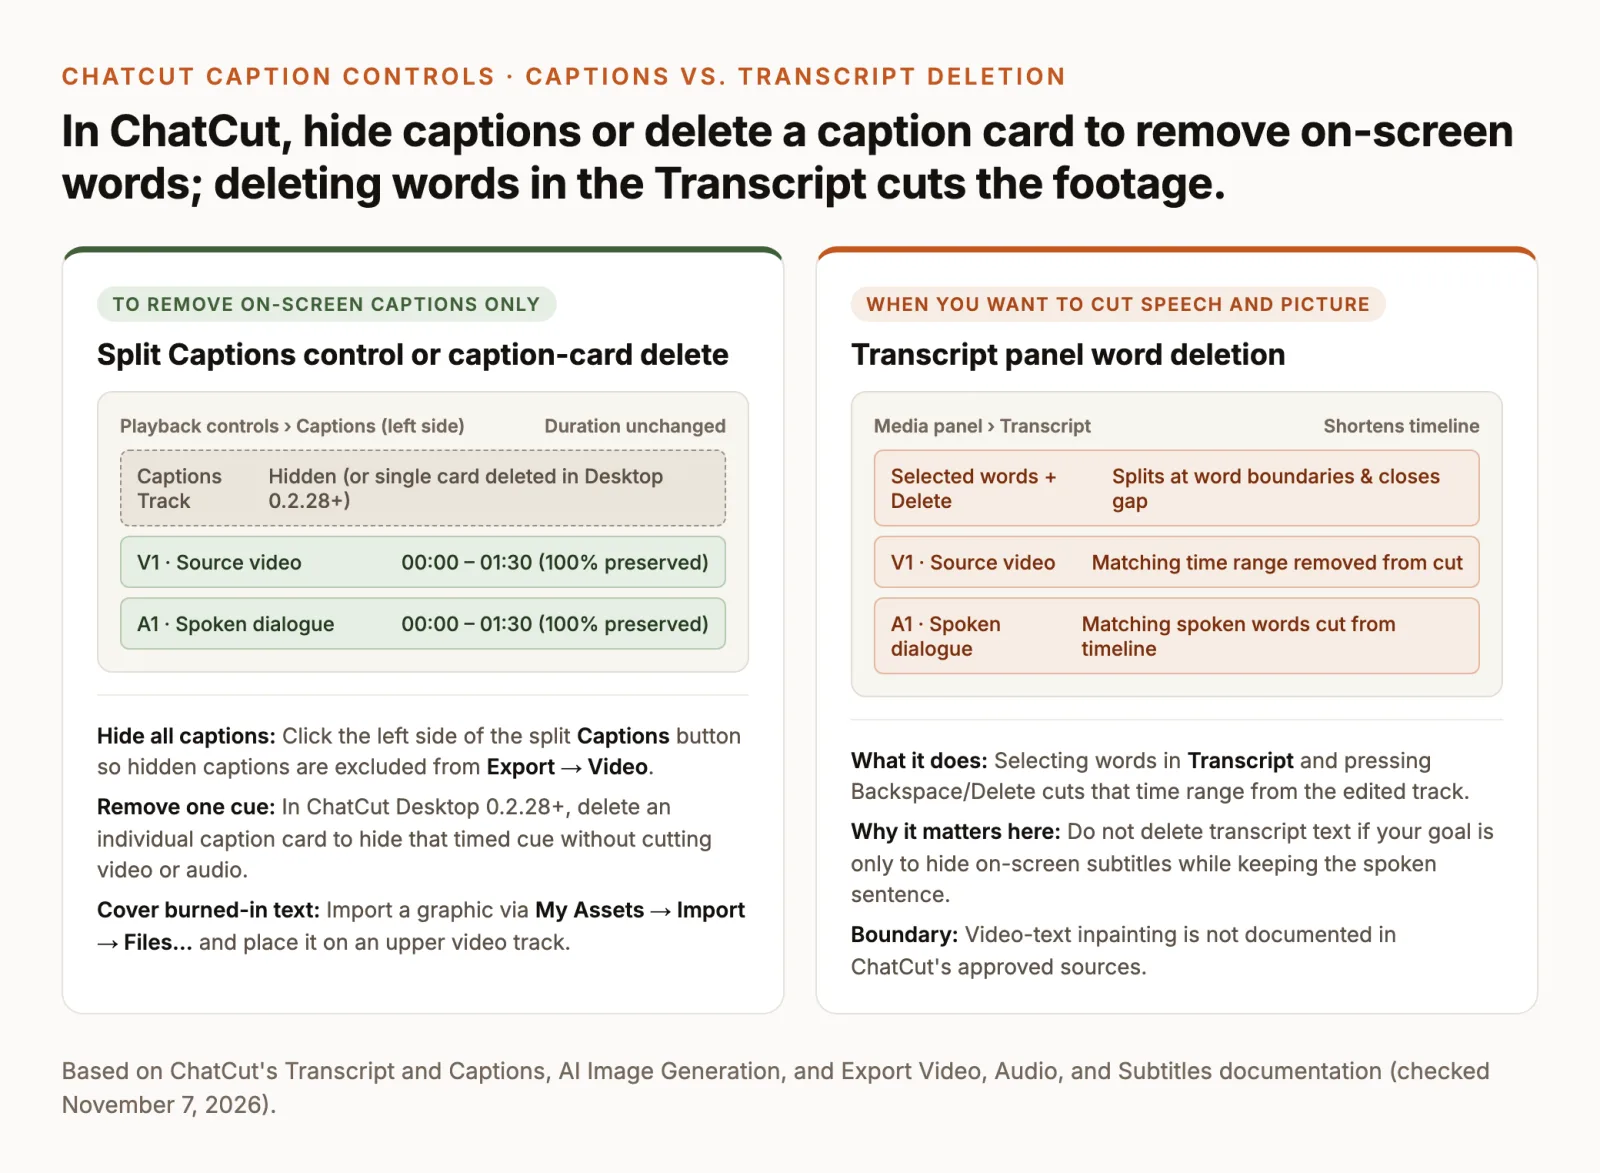
In ChatCut, the Transcript panel and the Captions controls do two different jobs, as documented in the Transcript and Captions guide:
- Don’t delete words in the Transcript panel if you only want to hide on-screen text. The Transcript panel is a text-based video editing surface: selecting words there and pressing Backspace or Delete splits the clip at the word boundaries, removes that time range of video and audio, and closes the gap on the timeline.
- Hide the entire caption track: In the playback controls under the Viewer, click the left side of the split Captions button to hide captions. Video export renders only active, visible captions into the picture; hidden captions or the None preset are omitted from the exported MP4 or WebM file.
- Delete one caption card only: In ChatCut Desktop 0.2.28 or later, open the active caption track’s Content panel and use the delete action on an individual caption card. That action hides that single timed cue from the caption program without cutting any source video or audio.
- Fix a typo without cutting media: On Web and in Desktop 0.2.25 or later, use the Content panel’s search-and-replace or card editing controls (or Edit text in the selection menu) to correct spelling while keeping the cut intact.
If you prefer directing the timeline through the Agent in ChatCut (or through Claude Code or Codex connected to ChatCut), test this prompt on your project and verify in the Viewer that the running time has not changed before exporting:
Cover burned-in text with an imported graphic and add replacement captions
When you bring an already-exported clip into ChatCut and need to cover a burned-in lower third or outdated label, you can layer an existing cover image (such as a brand bar, solid lower-third card, or slide graphic) on a video track above the footage:
- Choose My Assets → Import → Files… and select your prepared PNG or JPG cover graphic.
- Drag the image from My Assets onto a video track above your main footage clip on the timeline.
- Select the image item on the timeline and adjust its position, scale, crop, and duration in the Inspector or canvas controls so it sits cleanly over the old text for the exact time range required, then play through the cut in the Viewer to confirm the stacking order.
If you are replacing old captions across a spoken clip, you can also apply a new readable caption style on top. Check out the Add captions Skill to preview styled presets on your dialogue before applying one, or see our step-by-step subtitle guide and video editing prompts collection for caption formatting and translation prompts:
Which ChatCut steps cost nothing
On ChatCut’s Free plan, the core editor (uploading media, manual timeline editing, transcription, hiding or editing standard captions, and placing an imported cover image) never uses ChatCut credits. Exporting MP4 or WebM video, MP3 audio, and SRT or TXT subtitles also uses no credits: Free accounts share a cumulative 60-minute web and cloud export quota, while ChatCut Desktop (for macOS 13+ on Apple silicon or Intel and Windows 10+ x64) renders video locally on your computer at up to 4K. When you run edits through Claude Code or Codex using the ChatCut plugin or local MCP, the agent’s editing work is covered by your existing Claude or ChatGPT subscription rather than ChatCut credits; ChatCut credits are used only when you message the built-in ChatCut Agent or call a ChatCut-hosted generation service.
Check the exported clip before publishing
Every text-removal workaround can look acceptable on a single paused frame in the editor while failing in motion. Before rendering a long timeline, set an in-and-out range around the most difficult five to ten seconds, including a scene cut and a moment where the speaker moves, export that sample, and inspect the actual output file:
- First and last frames of the text cue. Animated titles and auto-captions often pop or fade in a frame earlier than expected. Step frame by frame across the entry and exit points to make sure a single unmasked frame of text does not flash on screen.
- Scene cuts and camera transitions. A tracked mask or freeze-frame patch that crosses a hard cut will smear or float onto the incoming shot. Split the mask or cover clip cleanly at every cut point.
- Moving edges, hands, and faces. Watch what happens when a hand gestures across the lower third or the camera pans past a textured background. If content-aware fill shimmers or a freeze patch shows a hard rectangular seam, switch to a clean edge crop or an intentional opaque lower-third card.
- Complete illegibility for private data. If you blurred a name, email, or account number for privacy, pause on several frames and view the clip on both a large monitor and a phone screen. If any character shape remains guessable, replace the blur with a solid opaque box.
- Framing, resolution, audio sync, and duration. Confirm that an edge crop did not clip top-of-frame titles or headroom, and verify that hiding or editing captions did not accidentally trim spoken words or shift audio sync.