To edit a podcast in Audacity 4.0.2, work in a fixed order so you never redo timing or level changes: import each speaker and music file onto its own track, save an .aup4 project, cut mistakes across all tracks together (Ctrl + DEL), reduce steady background noise per microphone, shape music fades with the clip gain tool, normalize loudness to around −16 LUFS with a −1 dB peak ceiling, and export an MP3 or AAC file alongside a WAV archive. You need your raw audio files, headphones, and Audacity on Windows, macOS, or Linux. Editing a video podcast too? Open Speech Cleanup to start refining the spoken edit in ChatCut.
Import recordings and save your project
Before you cut a single word, copy your raw recordings into a backup folder and work only from your project copies. Audacity is free, open-source software licensed under the GPL (Audacity FAQ), and many online guides still show older Audacity 2 or 3 controls such as the legacy Time Shift tool, the Sync-Lock toggle, or manual LAME MP3 setup. Every menu path and shortcut below follows Audacity 4.0.2 and its Audacity 3 to 4 transition guide, checked November 7, 2026.
Bring all of your episode recordings into a single open project window rather than opening each file separately:
- Create a new project. Press
Ctrl + N(Cmd + Non macOS) to open an empty project window (File menu reference). - Import each speaker onto a separate track. Drag your host, guest, and music files into the timeline, or select File → Import (
Ctrl + Shift + I). Unlike File → Open, which starts a new project window when one is already open, Import places each file onto its own horizontal track in the current project (Basic audio editing). In Audacity 4, File → Import also extracts the audio stream from most video files; formats such as M4A and WMA require the optional FFmpeg import/export library from the official download page. - Verify track layout and channels. Keep the host on Track 1, the guest on Track 2, and intro or outro music on Track 3. If an in-person recorder captured two microphones into one stereo file with Host on the left channel and Guest on the right, split that stereo track into two mono tracks first so each voice sits centered and can be leveled on its own.
- Save the editable project. Press
Ctrl + S(File → Save) and choose Save to computer (Save your project). Audacity 4 writes an.aup4project file on your drive and also opens.aup3projects made in Audacity 3. Choosing Save to cloud stores the project onaudio.cominstead.
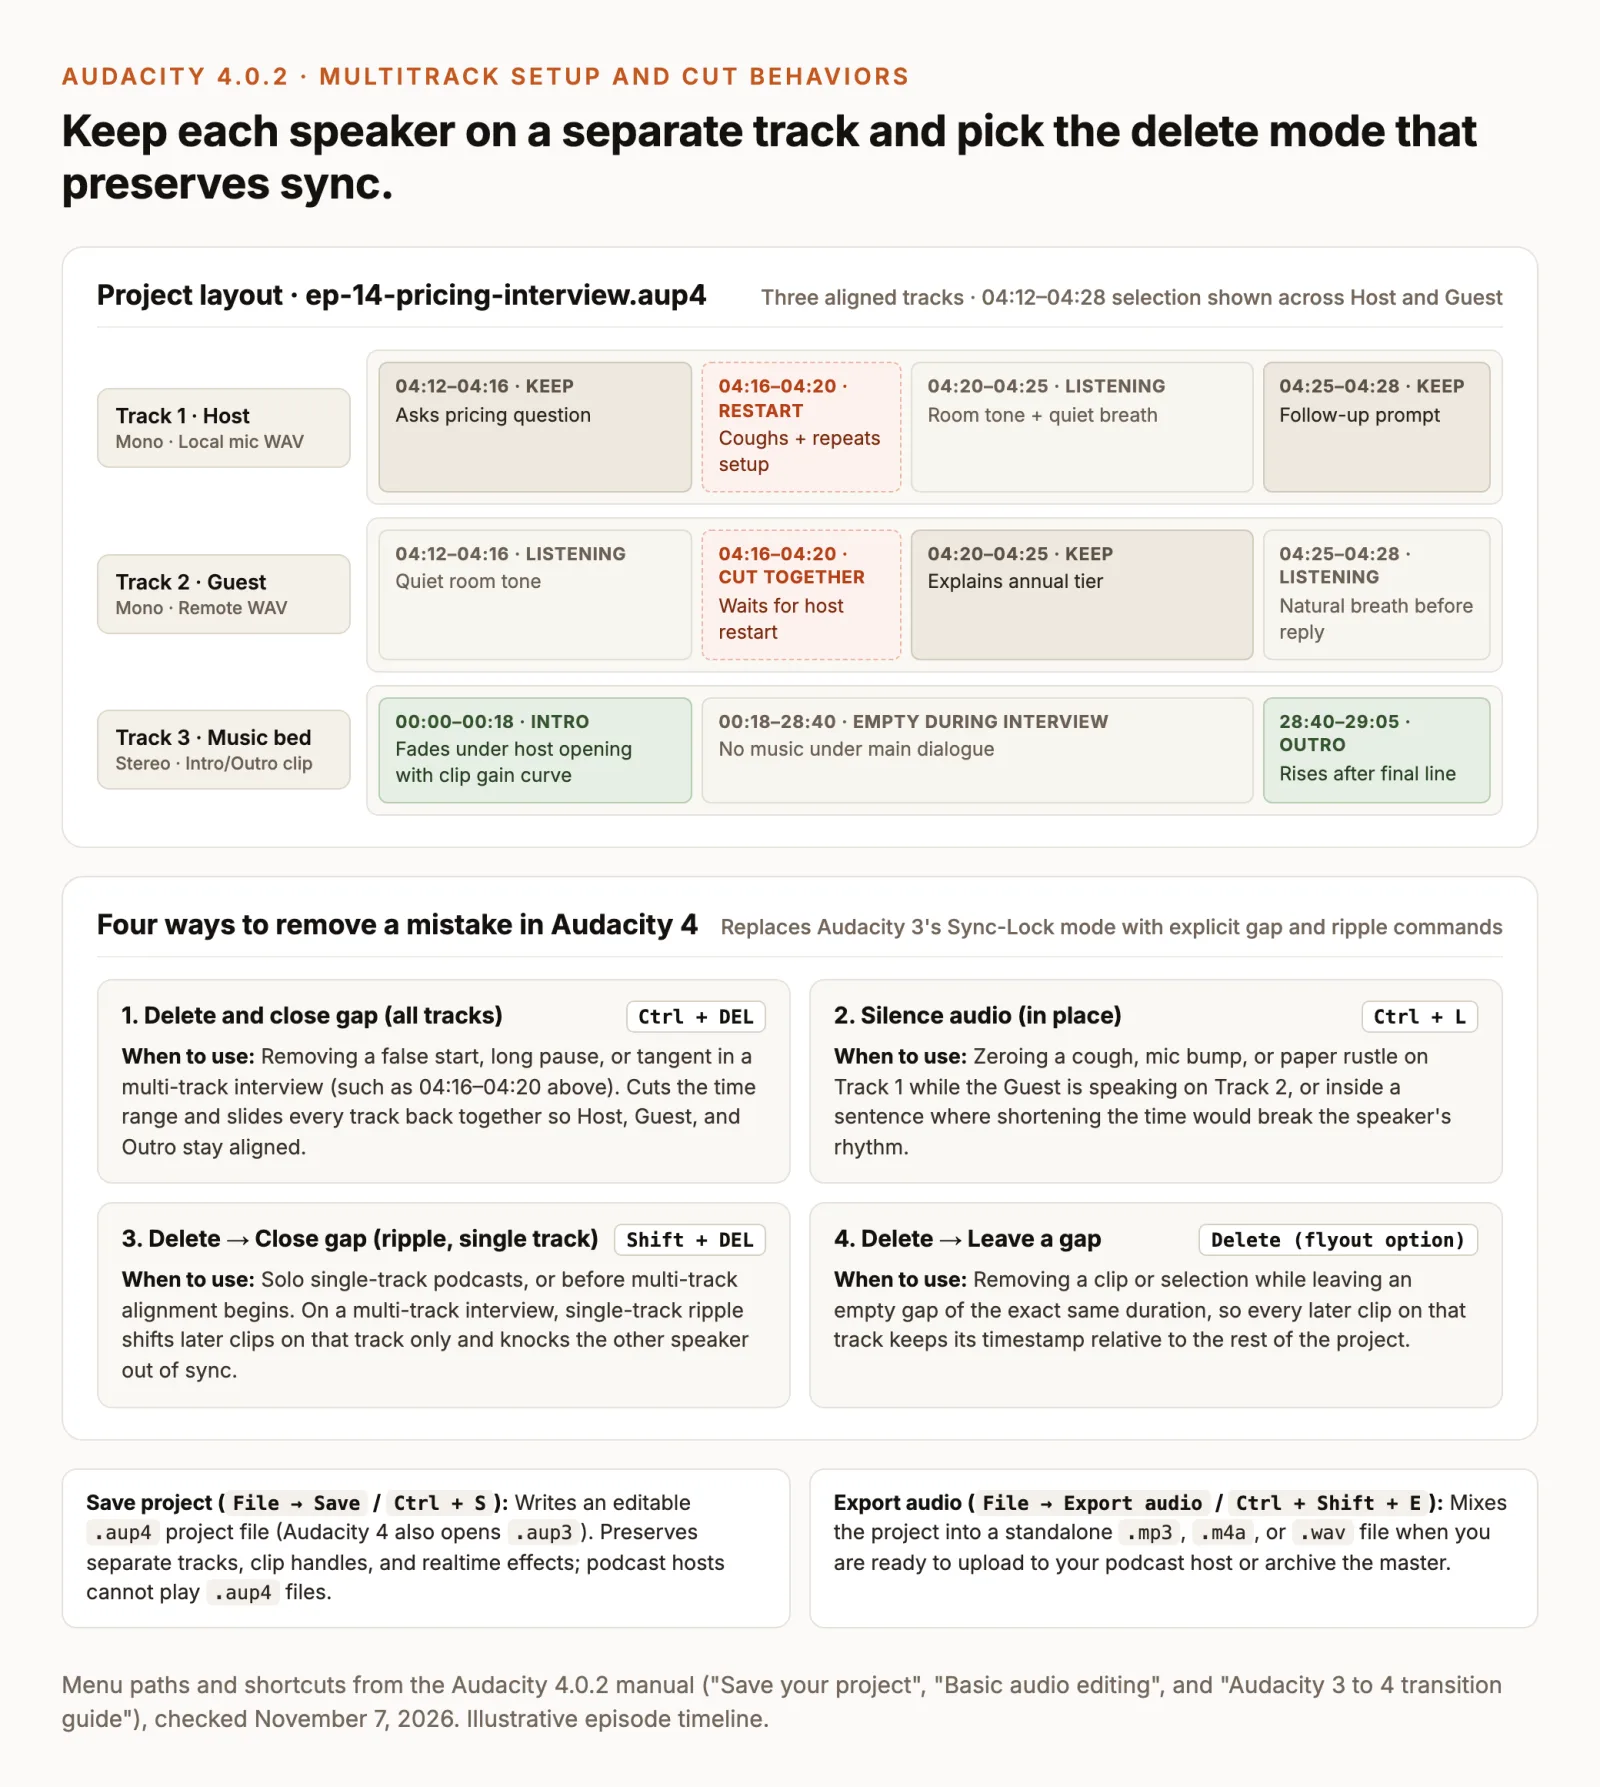
Keep the distinction between Save and Export clear throughout the edit. Saving (Ctrl + S) updates your .aup4 project file, which preserves your separate tracks, clip trim handles, realtime effects, and undo history, and can only be opened by Audacity. Exporting (Ctrl + Shift + E) mixes your tracks into a standalone .mp3, .m4a, or .wav audio file for your podcast host when the episode is finished.
Cut mistakes while keeping natural speech
Make your structural and word-level cuts before applying destructive noise reduction or loudness normalization, or keep your effects inside Audacity 4’s realtime track stack. That way you do not waste time processing retakes and dead air that will be deleted, and you can wait to place mid-roll music stings until the spoken timing is final.
Select and audition before deleting
In Audacity 4, every recorded or imported file lives inside a clip with its own header bar (Basic audio editing). Clicking a clip header selects the whole clip and reveals two pairs of edge handles: the top pair trims the clip, and the lower clock-icon pair changes its speed. Dragging inside the waveform body instead creates a time range selection across the audio data.
Use this four-step habit so you never clip the start of a word:
- Zoom in around the edit point. Hold
Ctrland scroll the mouse wheel to zoom around your pointer until the gap before and after the phrase is clear. A tall, thin spike standing alone is usually a mouth click, mic bump, or cough; a dense shape is a word; a low rounded wave right before a sentence is an inhale. - Highlight the mistake across aligned tracks. Click inside the waveform and drag left or right over the false start, repeated line, or long pause. In a multi-track interview, drag downward across the other speaker’s track as well so the exact same time span is selected on both tracks.
- Check the Snap toggle if the cursor jumps. When Snap is ticked in the top toolbar, selections jump to the chosen time grid (such as whole seconds). Untick Snap whenever you need fine syllable-level placement (Basic audio editing).
- Press Play before cutting. Playback follows the selection, letting you hear the exact stretch you are about to remove. Then click a second before the selection and play across the boundary after deleting to confirm the next word still starts cleanly.
Choose leave-gap, ripple, or silence
Audacity 4 retired the old F1–F6 tool modes and the Sync-Lock button (Audacity 3 to 4 transition guide). The first time you press Delete, a flyout asks whether you want Delete to leave a gap or close the gap (changeable anytime under Preferences → Editing), while dedicated keyboard shortcuts handle multi-track sync:
- Delete and close gap across all tracks (
Ctrl + DEL). Removes the selected time range and slides every track back together (Audacity 3 to 4 transition guide). UseCtrl + DELwhenever you cut a stumble, tangent, or long pause out of a multi-track podcast so Host, Guest, and outro music stay aligned. - Close gap / ripple on a single track (
Shift + DEL, orDeletewhen set to Close gap). Closes the gap on the active track only and shifts later audio on that track earlier. Use this for a solo single-mic show. Avoid single-track ripple on an aligned two-person interview, where shifting one track knocks every later reply out of sync. - Leave a gap (
Deletewhen set to Leave a gap). Replaces the deleted selection with silence of the exact same duration so downstream clips keep their timestamps (Basic audio editing). - Silence audio in place (
Ctrl + L). Empties the selected waveform without shortening it or splitting the clip. UseCtrl + Lwhenever the host coughs, laughs into their mic, or turns a page on Track 1 while the guest is speaking on Track 2, or inside a sentence where removing time would break the speaker’s rhythm. - Trim clip (
Ctrl + T) and Split (SorCtrl + I). PressingCtrl + Tkeeps the selection and discards everything outside it, which strips pre-show chatter off both ends of a take in one move. PressingSturns on the scissors Split tool so clicking cuts a clip in two, or pressCtrl + Ito split at the cursor or at both edges of a selection.
Leave natural breaths and thinking pauses in the conversation. As the Audacity manual advises, cutting every pause makes speech sound unnatural and rushed. Remove stumbles, throat clearing, and unmotivated dead air, but keep the inhale before a new thought and the beat after an important point. Press Ctrl + Z (Undo) whenever a cut feels abrupt; Audacity remembers your entire open session.
Reduce steady background noise in Audacity
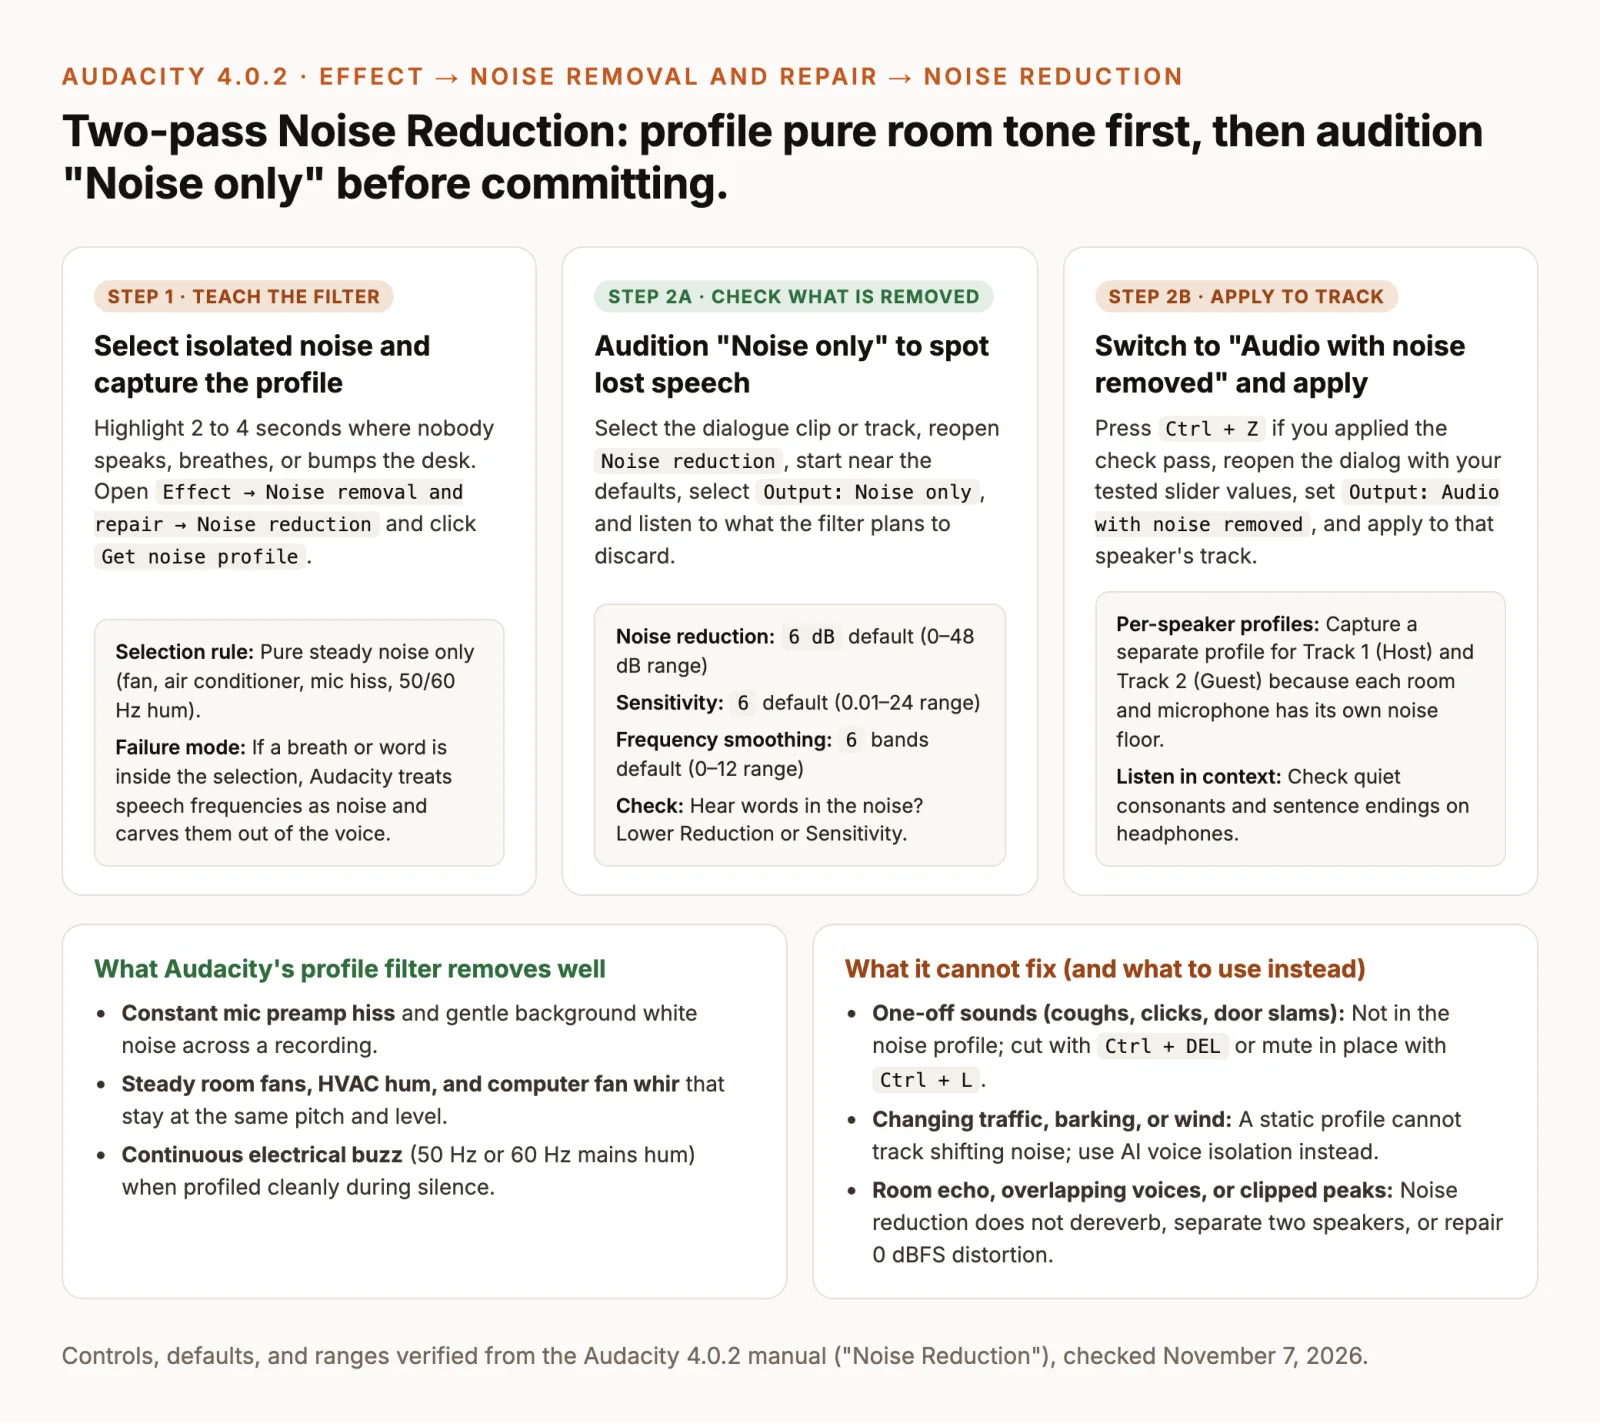
After the spoken edit is locked, clean steady room noise on each voice track. Audacity’s Noise Reduction (Effect → Noise removal and repair → Noise reduction) works in two passes: first you teach it the frequency profile of isolated background noise, and then you filter that profile out of the speech (Noise Reduction manual).
Capture a clean noise profile
In a multi-person podcast, capture a separate noise profile for each microphone track. The host’s room and the guest’s room have different background spectra, so reusing Track 1’s profile on Track 2 will miss the guest’s room tone or dull their voice.
- Select 2 to 4 seconds of isolated noise. Zoom in on a quiet gap on that speaker’s track where only steady room tone, mic hiss, fan whir, or hum is present.
- Play the selection on headphones. Confirm there is no breath, lip smack, chair creak, or distant word inside the highlight. As the Audacity Noise Reduction guide explains, any wanted audio included in the profile is treated as noise too and carved out of the voice during filtering.
- Click
Get noise profile. Open Effect → Noise removal and repair → Noise reduction and press Get noise profile under Step 1. Audacity analyses the selection, stores the profile in memory, and closes the dialog.
Audition removed noise before applying
Apply the filter conservatively so the speaker’s voice stays full rather than hollow or watery:
- Select the speaker’s track. Double-click an empty space on that track (or click the clip header) to select all of that speaker’s audio.
- Reopen
Effect → Noise removal and repair → Noise reduction. Start near Audacity 4’s documented defaults (Noise Reduction manual):- Noise reduction (
6 dBdefault, range0to48 dB): Sets how many decibels the detected noise is lowered. Between6and12 dBusually suppresses steady hiss or fan hum without creating metallic artifacts. - Sensitivity (
6default, range0.01to24): Sets how readily a sound is classified as noise rather than signal. Pushing Sensitivity too high makes the filter eat into quiet consonants and sentence endings. - Frequency smoothing (
6bands default, range0to12bands): Spreads attenuation across neighboring frequency bands so reduced noise sounds smooth rather than warbly.
- Noise reduction (
- Check
Output: Noise onlyfirst. Select Noise only under Output and preview or apply it to a short sentence. Listen to what is about to be discarded: if you hear recognizable words orsandttransients mixed in with the hiss, lower Noise reduction or Sensitivity. - Apply
Audio with noise removed. PressCtrl + Zif you applied theNoise onlycheck to the track, reopen Noise reduction, switch Output to Audio with noise removed, and apply.
Respect what a static noise profile can and cannot do. Audacity’s filter handles constant background noise such as preamp hiss, air conditioning, computer fans, and steady 50/60 Hz mains hum. It cannot remove one-off sounds like a cough or door slam (use Ctrl + L or Ctrl + DEL), shifting street traffic or wind, room echo from hard walls, two people speaking at once, or distortion from clipping at 0 dBFS. If you are cleaning noisy video recordings or variable background sound where an AI voice isolator outperforms a static profile, see our walkthrough on how to remove background noise from video.
Add intro and outro music
Place your intro and outro music on a dedicated stereo track below the dialogue tracks and shape the volume transitions with Audacity 4’s clip gain curve:
- Import the music track. Press
Ctrl + Shift + I(File → Import) and select your licensed music file. Audacity places it on a new stereo track at the bottom of the project. - Slide music clips by their header bar. Drag the clip’s top header strip left or right to position your intro and outro (Basic audio editing). Dragging inside the waveform body makes a time selection instead of moving the clip. Avoid dropping one clip onto another clip on the same track unless you mean to replace it, because overlapping clips in Audacity 4 overwrite the audio underneath.
- Draw the voiceover dip with the clip gain tool. Audacity 4 replaced the old
F2Envelope mode with a visual automation layer toggled by the clip gain tool (Automation button in the top toolbar). Switch it on, click the gain line on the music clip just before the host starts speaking to anchor full volume, click a second point a moment later and drag it down so the music dips cleanly under the voice, and add a final point at the end of the intro to fade down to zero (Basic audio editing). The waveform inside the clip shrinks as you drag so you can see the level drop directly. - Turn the clip gain tool off. Click the toolbar button again when done so normal clicks select clips and time ranges again.
Keep any fade on a voice clip under one second at the start and end of an episode; long fades on speech sound accidental. Save multi-second fades for music, and test every music-under-voice transition on both headphones and a phone speaker to confirm the music bed does not mask quiet words.
Balance voices when editing a podcast in Audacity
When editing a podcast in Audacity, two level mismatches stand out right away: one speaker sitting several decibels quieter than the other, and an exported file that plays much quieter than other shows in a podcast app. Fix the first issue per track with compression, and fix the second with perceived loudness normalization (LUFS) and a limiter.
Even out dynamics with compression
Audacity 4 provides two ways to run audio effects (Apply your first effect):
- Destructive effects (
Effectmenu): Select audio on the timeline and run the effect to rewrite the waveform immediately. You can step back with Undo (Ctrl + Z) while the project is open, but closing the project makes the change permanent. - Non-destructive realtime effects (
Effectsbutton on the track header, or pressE): Opens the left-hand realtime effects stack for the selected track. Effects added here are calculated live during playback without rewriting your audio on disk, so you can reopen an effect’s knobs, toggle its power button to compare before and after, or add a master effect in the Master effects section at the bottom of the panel at any time.
When a host or guest alternates between quiet explanations and loud laughs, add the Compressor (Effect → Volume and compression → Compressor, or via the track’s realtime Effects button). It attenuates signals that cross a threshold and lets you bring the overall track up with make-up gain (Compressor manual):
- Threshold (
−12 dBdefault, range−60to0 dB): Set so normal speech sits near the threshold while louder bursts cross above it. - Ratio (
4default, range1to100): At4, 4 dB above the threshold becomes 1 dB out. A modest ratio between2and4steadies spoken voices without making breaths pump. - Knee width (
6 dBdefault, range0to30 dB): Controls how gradually compression engages around the threshold. - Make-up gain (
9 dBdefault, range−30to30 dB): Raises the compressed signal so both speakers sit at a matched level. - Attack, Release, and Lookahead: Defaults are
3 msattack (0–200 ms),100 msrelease (0–1000 ms), and3 mslookahead (0–100 ms).
Avoid applying rigid preset EQ boosts across every voice. Unless a track has low-frequency mic-stand rumble or sharp sibilance that you can hear on headphones, heavy EQ curves often amplify room resonance and mouth clicks.
Set LUFS loudness and true-peak ceiling
Once the voices sit evenly together, set the episode’s final delivery level. Distinguish Audacity’s two normalization effects before you run either one:
- Peak
Normalize(Effect → Volume and compression → Normalize): Scales the audio so the single highest peak lands on your target level (−1 dBdefault, with Remove DC offset enabled by default to center the waveform on0.0) (Normalize manual). Because it only looks at the tallest spike, a single loud laugh preventsNormalizefrom raising the rest of the conversation. Loudness Normalization(Effect → Volume and compression → Loudness Normalization): Measures how loud the selection actually sounds (Perceived loudness inLUFS, or averageRMSin dB) and applies one gain change to reach your target (Loudness Normalisation manual).
Use Loudness Normalization followed by Limiter so your episode hits standard podcast loudness without clipping:
- Set
Perceived loudnessto your target LUFS. Audacity 4’sNormalize loudnessdialog defaults to−23 LUFS(the EBU R 128 broadcast standard). For podcast distribution, Apple Podcasts’ audio requirements recommend preconditioning audio to around−16 dB LKFSwith a±1 dBtolerance (LKFS and LUFS are identical units under ITU-R BS.1770-5). - Leave
Treat mono as dual mono (recommended)ticked. This option is enabled by default in Audacity 4’s perceived loudness mode (Loudness Normalisation manual). It measures a mono track as if the same signal were playing out of both left and right speakers, matching how listeners hear mono files on headphones. Older tutorials sometimes recommend−19 LUFSfor mono and−16 LUFSfor stereo; that 3 LU gap only applies to meters that do not treat mono as dual mono. With Treat mono as dual mono on, use−16 LUFSfor both mono and stereo shows, and leave Normalize stereo channels independently off. - Catch peaks with the
Limiterat−1 dB. Boosting a conversation to−16 LUFSoften pushes brief vocal peaks past0 dBFS. Run Limiter (Effect → Volume and compression → Limiter, or place it in the Master effects stack) using Audacity 4’s default Output ceiling of−1 dB(default Threshold−6 dB, Knee width2 dB, Lookahead1 ms, Release20 ms) (Limiter manual). Apple Podcasts recommends a true-peak ceiling of≤ −1 dBFSbefore encoding because MP3 and AAC compression can introduce inter-sample peaks slightly above the uncompressed sample peak (Apple Podcasts audio requirements).
Export podcast audio settings in Audacity
Save your .aup4 project (Ctrl + S), then open File → Export audio (Ctrl + Shift + E) to render your delivery file (Export your audio).
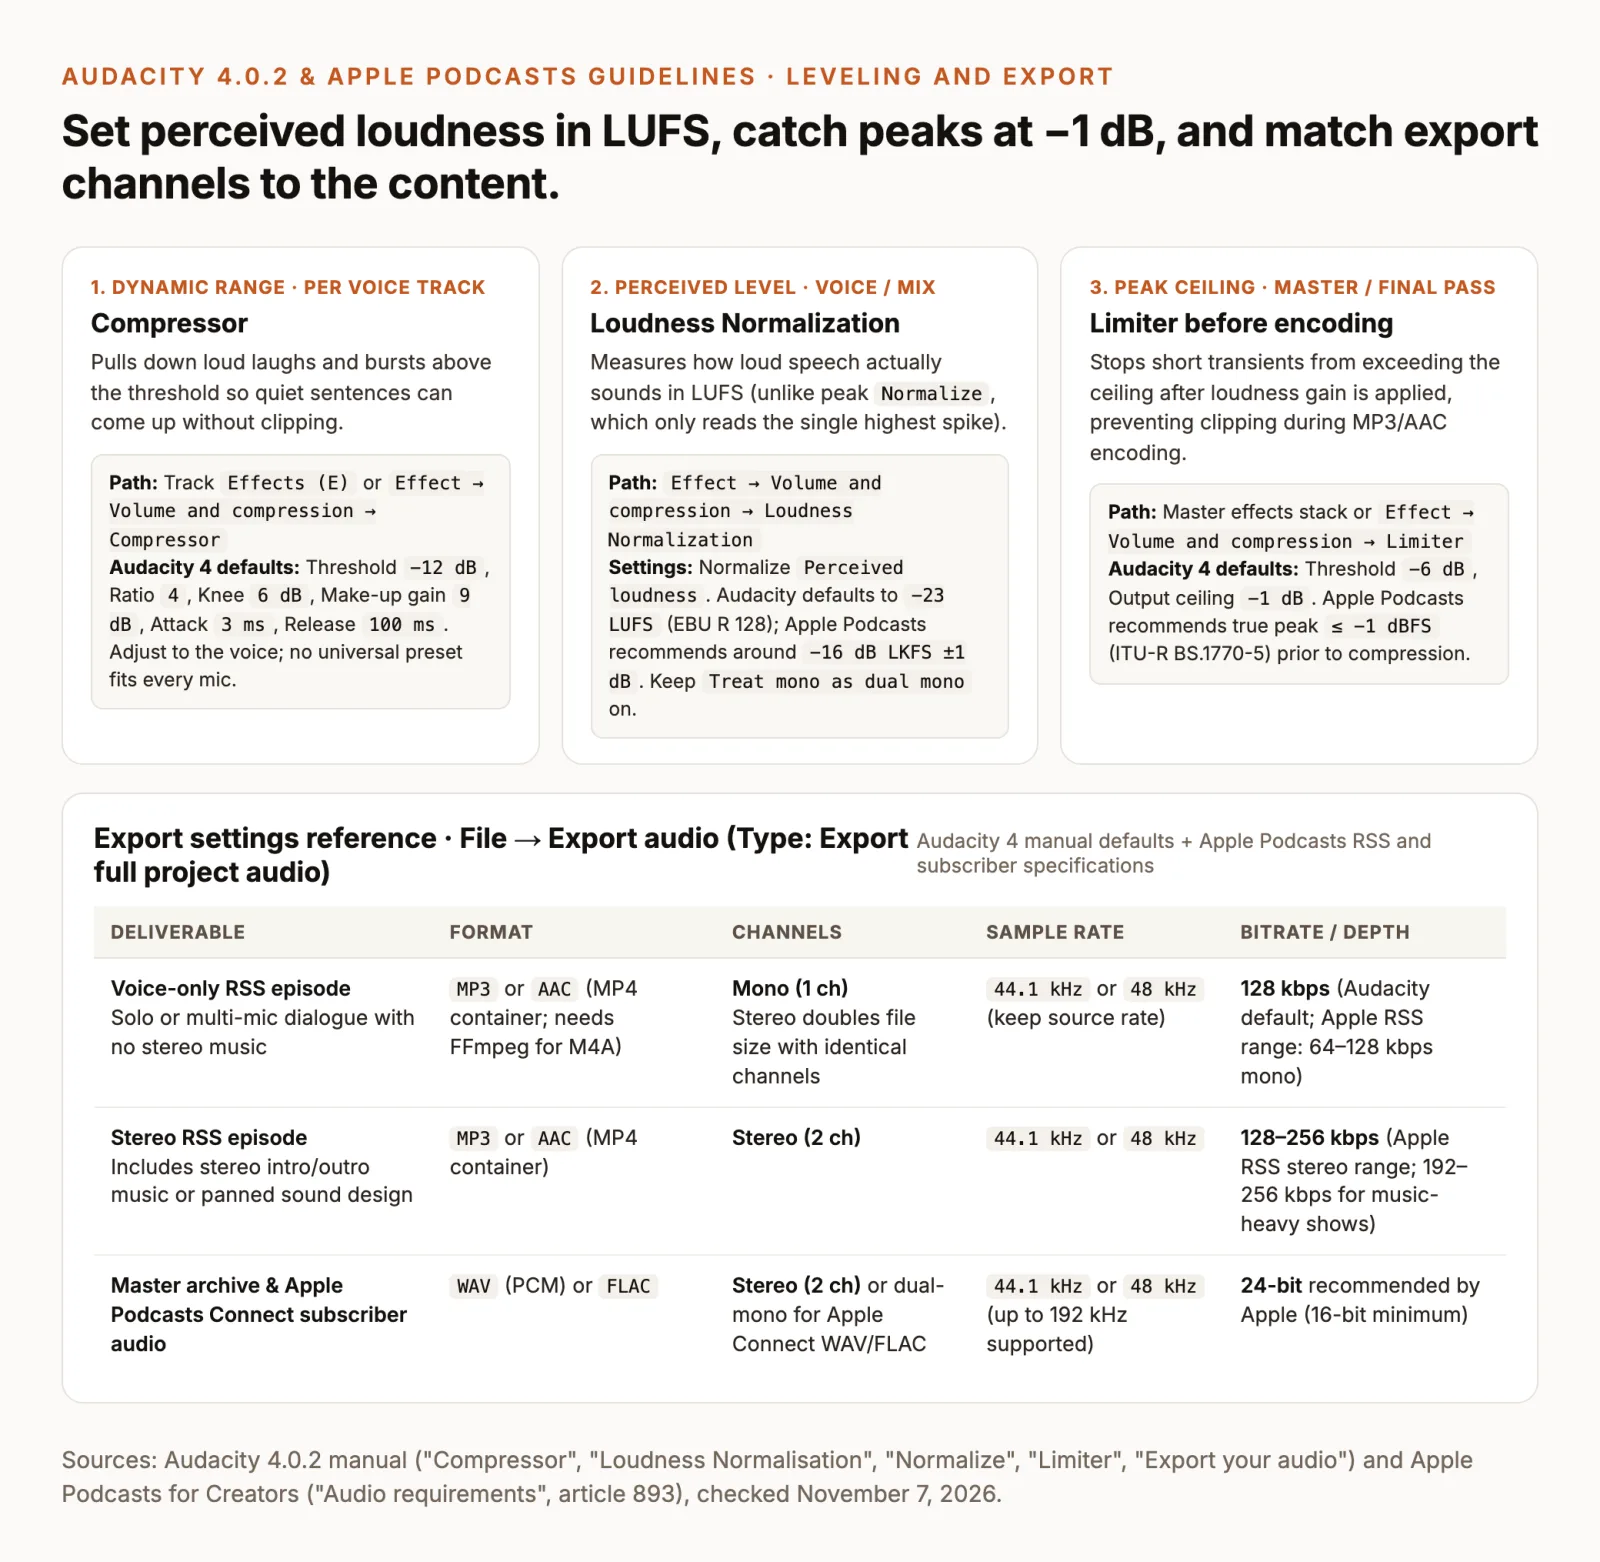
At the top of the Export audio dialog, confirm Type is set to Export full project audio so Audacity mixes all unmuted tracks into the finished file (Export selected audio and Export audio in loop region export only partial ranges). Then configure the four encoding fields (Export your audio and Apple Podcasts audio requirements):
- Format: Select MP3 for universal RSS compatibility, or AAC in an MP4 container (
.m4a, requiring FFmpeg in Audacity; Apple notes AAC yields higher quality than MP3 at the same bitrate). Also export a lossless WAV or FLAC copy for your master archive. - Channels: As the Audacity export guide notes, export voice-only mono shows as Mono (1 channel); exporting a mono recording as stereo writes two identical channels and doubles the file size. Choose Stereo (2 channels) when your project includes stereo intro/outro music or stereo sound design. One exception: for WAV or FLAC subscriber audio uploaded in Apple Podcasts Connect, Apple requires two-channel files (send two identical channels if the source is mono; single-channel WAV/FLAC files are rejected there).
- Sample rate: Keep your source sample rate of
44.1 kHzor48 kHz. Both rates are supported across Apple Podcasts’ RSS and subscriber specifications, so there is no need to downsample a48 kHzrecording to44.1 kHz. - Bitrate: When your host gives no specific rule, the Audacity manual recommends
128 kbpsfor speech and256 kbpsfor music. Apple Podcasts’ RSS specification at44.1/48 kHzrecommends64–128 kbpsfor mono and128–256 kbpsfor stereo (96–128 kbpsmono and128–256 kbpsstereo for MP3 subscriber uploads in Apple Podcasts Connect).
Always inspect the exported file before uploading it to your podcast host. Open the finished .mp3 or .m4a in a media player or a new Audacity window (Ctrl + O) and verify its total running time, confirm voices play centered in both ears on headphones, check loud laughs for clipping after encoding, and listen to the final five seconds to make sure no stray clip left a long tail of silence at the end.
Editing a video podcast? Continue in ChatCut
Audacity edits audio only. When you import a video file into Audacity 4, it strips out the audio stream and discards the video frames. If you use Close gap (ripple) (Shift + DEL or Ctrl + DEL) in Audacity to cut false starts, filler words, and long pauses from a video podcast, the audio track gets shorter at every cut and immediately loses lip sync with your camera footage.
When your podcast has video, perform your speech cuts inside an editor that cuts the camera frames and audio waveform together. In ChatCut, you can import your original video recordings, run the Speech Cleanup workflow to remove retakes and dead air across picture and sound simultaneously, or delete words directly in the Transcript panel (Talking Head Edit guide). To compare how transcript editors, NLE plugins, and clip tools handle video shows, see our guide to the best AI tools for editing podcasts, interviews, and talking-head videos.
Follow these five steps to clean up and package a video podcast in ChatCut:
- Import your camera and microphone recordings. In ChatCut Web or ChatCut Desktop (macOS 13+ on Apple silicon or Intel; Windows 10+ x64), choose My Assets → Upload → Files…, or drag local files from Finder or File Explorer into Desktop, which reads supported local media directly from your drive. If you have separate camera angles and an unshortened, Audacity-denoised WAV file from the same take, select the overlapping clips at 1× speed, right-click, and choose AI multicam sync to align them before cutting.
- Send a constrained speech-cleanup request. Open the AI panel in Agent mode, type
@to reference your recording (or open Speech Cleanup from Home), and specify what to cut, what to preserve, and when to pause for review:
- Review the cuts in the Timeline and Transcript. Open Transcript (Workspace → Transcript if hidden) and play across each join with sound on (Talking Head Edit guide). Confirm that every answer keeps its full meaning and natural breaths, and use Undo (or save a snapshot first via Versions → Save Current Version) if any cut feels rushed. You can also highlight words in Transcript and press
DeleteorBackspaceto cut that spoken segment manually. For more targeted rough-cut, audio, and B-roll requests, see our guide to 26 video editing prompts for your own footage. - Hide jump cuts and verify captions. Cutting a stumble out of a single camera angle leaves a visible jump in the speaker’s posture. Cover noticeable jumps by switching to the other speaker’s camera angle, punching in slightly on 4K footage, or placing relevant B-roll on the track above while keeping the dialogue audio continuous underneath. Once the spoken edit is final, turn on Captions below the Viewer, pick a style, and fix any misspelled names or terms in the caption Content panel rather than deleting words in Transcript (deleting in Transcript cuts the video and audio timeline).
- Export the episode or repurpose social clips. Select Export → Video for your full episode (or Export → Audio for an MP3 version), and open the finished file in your player to check lip sync, levels, and captions. Once the full episode is done, you can also extract vertical highlights using our workflow on how to repurpose a podcast into TikToks and Shorts.
Several steps in this ChatCut workflow cost nothing. The Free plan includes the core editor: manual timeline editing, uploads, transcription, and standard caption editing never use credits. Exporting MP4/WebM video, MP3 audio, subtitles, and Premiere/DaVinci XML also uses no credits (Credits policy): on Free, web and cloud exports (up to 1080p) share a cumulative 60-minute account quota (Web vs Desktop Export), while ChatCut Desktop renders video locally on your computer with presets up to 4K. With Claude Code or Codex (connected via the ChatCut Agent Plugin or Desktop’s local MCP bridge; installation inside the ChatGPT or Claude websites is not supported), the agent’s editing work (cutting, reordering, removing pauses and fillers, captions, B-roll placement, and motion graphics the agent writes) is covered by your existing Claude or ChatGPT subscription and uses no ChatCut credits unless the workflow calls a ChatCut-hosted generation service.