Adding DaVinci Resolve subtitles works in three ways: typing cues on a subtitle track, importing an .srt file, or transcribing speech automatically. If you need to know how to add subtitles in DaVinci Resolve for free, the free edition supports manual subtitle tracks, SRT import, track styling, and SRT or burned-in delivery, while native DaVinci Resolve auto captions (Timeline → AI Tools → Create Subtitles from Audio) and AI Animated Subtitles require paid DaVinci Resolve Studio. This guide covers all three methods in DaVinci Resolve 21 on macOS, Windows, and Linux, plus timing checks and how to export SRT or burned-in video. Prefer preparing captions through a guided workflow? Explore ChatCut’s Add captions Skill.
Which subtitle features are free?
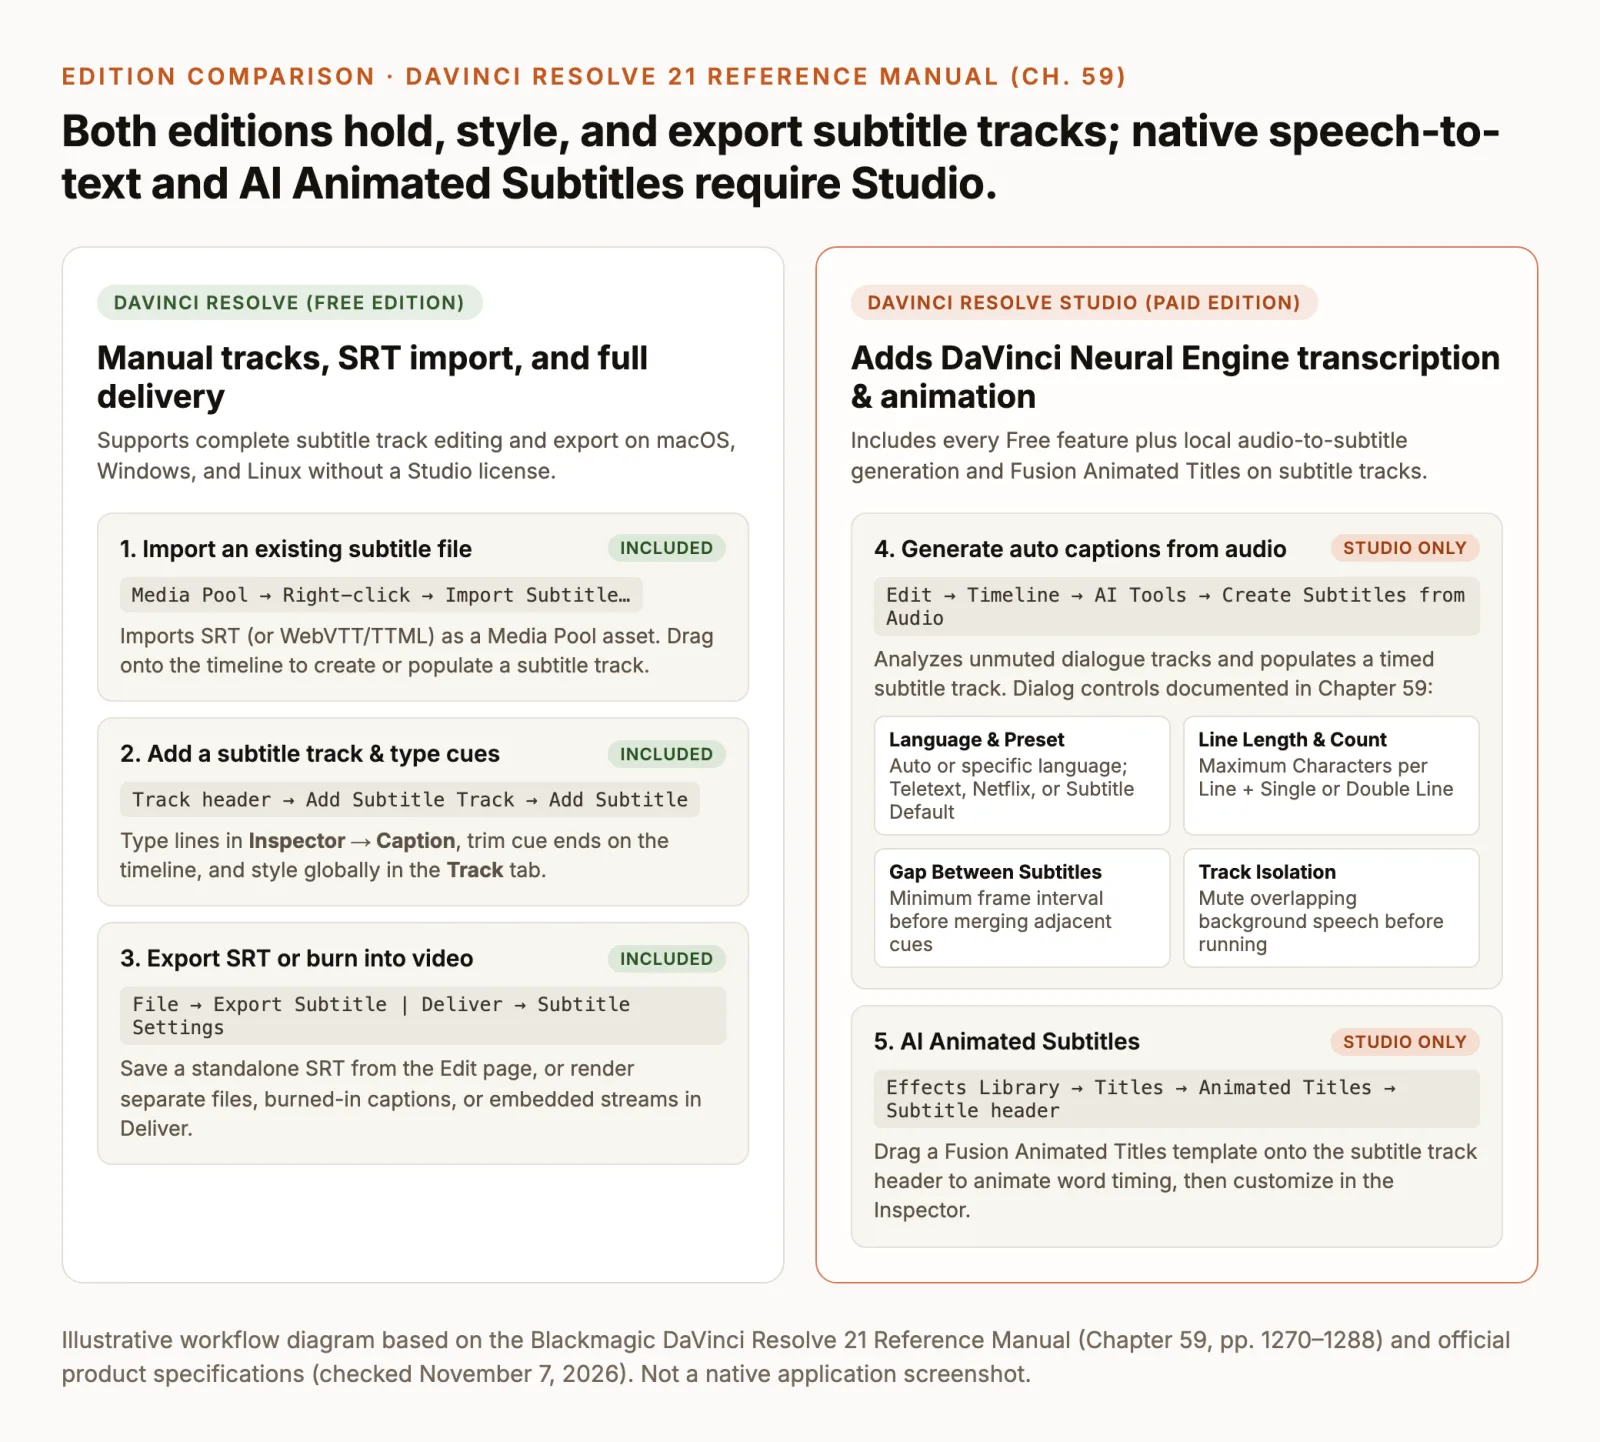
Before opening a menu, check whether your task belongs to Resolve’s core subtitle track tools or to the DaVinci Neural Engine features reserved for DaVinci Resolve Studio. Both editions run on macOS, Windows, and Linux (Blackmagic DaVinci Resolve product page), and both share the same Edit page subtitle track architecture and Deliver page export options.
We verified the edition boundaries and menu paths below against Chapter 59 (“Subtitles and Closed Captioning”, printed pages 1267–1288) of the Blackmagic DaVinci Resolve 21 Reference Manual and the DaVinci Resolve Studio feature comparison on November 7, 2026; this guide reflects official documentation verification rather than a live native-app render test.
| Subtitle task | Resolve Free | Resolve Studio |
|---|---|---|
| Add subtitle tracks & type cues | Included | Included |
Import .srt subtitle files | Included | Included |
| Style track or individual cues | Included | Included |
Export .srt or burn into video | Included | Included |
| Create Subtitles from Audio (AI) | Not included | Studio only |
| AI Animated Subtitles templates | Not included | Studio only |
As of November 7, 2026, Blackmagic’s DaVinci Resolve product page lists DaVinci Resolve Studio at a promotional price of US$236, reduced from its standard US$295 one-time license (check the official store page for your region, as promotional pricing can return to US$295 at any time). If you are still deciding whether to edit captions in Resolve, Premiere Pro, CapCut, YouTube Studio, or an AI editor, see our general guide on how to add subtitles to a video.
Generate DaVinci Resolve auto captions in Studio
If you have DaVinci Resolve Studio, the built-in speech-to-text engine analyzes timeline audio locally and populates a dedicated subtitle track without uploading media to an external server (Resolve 21 Reference Manual, pp. 1275–1276). In the free edition, the Create Subtitles from Audio command under Timeline → AI Tools is unavailable.
Choose audio and generation settings
Finish your primary dialogue cut before transcribing so you do not have to re-time dozens of split caption cues later. Then configure the generator on the Edit page:
- Isolate the dialogue audio. Resolve transcribes the audible tracks on your timeline. If your sequence already has background chatter, scratch takes, or overlapping commentary on secondary audio tracks, mute those unwanted tracks in their track headers before running transcription (Resolve 21 Reference Manual, p. 1275).
- Scope the range (optional). To caption only one segment of a long timeline, set In and Out points around that passage; otherwise Resolve transcribes the full timeline.
- Open the generator. In the top menu bar, choose Timeline → AI Tools → Create Subtitles from Audio.
- Select the Language. Leave Language on Auto or choose the specific spoken language from the dropdown so the model matches the speaker’s vocabulary.
- Choose a Caption Preset. Pick Subtitle Default for general video, Teletext for broadcast teletext constraints, or Netflix when following stricter streaming line-length defaults.
- Set Maximum Characters per Line and Line count. Adjust Maximum Characters per Line to fit your aspect ratio (narrower 9:16 vertical frames need fewer characters per line than 16:9 widescreen), and choose Single or Double under Line to cap each caption at one or two lines.
- Set Gap Between Subtitles. This frame counter sets the minimum silence threshold between two adjacent subtitle cues; when two cues sit closer together than the specified frame gap, Resolve closes the gap so captions do not flash off and on for a few frames.
- Click Create. Resolve analyzes the audio and inserts a new subtitle track (
ST1) above your video tracks filled with timed subtitle clips.
Review the generated subtitle track
Automatic speech recognition produces a timed first draft, not a finished transcript. Play through the sequence from the beginning with the Inspector open on the Edit page:
- Proofread names, acronyms, and numbers. Click any subtitle clip on the
ST1track and edit its wording inside the Caption tab of the Inspector. Fixing text in a subtitle clip never cuts your underlying video or audio. - Fix awkward phrase splits. Where fast speech packs two clauses into one cue or breaks a two-word noun across two separate captions, trim the cue boundaries on the timeline or split the cue at the playhead and move the trailing words into the next caption.
- Check quiet starts and crosstalk. Room noise or overlapping laughter can stretch a caption’s start handle earlier than the first spoken word; drag the left edge of the subtitle clip to match the waveform in the audio track below.
Add subtitles in DaVinci Resolve for free
When you are working in the free version of DaVinci Resolve, you have two native ways to build a subtitle track: importing a pre-made subtitle file or typing cues directly on the timeline. Using an external transcription app to generate an .srt file (or running a third-party workflow script) is an optional outside preparation step rather than a hidden native switch inside Resolve Free.
Import an existing SRT file
If you already have a SubRip (.srt) file from a transcription tool, a translator, or a client, both the free and Studio editions import it into a standard subtitle track (Resolve 21 Reference Manual, p. 1270; The Editor’s Guide to DaVinci Resolve 20, Lesson 9):
- Open the Edit page and make sure the Media Pool is visible.
- Right-click an empty area of the Media Pool (or a specific bin) and choose Import Subtitle (you can also use the top menu bar: File → Import → Subtitle).
- Select your
.srtfile in the file browser and click Open. The subtitle file appears in the Media Pool as a subtitle asset with its own icon. - Drag the subtitle asset from the Media Pool onto your timeline above the video tracks, or right-click it and choose Insert Selected Subtitles to Timeline / Insert Selected Subtitles to Timeline Using Timecode.
- Align the imported cues with the start of the edit that the
.srttimings describe. If the.srtwas generated from a video starting at00:00:00:00, place its start at the beginning of that cut rather than guessing from the first spoken syllable.
Create subtitle cues manually
For a short social clip, a few foreign-language lines, or an edit where you already have a written script to paste from, creating cues by hand on the Edit page takes no outside tools (Resolve 21 Reference Manual, pp. 1272–1273):
- Add a subtitle track. On the Edit page timeline, right-click in the track header column above your
V1video track header and choose Add Subtitle Track. A track labeledST1appears at the top of the timeline. - Add the first cue. Move the playhead to the exact frame where the speaker begins a sentence. Right-click inside the
ST1subtitle track at the playhead and choose Add Subtitle (or open Inspector → Caption and click Create Caption). - Enter the caption text. With the new subtitle clip selected, type or paste the spoken words into the Caption text box in the Inspector. Press
Return(Enter) inside the text box when you want to break a long sentence into two balanced lines. - Trim the cue duration. Drag the left and right edges of the subtitle clip on the
ST1track so it starts with the first word and ends shortly after the last word. - Continue down the timeline. Move the playhead to the next spoken phrase and click Add New in the Inspector (or right-click the track and choose Add Subtitle) to create the next cue, which automatically inherits the track’s styling.
Correct subtitle timing and track style
Once your cues are on the ST1 track (whether generated in Studio, imported from an .srt, or typed by hand), check their sync across the entire sequence before spending time on fonts or colors.
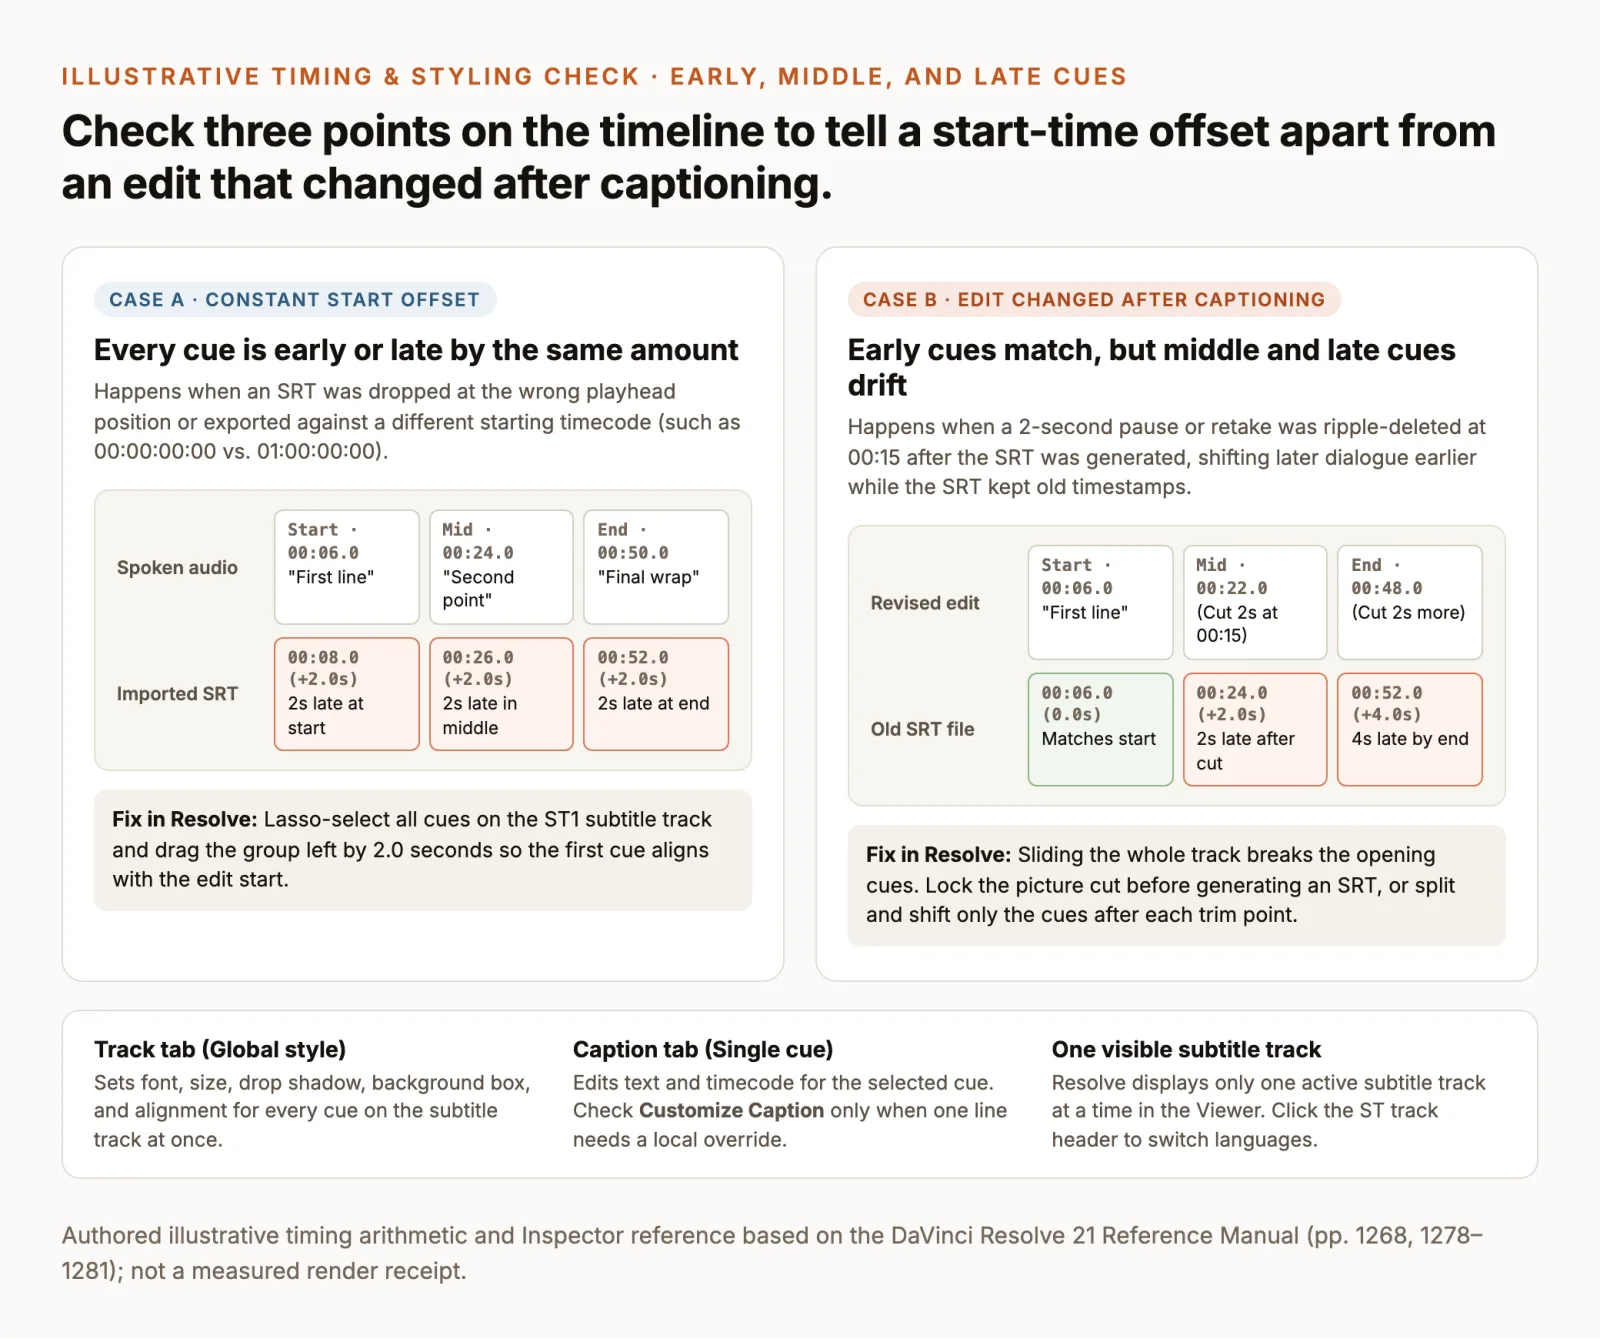
Diagnose a start offset vs. a changed edit
When imported subtitles appear out of sync with the speaker’s mouth, do not immediately drag individual cues one by one. Instead, inspect three points on the timeline (an opening sentence, a passage near the middle, and the final line) to tell two different problems apart:
- Constant start offset (every cue is off by the same amount). Suppose the speaker’s first sentence begins at
00:06.0, the middle point at00:24.0, and the closing line at00:50.0, while your imported cues appear at00:08.0,00:26.0, and00:52.0. Because every cue is late by the same 2.0 seconds, the.srtwas either dropped at the wrong timeline position or exported with a different starting timecode offset (for example,00:00:00:00versus Resolve’s default01:00:00:00timeline start). Fix it in one move: lasso-select all clips on theST1track and slide the entire group left by 2.0 seconds until the first cue locks to00:06.0. - Changed edit after captioning (early cues match, later cues drift). Suppose the opening cue at
00:06.0matches the audio, but after you trimmed a 2-second pause at00:15.0and another 2-second retake later, the middle cue is 2.0 seconds late and the final cue is 4.0 seconds late. Shifting the whole subtitle track left by 2.0 seconds will push the opening caption 2.0 seconds too early. To fix a changed edit, either regenerate the.srtfrom the revised cut or select only the cues after each cut point and ripple-shift them forward.
Style the whole track or single cues
DaVinci Resolve splits subtitle formatting into two Inspector tabs so you can restyle an entire project at once while still nudging individual lines (Resolve 21 Reference Manual, pp. 1268, 1278–1281):
- Global styling (
Inspector → Tracktab). Select any subtitle clip and switch to the Track tab in the Inspector. Changes you make here (Font family, Font Face, Size, Color, Stroke, Drop Shadow, Background box opacity and corner radius, and Transform / Alignment) apply to every cue on that subtitle track automatically. - Individual cue overrides (
Inspector → Captiontab). Keep the Caption tab open when you need to change a single selected cue. If one subtitle sits over an on-screen graphic or lower third, check Customize Caption inside the Caption tab; that unlocks local position, font, and color controls for just that cue without altering the rest of the track. - Single visible subtitle track rule. A Resolve timeline can hold several subtitle tracks for different languages (
ST1English,ST2Spanish,ST3Japanese), but only one subtitle track can be visible in the Viewer at a time (Resolve 21 Reference Manual, p. 1268). Click the track header badge (ST1,ST2) to toggle which track is active before reviewing or burning captions in. - Studio AI Animated Subtitles vs. Text+ titles. In DaVinci Resolve Studio, you can open Effects Library → Titles → Animated Titles and drag a Fusion template directly onto the
ST1subtitle track header (Resolve 21 Reference Manual, p. 1281). The template uses the transcription’s word-level timing to animate words on the subtitle track, and you can adjust its look in the Inspector. Keep two format boundaries in mind: exporting an.srtfile saves plain timed text without fonts or Fusion animations, and building captions out of regularText+title clips on a video track means they render as video graphics rather than an exportable.srtsubtitle track.
Export SRT or burn subtitles into video
DaVinci Resolve never includes a subtitle track in a video render by accident: you must either export the subtitle track directly as a text file or explicitly enable Export Subtitle on the Deliver page (Resolve 21 Reference Manual, pp. 1287–1288).
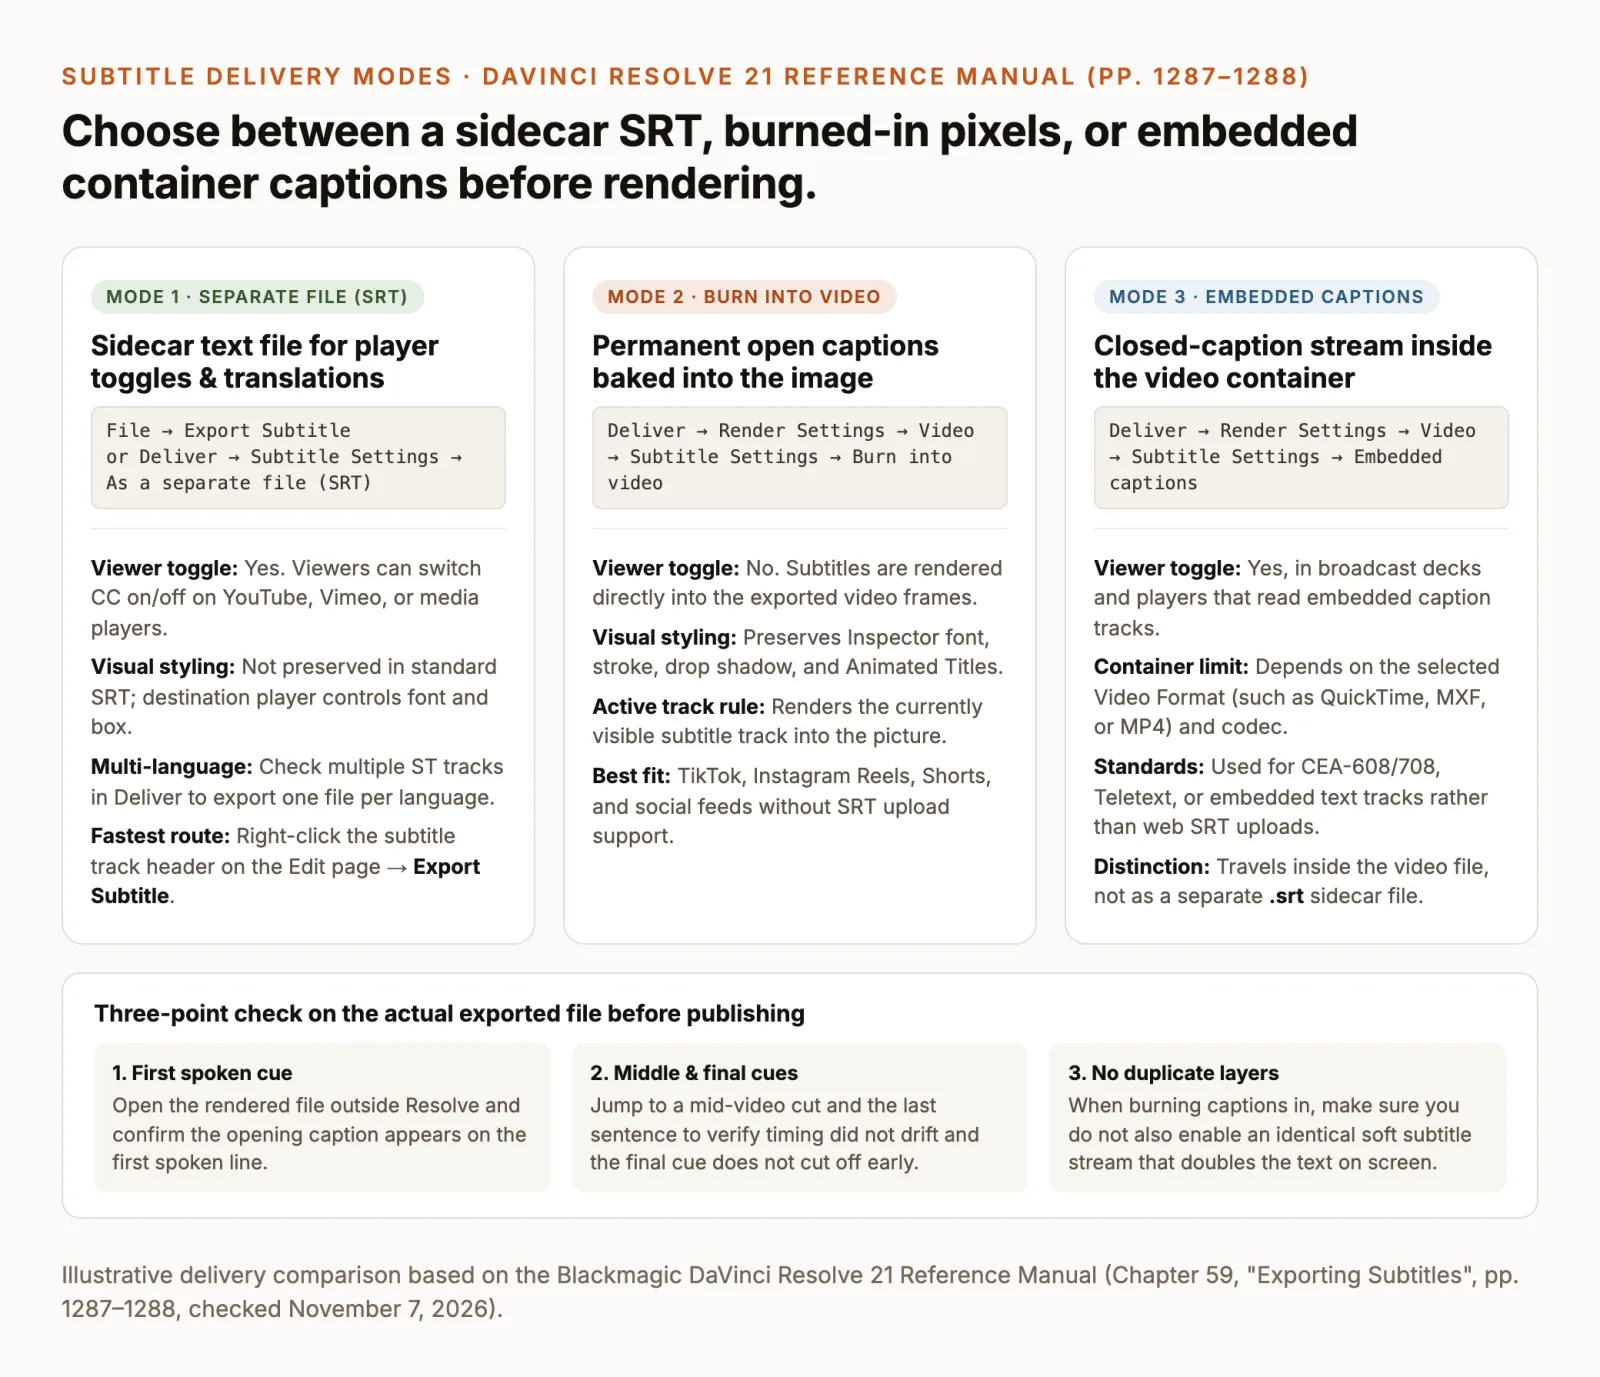
Export a track-only SRT file
When your video is already rendered, or when you only need to export an .srt file for a translator or a YouTube Studio subtitle upload, you do not need to re-render the video on the Deliver page:
- On the Edit page, click the header of the subtitle track (
ST1) you want to export so it is active. - Choose File → Export Subtitle from the top menu bar, or right-click the subtitle track header and select Export Subtitle (Resolve 21 Reference Manual, p. 1287).
- In the save dialog, choose SubRip (*.srt) (or W3C WebVTT / TTML if your platform requires them), pick a destination folder, and click Save.
Render video and subtitles in Deliver
When you are rendering your master video and subtitles together, configure Subtitle Settings on the Deliver page (Resolve 21 Reference Manual, pp. 1287–1288):
- Open the Deliver page and configure your video format, codec, and resolution in Render Settings → Video.
- Scroll to the bottom of the Video tab, expand Subtitle Settings, and check Export Subtitle.
- Open the Format dropdown and select one of the three delivery modes:
- As a separate file: writes a sidecar subtitle file alongside the rendered video. Set Export As to SRT (or SRT Without Formatting, WebVTT, or TTML), and check the box beside each subtitle track (
ST1,ST2) you want exported. Use this mode when uploading to platforms that support viewer-toggled captions, such as YouTube or Vimeo. - Burn into video: bakes the currently active subtitle track permanently into the exported video pixels. As HandBrake’s subtitle documentation notes, burned-in captions are permanently written into the image frames so viewers cannot turn them off. Choose Burn into video when publishing to Reels, TikTok, or Shorts, or whenever your edit relies on custom Inspector typography or Studio’s AI Animated Subtitles.
- Embedded captions: embeds closed-caption data (such as broadcast CEA-608/708 television captions or container text tracks) directly inside the rendered media file. Available embedded formats depend on the selected Format container (such as QuickTime, MXF, or MP4) and codec; do not confuse an embedded container stream with a standalone
.srtfile.
- As a separate file: writes a sidecar subtitle file alongside the rendered video. Set Export As to SRT (or SRT Without Formatting, WebVTT, or TTML), and check the box beside each subtitle track (
- Click Add to Render Queue, then click Render All.
Once the render finishes, reopen the actual delivered file outside Resolve and check three points before publishing:
- Opening cue: play the first spoken sentence to confirm the first subtitle appears in sync and uses the right language track.
- Middle cut and final cue: scrub to a mid-video edit and the last spoken line to verify that timing stays locked through the end and that your timeline Out point did not clip the final caption early.
- No duplicate caption display: if you burned subtitles into the picture, confirm you did not also upload or mux an identical soft
.srttrack that displays a second layer of text over your burned-in captions (YouTube automatic and uploaded caption settings).
Use ChatCut to prepare captions instead
If you use the free edition of DaVinci Resolve and want automatic transcription without buying Studio, or if you prefer reviewing dialogue, fixing speaker names, and previewing caption presets in a dedicated transcript editor, you can prepare your captions in ChatCut with the Add captions Skill and either export an .srt file for your Resolve timeline or render the captioned video directly.
Once your locked picture cut or source clip is imported into ChatCut, you can direct the Agent with a suggested prompt (shown below as a starting template rather than a tested benchmark result):
If your video includes technical terms or you want two-line pagination checked before exporting the .srt, give the exact spellings in a follow-up prompt:
You can also complete every step manually using the controls documented in ChatCut’s Transcript and Captions guide and Export Video, Audio, and Subtitles documentation:
- Match the edit duration first. Export a reference cut from DaVinci Resolve (or use the exact unedited source clip you placed on your Resolve timeline) and upload it to My Assets in ChatCut. Because an
.srtfile stores absolute timestamps, any ripple trim made after transcription will shift later cues out of sync. - Select the transcript source and enable captions. In the Transcript panel, use the
V1/V2orA1/A2track selector to pick the intended speech track when several tracks exist. Click the left side of the split Captions control in the playback bar to show captions, then click its chevron to preview built-in presets such as Plain, Netflix, or TikTok Pop (keep in mind that if you only bring the.srtinto Resolve, Resolve’s Inspector controls the visual styling). - Review text in the Content panel, not by deleting transcript words. Use the caption track’s Content panel to search and replace names, fix typos, or split and merge caption cards (Transcript and Captions). Do not press Delete on words inside the Transcript panel if you are preparing an
.srtfor an existing Resolve timeline: deleting words in the Transcript cuts that time range from the video and shifts every subsequent timestamp. - Export the SRT and import into Resolve. Wait until every clip on the active caption track finishes transcribing, then open Export → Subtitles, choose SubRip (.srt), and export (Export Video, Audio, and Subtitles). Back in DaVinci Resolve, right-click in the Media Pool, choose Import Subtitle, and place the
.srtat the start of your matching cut.
Which steps cost nothing in ChatCut: According to ChatCut Product Facts, the Free plan includes the core editor (uploads, manual timeline editing, transcription, standard caption editing, and exporting subtitles in .srt or .txt, MP4/WebM video, MP3 audio, and Premiere/DaVinci XML), and these steps never use ChatCut credits. When you run captioning or editing tasks through Claude Code or Codex (via the Agent Plugin or ChatCut Desktop’s local MCP), the agent’s work is covered by your existing Claude or ChatGPT subscription rather than ChatCut credits; ChatCut credits are used only when messaging the built-in ChatCut Agent or running ChatCut-hosted media generation. On the Free plan, web and cloud video exports share a cumulative 60-minute account quota (up to 1080p in the cloud), while ChatCut Desktop (available for macOS 13+ on Apple silicon and Intel, and Windows 10+ x64; Linux is not supported) renders video locally on your computer, including 4K.