To record a video interview that holds up in the edit, work in a fixed order: test both microphones on headphones, frame the speakers at eye level on one side of the eyeline axis, record separate voice tracks alongside a backup, verify every file before the guest leaves, and then cut the conversation. Whether you plan an in-person shoot or a remote video interview recording, isolated audio and a reliable safety angle matter more than expensive cameras. This tutorial covers how to record video interview sessions for publication—podcasts, YouTube episodes, documentaries, and customer stories (making a testimonial video)—not job screenings. Already have the recordings? Use the multicam editing Skill to turn matching angles into an interview cut.
Choose your video interview recording setup
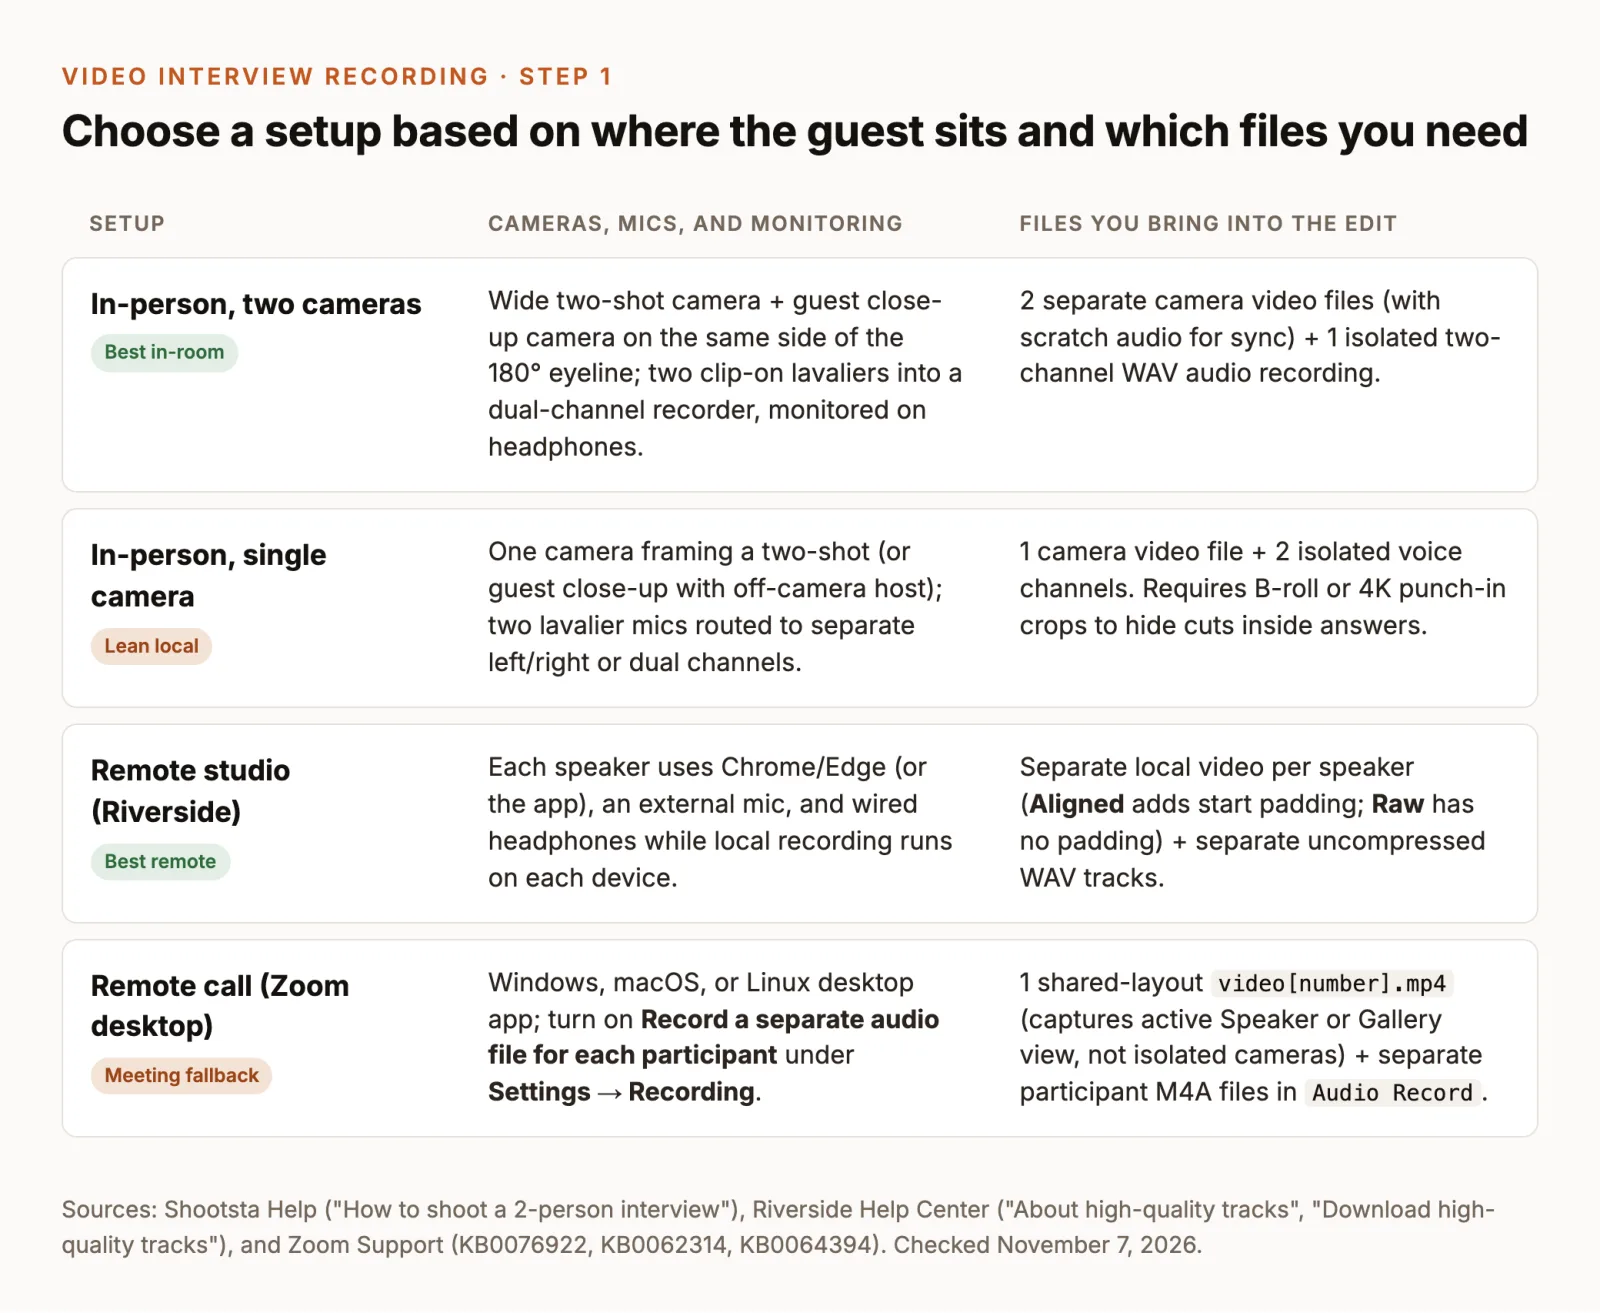
Before setting up tripods or sending a meeting link, decide which files your editor will need. Every interview recording setup trades setup time against how freely you can switch angles, mute cross-talk, and hide trims inside long answers.
One room: shared space and separate tracks
Filming in the same room gives you control over lighting, acoustics, and camera angles, but it introduces two challenges that solo shoots never face: audio bleed between speakers and screen-direction continuity across cuts.
- Two cameras plus an external audio recorder is the standard setup when you want to cut between a wide two-shot and a close-up of the guest, or shorten a long answer without a visible jump cut (Shootsta). Each camera records scratch audio on its built-in microphone for alignment, while two clip-on lavalier microphones record isolated voice channels to a dedicated recorder or dual-channel receiver.
- One camera with two isolated microphones suits lean local shoots where you either frame both people in a wider two-shot or sit just off-camera while framing the guest alone. Because you lack a simultaneous second angle to cover edits, shoot in 4K so you can punch in on alternate sections, or film B-roll right after the conversation to cover cuts.
Avoid sharing one microphone between two people. When a quieter guest and a louder host share one mic, setting input gain for the softer voice risks clipping when the louder person laughs or interrupts, and aiming a boom at one person leaves the other off-axis.
Remote guests: local capture versus meeting recording
When your guest is in another city, the quality of a remote interview depends on whether recording happens on each participant’s device before internet compression or captures the live meeting stream.
- Local per-participant studio software (such as Riverside) records each person’s camera and microphone locally on their own computer or phone and uploads the separate high-quality tracks to your project (Riverside Track Formats). Brief Wi-Fi stutters during the call do not degrade the local files, and you receive separate video and uncompressed WAV audio tracks for every speaker.
- Desktop video-call recording (such as Zoom) is a practical fallback when a guest can only use a corporate Zoom client. On Windows, macOS, and Linux, Zoom’s computer recording can save a separate audio file for each participant, but its local video file captures only the active meeting view (Speaker view or Gallery view), not isolated camera feeds per person (Zoom KB0076922, Zoom KB0062314).
- Smartphone side-car angle: if you must record on Zoom but want a locally recorded close-up of the guest, ask them to prop their phone horizontally on a stand at eye level, record themselves during the call, and send the original file afterward.
Set up an in-person two-camera interview
A two-person room setup works as a single system: where you place the chairs sets the eyeline, the eyeline defines the safe side for your cameras, and the camera positions determine where light stands and microphone receivers can go.
Position the seats, eyeline and lighting
Decide where both people will sit before placing any gear, because moving a chair later forces you to re-aim every camera and light.
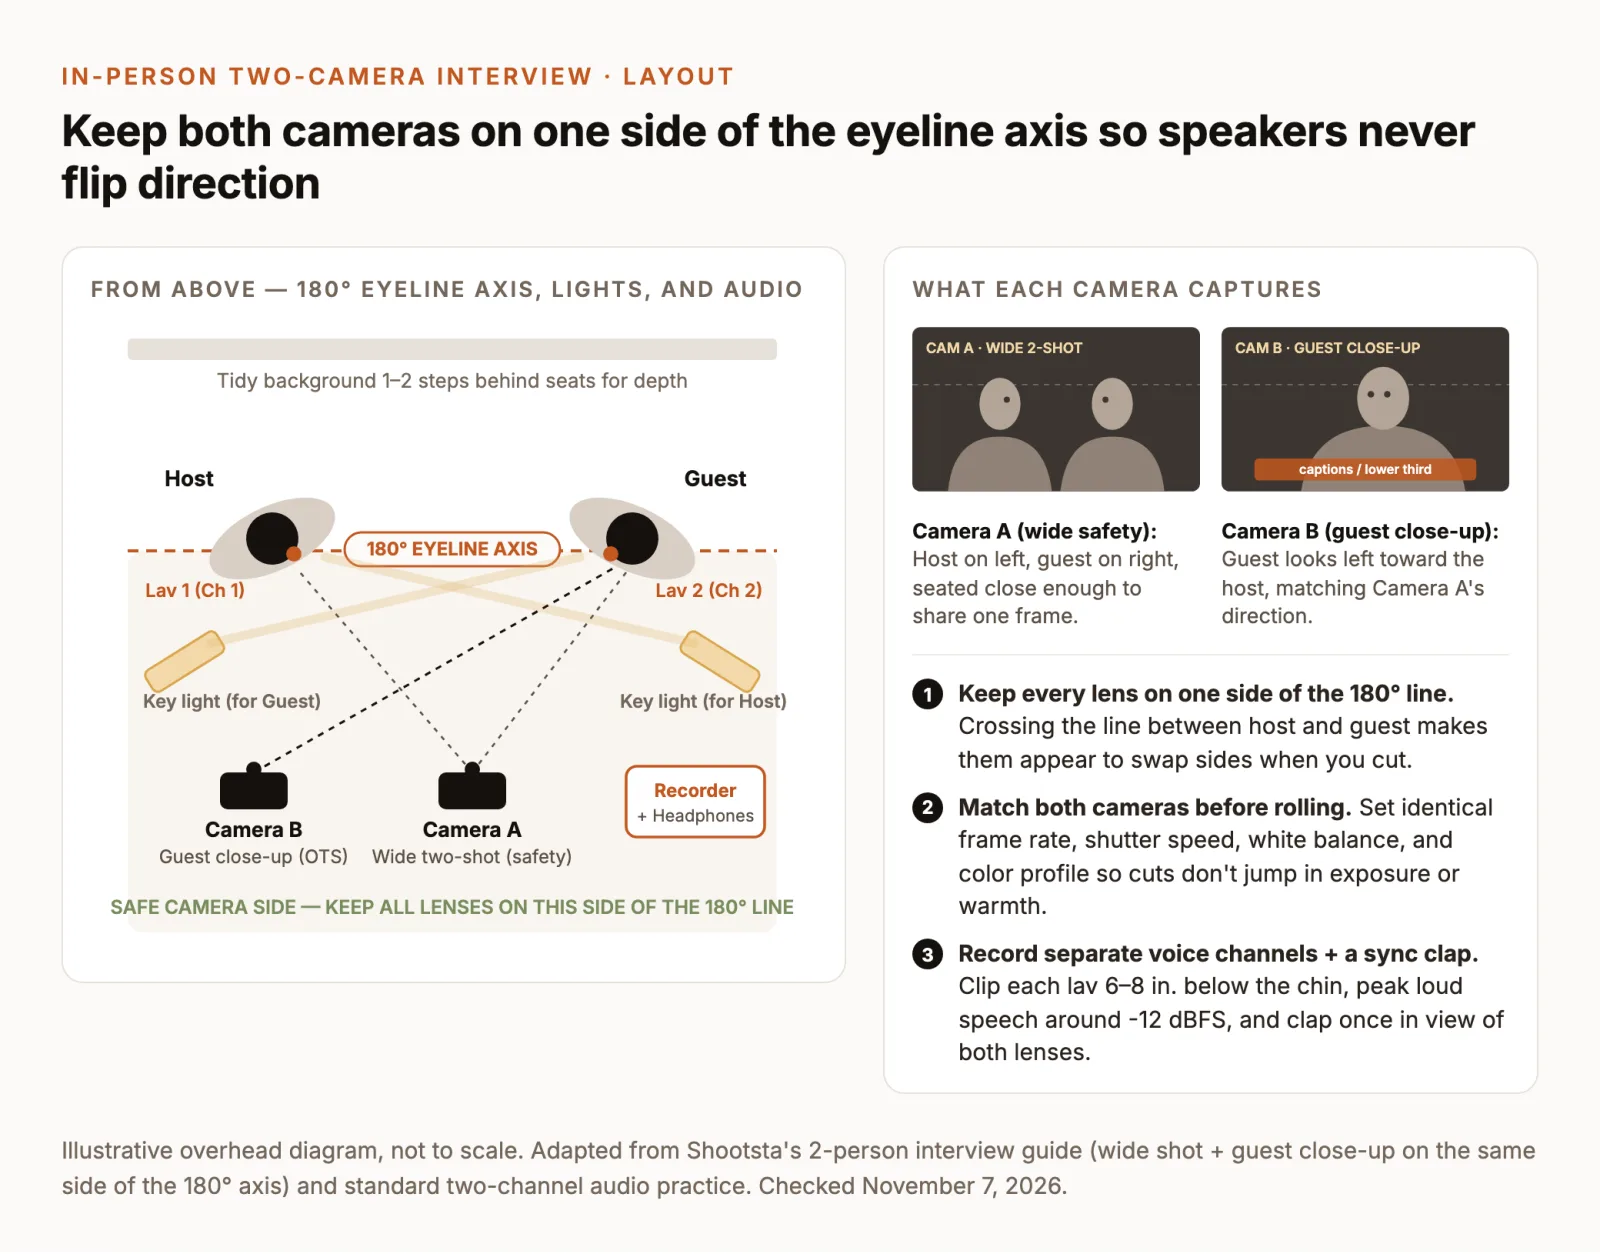
- Angle the seats inward. Seat the host on the left and the guest on the right, angled roughly 45 to 90 degrees toward each other and slightly toward the cameras. As Shootsta’s two-person interview guide notes, placing speakers close enough that knees or shoulders nearly align keeps the wide two-shot cohesive rather than leaving an empty gap in the middle of the frame. If one person is taller, adjust chair heights so their eyes sit at a similar level.
- Set the eyeline rules before rolling. Ask the guest to look at the host throughout the conversation rather than glancing at the camera. The host looks at the guest while asking questions and listening, and turns to the main lens only when addressing the audience for an introduction or wrap-up (Shootsta).
- Leave depth behind both chairs. Pull both seats a step or two away from the back wall so shadows drop out of the shot and the background reads as a real room. Check both camera frames before the guest sits down so neither background shows bare cables or clutter.
- Cross-key the lighting with matched color temperature. Place a diffused key light for the guest roughly 45 degrees off camera-left and a second key light for the host off camera-right, feathering each light so one speaker’s key does not cast a hard shadow across the other speaker’s face. Match the color temperature across every fixture in the room (all daylight around 5600K or all tungsten around 3200K) so cuts between angles do not shift skin tones. For single-person window or one-light setups, see our talking-head video guide.
One camera versus a two camera interview
When filming a two camera interview, assign each camera a distinct role so every cut changes the shot size cleanly:
- Camera A (Wide safety two-shot): frame both the host and the guest from the chest or waist up on a locked tripod. This angle establishes that both speakers share the room and gives you a continuous safety shot whenever the close-up camera adjusts focus or a speaker gestures wide (Shootsta).
- Camera B (Guest close-up or over-the-shoulder): place the second camera closer to the host’s side, framing a medium close-up of the guest (optionally over the host’s shoulder) with the guest’s eyes near the top third of the frame (Shootsta). With a third camera, mirror Camera B on the guest’s side to capture a dedicated close-up of the host.
Protect the 180-degree rule before setting down tripods. Draw an imaginary line connecting the host’s eyes and the guest’s eyes, and keep every camera on the same side of that axis (Shootsta). When both lenses stay on one side, the host stays on the left of the frame and the guest looks right-to-left in both the wide shot and the close-up. Crossing the line reverses the guest’s gaze, making both speakers appear to face the same edge of the screen.
Before pressing record, match both cameras manually: set the same frame rate (such as 24 fps or 30 fps), shutter speed, white balance Kelvin value, exposure, and color profile. If you use an iPhone for one angle, set a matching resolution and frame rate and touch and hold the speaker’s face until AE/AF Lock appears so exposure and focus do not drift mid-answer (Apple iPhone User Guide).
If you only have one camera, Shootsta documents a three-pass workaround: first record the guest’s answers in a close-up over the host’s shoulder while the host stays silent during replies; second, move the camera on the same side of the 180-degree line to record the host asking the questions and nodding; third, film the intro and outro in a two-shot. Use this approach carefully: reaction nods recorded after the answer are staged transitions to cover edits, not documentary evidence of how someone reacted in the moment.
Microphones and live headphone monitoring
Clip a dedicated lavalier microphone onto each speaker’s chest roughly 6 to 8 inches below the chin. Point the capsule toward the mouth and keep it clear of collars, zippers, necklaces, or hair that will rub when the speaker moves. Leave a small slack loop of cable behind the clip so turning the head does not pull the capsule.
Route the two microphones to separate tracks—Track 1 for the host, Track 2 for the guest—on an external recorder or a dual-channel receiver. Isolated tracks let you lower or mute the host’s mic while the guest speaks, removing room echo, breaths, and overlapping interjections without cutting the guest’s words.
Run a 30-second test with both speakers talking at conversational volume. Set input gain so the loudest words peak with safe headroom (around -12 dBFS on digital meters, well below 0 dBFS clipping), and monitor on closed-back headphones during the test and throughout the interview. A meter shows volume, but only headphones catch clothing rustle, HVAC hum, or wireless dropouts while you can still fix them.
Record a remote interview in Riverside or Zoom
When you record a remote interview, your job shifts from placing physical tripods to preparing your guest’s room and choosing software settings that preserve separate tracks.
Prepare your remote guest before the call
Most remote recording problems happen because a guest joins two minutes before the start time using built-in laptop speakers. Send a short preparation checklist alongside your questions two or three days ahead (Shootsta):
- Wear wired headphones or earbuds. When a guest listens through laptop speakers, your voice plays into their room and bleeds back into their microphone, baking an echo into their track.
- Select an external mic and raise the lens to eye level. If they have a USB microphone, headset mic, or wired earbuds, check the app settings to confirm that mic is selected instead of the laptop’s internal mic. Prop the laptop on books or mount the phone horizontally on a stand so the lens sits at eye level.
- Face a window or lamp in a quiet room. Ask the guest to sit facing a window or soft lamp rather than with a bright window behind them, and choose a room with rugs, curtains, or bookshelves and the door closed.
- Quit noisy apps and pause cloud syncs. Close messaging apps, silence phones, and pause large cloud backups that compete for CPU or upload bandwidth.
- Avoid talking over each other. Coach both speakers to let the other person finish a complete sentence before replying, using nods instead of verbal “yeah” or “right” cues.
Schedule 10 extra minutes at the start of the call to check framing, listen to both microphones on headphones, and play back a 15-second test recording.
Riverside: local per-participant video and audio
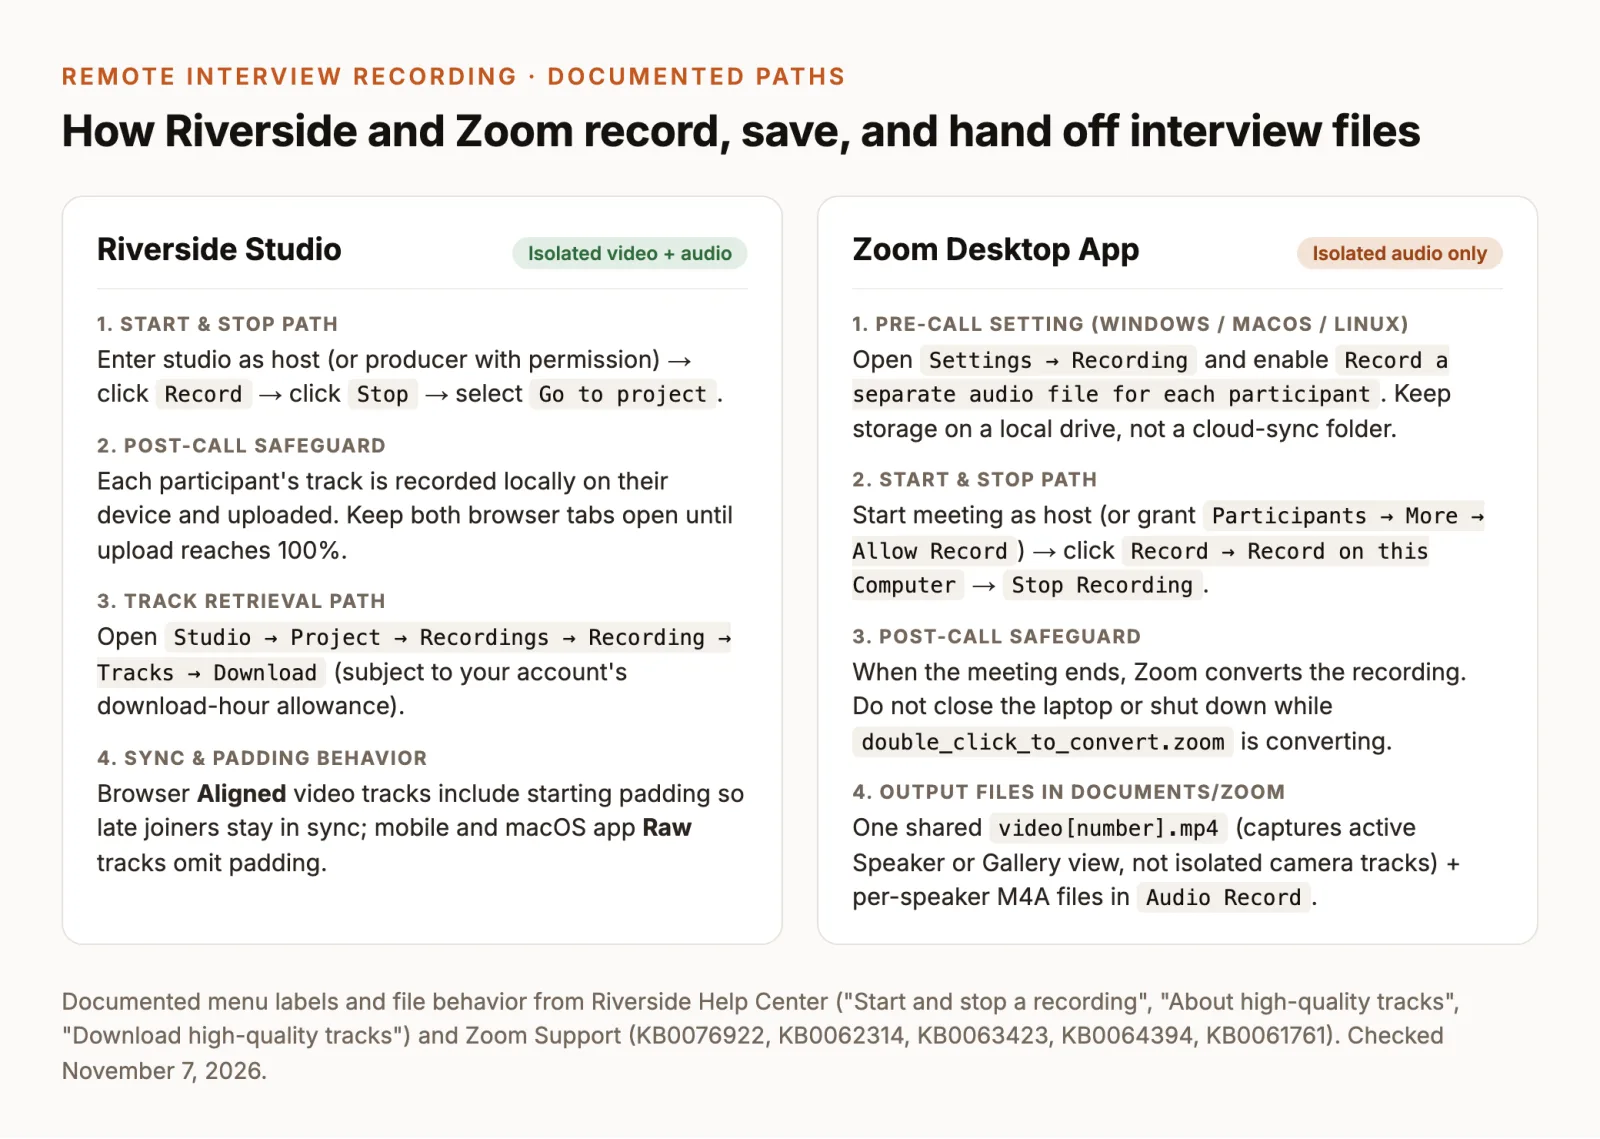
In Riverside, each participant’s audio and video are recorded locally on their own device and uploaded progressively to the studio project, protecting the files from live internet drops (Riverside Track Formats). Follow the documented path from Riverside’s Help Center:
- Enter the studio with recording permissions. Join the studio as the Host (or as a producer; note that internal-producer permissions differ from invited-producer permissions) and verify each participant’s camera, microphone, and headphones (Riverside Start and Stop).
- Start and stop the recording. Click Record to begin local capture, click Stop when the conversation finishes, and select Go to project (Riverside Start and Stop).
- Wait for uploads to reach 100%. Ask the guest not to close their browser tab or quit the app immediately after stopping. Keep both tabs open until the upload indicator confirms every participant’s track has finished uploading.
- Download the separate tracks. Open Studio → Project → Recordings, select the recording, and choose Tracks → Download (Riverside Download Tracks). Because download eligibility depends on your account’s download-hour allowance rather than an unlimited individual-track promise, check the official page for your current plan before the session.
- Check Aligned versus Raw video tracks. According to Riverside’s track documentation, browser Aligned video tracks include starting padding so a participant who joined late stays synchronized with the rest of the session. Raw tracks from the mobile or macOS app omit that padding and need manual alignment if someone joined after the start.
Zoom: computer recording with separate participant audio
When recording in Zoom, use the Zoom desktop app for Windows, macOS, or Linux, where local computer recording works on both Basic (free) and paid accounts (Zoom KB0076922). Paid Pro, Business, and Enterprise subscribers can also use Zoom cloud recording to capture multiple views in the cloud (Zoom KB0062314).
To capture separate audio tracks in a Zoom computer recording:
- Enable separate audio files before the call. Sign in to the Zoom desktop app, click your profile picture, open Settings → Recording, and enable Record a separate audio file for each participant (Zoom KB0076922).
- Keep the storage folder on a local drive. Zoom saves computer recordings under
Documents/Zoomon Windows, macOS, and Linux by default (Zoom KB0063423). Zoom warns that setting the default folder to Dropbox, Google Drive, OneDrive, an external drive, or network storage can cause saving and conversion problems (Zoom KB0076922). - Start the computer recording and lock your view. Start the meeting as host (or grant recording privileges via Participants → More → Allow Record) and click Record → Record on this Computer (Zoom KB0076922). Computer recording writes one combined
video[number].mp4file (Zoom KB0064394) that mirrors whatever layout the person recording is viewing—such as Speaker view or Gallery view—rather than isolated video tracks per speaker (Zoom KB0062314). - Pause instead of stopping mid-session. Clicking Pause Recording and resuming writes to the same video file, whereas clicking Stop Recording and starting again creates a new video file segment (Zoom KB0076922).
- Let local conversion finish before closing the computer. When the meeting ends, Zoom converts its recording files and opens the destination folder. Do not close the laptop lid, put the disk to sleep, shut down, or rename
double_click_to_convert.zoomwhile conversion runs, or the files can become corrupted (Zoom KB0076922, Zoom KB0061761). Inside the converted folder, open Audio Record to retrieve each participant’s isolated M4A track (Zoom KB0076922).
Check audio and protect the recording
Good microphone placement and studio settings only save a shoot if the files survive to the edit. Run five checks on every interview:
- Confirm recording and publication permission first. Agree with your guest before rolling on how the conversation will be recorded, where the finished video will appear, and whether they will review the final cut.
- Verify wall power and free disk space. Low storage can halt local Zoom conversion with Error Code 614 (Zoom KB0061761), and a dead camera battery splits a continuous take into fragments. Plug laptops and cameras into wall power when possible.
- Make a visible sync clap and record room tone. When rolling multiple in-room cameras and an external recorder without shared timecode, clap once clearly in view of both lenses so every file gets a matching visual and waveform spike (Apple Final Cut Pro). Then capture 15 to 30 seconds of silence so you have clean room tone to smooth audio edits.
- Assign explicit backup ownership. Never treat an automatic upload or wireless link as a verified backup. Record a second local copy—internal transmitter recording on your wireless lavaliers, a standalone table recorder, or a local phone recording on a remote guest’s desk—and assign one person to start, stop, and collect it.
- Inspect the files before releasing the guest. Before anyone hangs up or packs gear, confirm uploads have reached 100% and local conversions have completed, then open the downloaded or copied files and listen to the start, middle, and end on headphones. Keep untouched originals archived in two locations and edit from working copies.
Turn the recordings into an interview edit
In ChatCut, import your verified files with My Assets → Upload → Files… (or Folder…). To align same-take recordings without cutting between angles, select at least two clips with recognizable overlapping audio at 1× speed, right-click, choose AI multicam sync, and inspect a clap or phrase afterward (Timeline). To align the session and draft a speaker-follow cut like the demo at the top of this article, run the AI Multicam Editor Skill:
Remote isolated voice tracks may lack shared audio, so preserve Riverside alignment padding instead of assuming waveform sync will work (Riverside Track Formats). Review interruptions and reaction shots, then open Transcript (Workspace → Transcript) to select unwanted words and press Delete or Backspace, reviewing continuity and captions afterward. For Premiere, Final Cut Pro, and DaVinci Resolve 20 menus, see our multicam editing guide, and export MP4 (H.264) at the recorded frame rate for YouTube.
ChatCut’s Free plan includes the core editor: manual timeline editing, uploads, transcription, and standard caption editing never use credits. Exporting MP4/WebM video, MP3 audio, subtitles, and Premiere/DaVinci XML also uses no credits: Free web/cloud exports share a cumulative 60-minute account quota and cloud video renders up to 1080p, while ChatCut Desktop (macOS 13+ Apple silicon/Intel; Windows 10+ x64) renders video locally on your computer with presets up to 4K. Built-in ChatCut Agent messages use variable credits, whereas editing through Claude Code or Codex (plugin or local MCP; installation inside the ChatGPT or Claude websites is not supported) is covered by your existing Claude or ChatGPT subscription and uses no ChatCut credits unless the workflow calls a ChatCut-hosted generation service.