An app promo video earns attention in a feed or on a landing page in 15 to 30 seconds by pairing one clear benefit with real interface footage that proves it. To make one without rebuilding the project for every channel, write a 30-second storyboard where every claim is backed by a real screen action, capture clean takes with sample data, add motion-graphics cards for context, and export separate versions for your website, the Apple App Store, and Google Play. You need a working build or demo account, a screen recorder, and an editor that handles both screen captures and typography.
How to make an app promo video
- Choose which app video to cut first. Decide whether the primary cut is a benefit-led marketing promo, a task-led walkthrough, or an app store preview, and plan how one recording session will feed them.
- Write a 30-second storyboard the UI proves. Pair every benefit headline with the exact click, tap, or screen change that demonstrates it.
- Capture clean, modular screen interactions. Load believable sample data, silence notifications and status-bar clutter, and record one interaction per take.
- Use motion graphics to frame real UI. Place short title cards and callouts around the screen recordings so viewers watching on mute understand the benefit before the interface appears.
- Cut separate Apple and Google store previews. Strip out marketing end cards that violate store policies, add required account or purchase disclosures, and format for each store’s delivery system.
- Export, watch muted and verify each file. Check legibility on a phone screen, confirm audio licensing, and verify exact pixel dimensions before uploading.
This guide follows one invented mobile and web product—a team task app at taskboard.example—from a blank storyboard to two finished deliverables: a 30-second marketing promo and a compliant store preview. If you are still comparing template tools and editors before starting, see our comparison of promo video makers.
Choose which app video to cut first
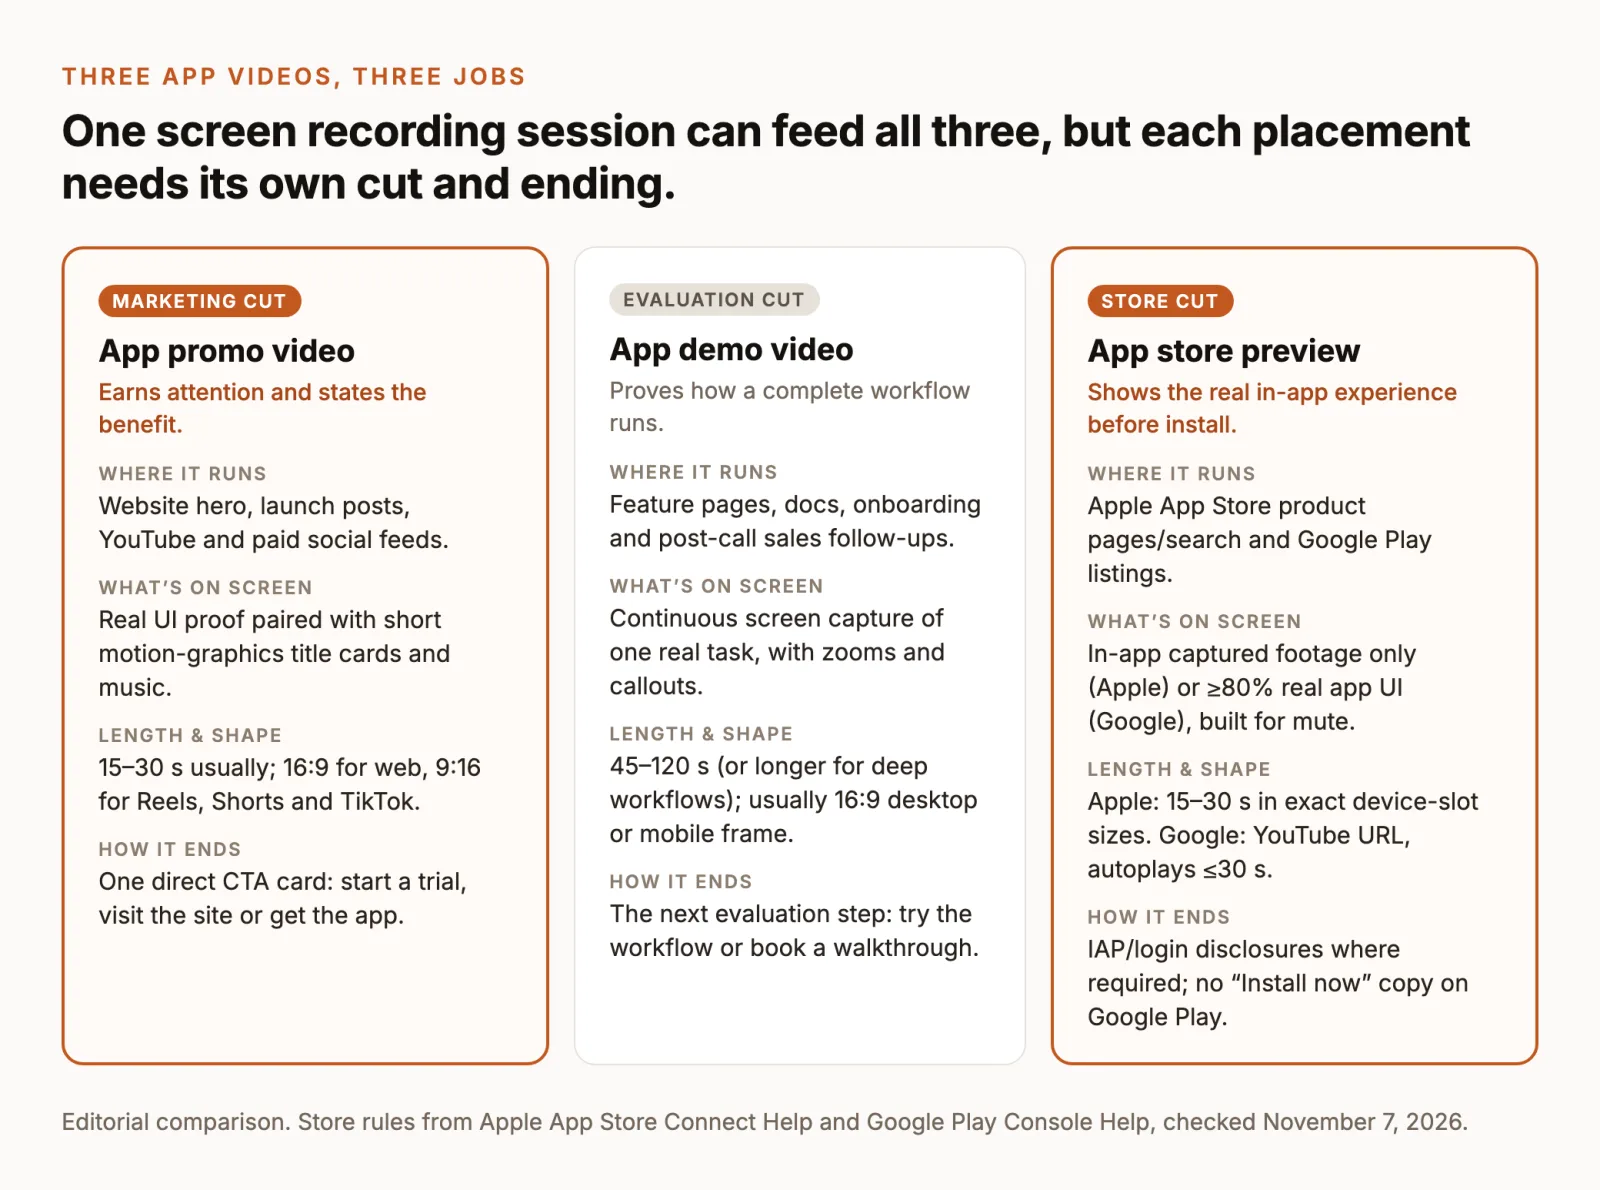
Teams often ask for one video that can sit on the homepage hero, run as a vertical social ad, and upload directly to App Store Connect and Google Play Console. In practice, those placements enforce incompatible rules. A marketing cut that opens on a three-second kinetic typography card and closes with “Download free today” works well on a landing page or in a social feed, but it conflicts with store preview guidelines that prioritize immediate in-app footage and restrict promotional calls to action.
Benefit-led app promo video
A marketing promo is built for discovery on your website hero, launch posts, YouTube channel, or paid social feeds. Viewers have not yet decided to evaluate your software, so the video leads with the problem or outcome, uses bold motion-graphics cards and music to set the pace, and shows just enough real UI to prove the claim works. Most marketing promos run 15 to 30 seconds in 16:9 for web embeds or 9:16 for Reels, TikTok, and YouTube Shorts, ending on a direct call to action such as starting a free trial or visiting your domain.
Task-led app demo video
An app demo video is built for evaluation on feature pages, documentation, onboarding steps, or sales follow-ups. Instead of quick cuts between benefit cards, it follows one complete workflow from trigger to finished result so a skeptical buyer can see every click and state change. If your primary goal is a 60-to-90-second narrated walkthrough rather than a fast launch cut, follow our product demo video guide, which covers cursor pacing, zoom timing, and narrated screen edits in full.
App store preview video
An app preview video (Apple’s term) or preview video (Google Play’s term) runs inside the store listing itself and in store search results. The viewer is already on a download page, so the job is not to tell them to install—it is to remove uncertainty about what happens after they tap the button. Apple requires previews to consist of captured in-app footage (Apple App Previews), and Google recommends that at least 80% of the video represent the actual user experience while avoiding “Download now” or “Install now” copy (Google Play Console Help).
The most efficient workflow is to script and capture the real UI sequence once, assemble the 30-second marketing promo with motion-graphics cards on separate tracks, and then duplicate that timeline to trim a store-compliant version.
Write a 30-second storyboard the UI proves
Pair every benefit claim with a screen action
A weak saas promo video or mobile app promo makes abstract promises—“work faster,” “instant team sync,” “AI-powered productivity”—while showing a static dashboard where nothing changes. Before opening a screen recorder, write a two-column script that pairs each on-screen claim with the specific interface transition that proves it. If a line of copy cannot be demonstrated by a visible tap, click, or state change in under five seconds, rewrite the line around something the interface actually shows.
For our running example (taskboard.example), the core promise is turning scattered client messages into tracked Friday deliverables. A 30-second storyboard breaks that promise into five beats:
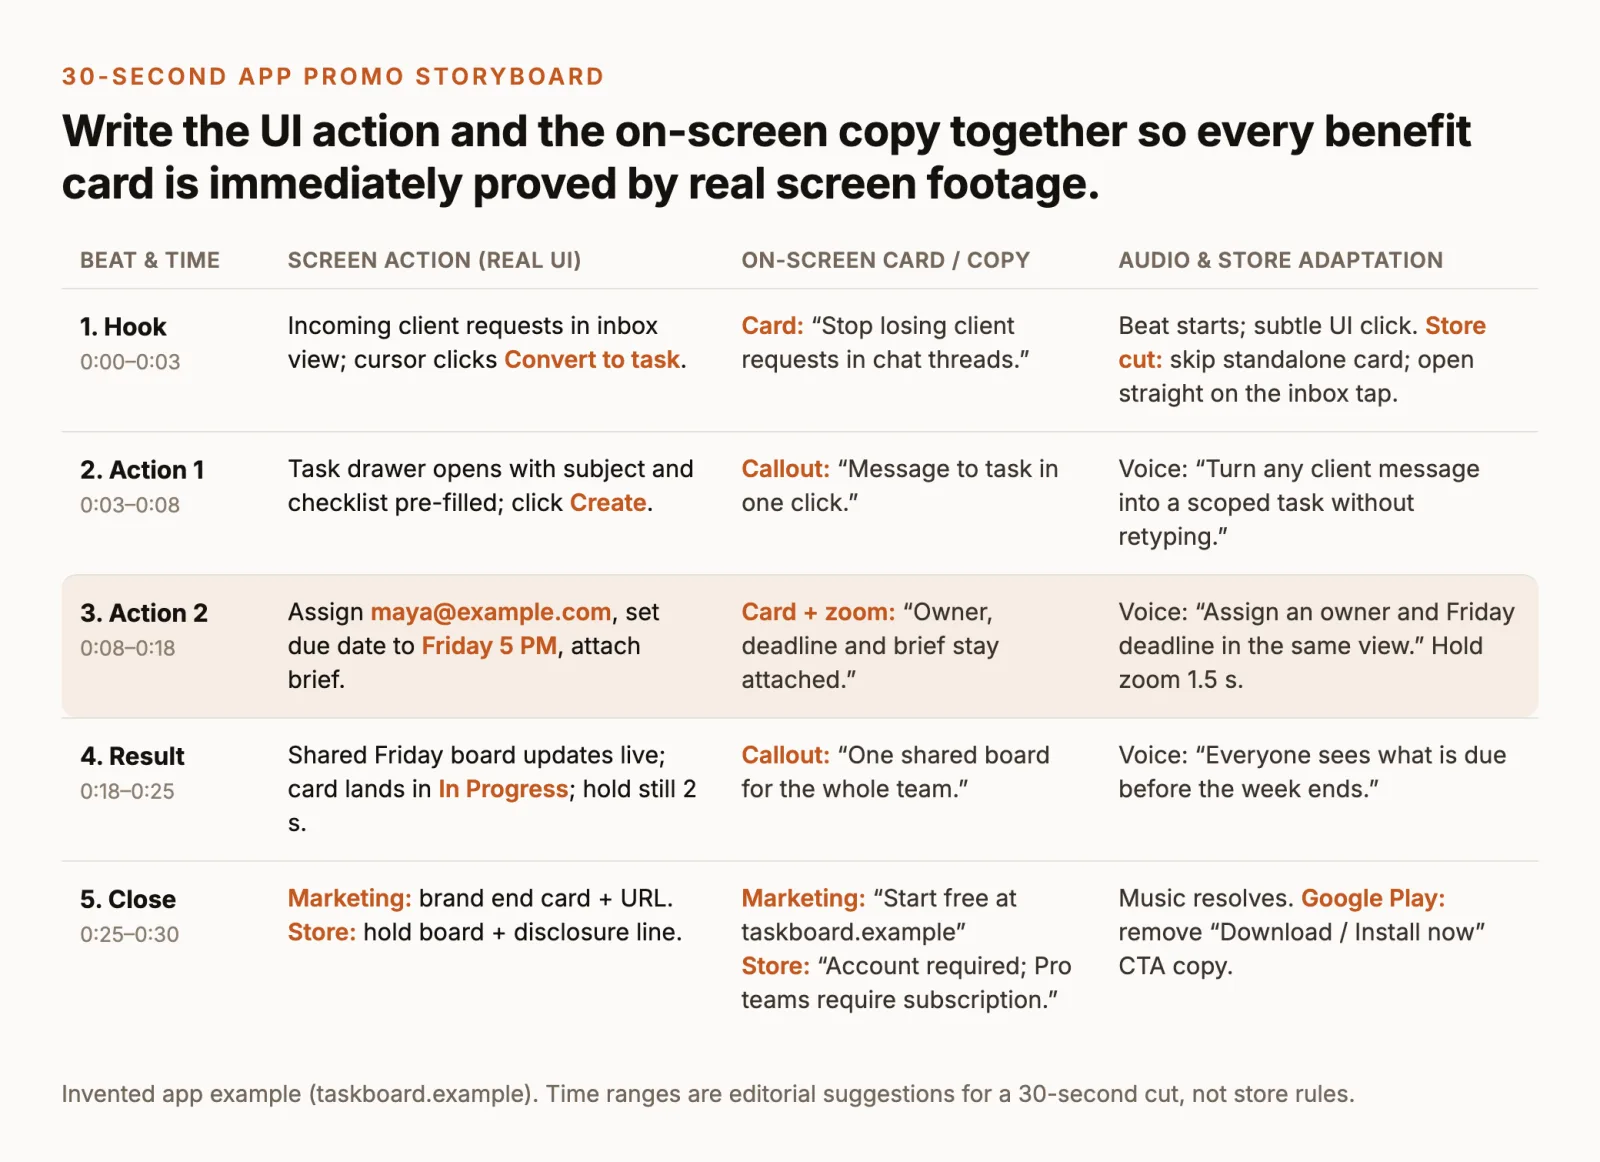
- Hook (0:00–0:03): Show the recognizable pain or the immediate trigger. A motion-graphics card reads “Stop losing client requests in chat threads,” cutting straight to an inbox view where a cursor clicks Convert to task. For the store preview cut, drop the standalone opening card and start on frame one of the inbox interaction.
- Action 1 (0:03–0:08): Prove the first step is fast. The task drawer opens with the client’s subject line and checklist pre-filled from the message, and the user clicks Create. A short callout label reads “Message to task in one click.”
- Action 2 (0:08–0:18): Show the core workflow detail. The user assigns
maya@example.com, selects Friday 5 PM, and attaches the project brief. Zoom in on the assignee and deadline controls so the labels remain legible on a phone screen. - Result (0:18–0:25): Hold on the payoff. The shared Friday board updates live and the card settles into the In Progress column. Hold the completed state still for at least two full seconds so the viewer can read the board without pausing.
- Close (0:25–0:30): Split the ending by destination. The marketing cut finishes on a branded end card (“Start free at taskboard.example”). The store preview cut holds the in-app board and adds any required disclosure (“Account required; Pro team workflows require a subscription”).
Script the muted track before the voiceover
Both store listings and web embeds default to silence. On the web, modern browsers allow muted autoplay while restricting autoplay with audio until the user interacts with the page (Chrome autoplay policy; WebKit iOS video policy). In the stores, Apple app previews autoplay with sound muted (Apple App Previews), and Google Play preview videos may autoplay inline with muted audio for up to 30 seconds (Google Play Console Help).
Read your storyboard’s third column—the on-screen cards and callout labels—from top to bottom without reading the voiceover column. If a stranger reading only those four or five cards and watching the UI clips can tell what the app does and who it is for, the visual script is ready. Keep each card under seven words so it can be read twice in two seconds.
If you already have raw UI clips in a ChatCut project and want the Agent to draft a timed storyboard before touching the timeline, paste a prompt that names your clips and forbids invented features:
For more ways to structure rough-cut and B-roll instructions, see our library of video editing prompts.
Capture clean, modular screen interactions
Stage a demo account and status bar
Recording one continuous 30-second run through your app almost always fails: a notification banner drops down at second 19, a typo creeps into a text field, or a network spinner hangs for four seconds. Following the modular approach indie developers use for store experiments, record each beat of the storyboard as its own short, repeatable clip of five to ten seconds.
Before capturing the first take, stage the environment so nothing in the frame distracts from the interface or leaks private data:
- Seed realistic, safe sample data. Replace “test 123” or
asdfwith believable project names, tasks, and avatars. Use reserved documentation domains such asexample.comorexample.org(IANA example domains) for email addresses and URLs, and never record a production workspace containing real customer names, API keys, or billing details. - Pre-load the “after” state. For beat 4 of the storyboard, populate the shared board with ten realistic tasks before hitting record so the board looks lived-in when the new card lands.
- Clean the mobile status bar. A 7% battery icon, carrier name, or unread badge makes a mobile recording look hurried. When you connect an iPhone or iPad to a Mac with a cable and record it through QuickTime Player, macOS automatically renders a clean iOS status bar (9:41 AM, full signal, full battery). On Android devices, enable System UI Demo Mode in System → Developer options → System UI demo mode (or via
adb shell settings put global sysui_demo_allowed 1) to force a clean, static status bar with no notification icons. - Lock window dimensions and zoom for web apps. For a browser-based saas promo video, use a dedicated browser profile with no bookmark bar or extension icons, turn on operating-system Do Not Disturb, and zoom the interface to 110%–125% so body labels remain legible when the video is scaled down inside a mobile feed.
Pick a recording method for your platform
Choose the capture tool that matches where your app runs and how much cursor or framing polish you need:
- iPhone or iPad via Mac cable (QuickTime Player): Connect the device to your Mac, open QuickTime Player, choose File → New Movie Recording, click the arrow beside the Record button, and select your iPhone or iPad under Screen (Apple QuickTime Player User Guide). This captures uncompressed device frames directly to your Mac without the red Control Center indicator.
- On-device iOS screen recording: Swipe down to open Control Center, tap the gray Record button, wait for the three-second countdown, and tap the top-screen red status pill to stop; clips save to the Photos app (Apple Support). Trim the start and end in your editor so the Control Center drawer and red stop prompt never appear in the finished cut.
- Android Studio Logcat screen recorder: Connect an Android device or launch an emulator, open View → Tool Windows → Logcat, and click Screen Record in the left Logcat toolbar (Android Studio User Guide). Set the bit rate (default 4 Mbps) and resolution (width and height in multiples of 16), optionally enable Show Taps, and save the resulting MP4 (up to three minutes per take; audio is not recorded with the video file).
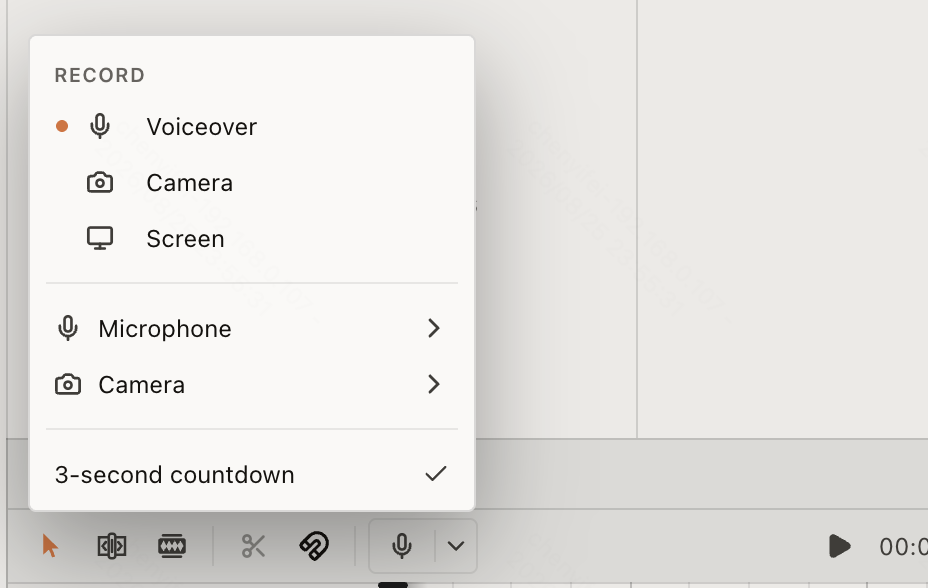
- Manual web or desktop capture in ChatCut: In ChatCut Web or Desktop, click the chevron on Record in the Timeline playback controls, open Recording settings, choose Screen, select a microphone if narrating live, and click the left Record button to pick your app window or display in the system picker (ChatCut recording docs). Click Stop recording when the interaction finishes; the clip lands in My Assets and on the timeline at the starting playhead, and recording itself uses no credits.
- Assisted or automated Mac capture (Auto Screen Recorder): If you are recording a web or desktop app in ChatCut Desktop on macOS, open Skills in the AI composer (or type
/) and select Auto Screen Recorder (Auto Screen Recorder guide). You can either let the Agent operate the target window and record the steps automatically (after granting macOS Screen Recording and Accessibility permissions), record the steps yourself while the Agent handles framing and cleanup, or pass an existing screen recording. It removes failed attempts and dead time with hard cuts, frames the window on your chosen aspect ratio (16:9,4:3,9:16, or1:1) and background, and places the recording, callouts, pointer effects, zooms, and optional voiceover on separate editable tracks.
Use motion graphics to frame real UI
Pair short title cards with real UI proof
Raw screen recordings rarely work alone as a marketing promo because an unfamiliar interface takes several seconds for a viewer to parse. Full-screen motion graphics have the opposite problem: animated shapes and slogans look polished, but a careful buyer immediately wonders whether the actual software exists.
The fix is a strict division of labor between motion graphics and real screen footage:
- Use a motion-graphics card (1.5–2.5 seconds) to ask the question or state the benefit in large, high-contrast typography before the UI appears.
- Cut immediately to the real screen recording (3–8 seconds) at the exact frame where the cursor or finger initiates the action, and hold the resulting screen state still so the viewer sees the proof.
- Use lightweight on-screen callouts or zooms inside the UI shot only to direct the eye to the active control, never covering the button being clicked or the result being proved.
Keep card and callout typography high-contrast and uncluttered. Web accessibility standards require a minimum contrast ratio of 4.5:1 for normal text and 3:1 for large text (W3C WCAG 2.2 Contrast Minimum); in a compressed mobile feed watched outdoors, meeting or exceeding those contrast ratios determines whether a two-second title card is readable at a glance.
In the Cards & Text Skill demo above, each scene opens with a single short headline on a clean background, then brings in visual cards that illustrate the feature before advancing to the next beat. When you adapt that structure for your own app, replace the sample cards in beats 2, 3, and 4 with your captured UI interactions so the typography sets up the claim and your real interface closes it.
Match the motion style to the app
Different app categories need different ratios of typography, card animation, and raw interface capture. In ChatCut, three app-promo visual Skills cover the common structures on an editable multi-track timeline:
- Cards & Text (
app-saas-cards-text): Best when you want a fast, typography-led launch promo for a mobile app or SaaS tool. You supply your product website URL and assets, and the Skill adapts its measured storyboard of bold intro cards and feature frames to your brand colors, logo, and copy. - Flat-card SaaS Explainer (
app-promo-flat-cards): Best when your product replaces a messy multi-window workflow (such as switching between email, docs, and spreadsheets) and you need simplified flat UI cards to visualize the before-and-after state before showing the real interface. - AI Assistant Feature Tour (
app-promo-ai-feature-tour): Best when a release introduces three or four distinct capabilities (such as prompt input, generation, and export) that each need a chapter title card followed by a focused interface demonstration.
Notice in the Flat-card SaaS Explainer demo how simplified graphics can illustrate a concept like “switching focus across windows” faster than four tiny, unreadable browser screenshots—and notice that the sample includes a social-proof card (“Used by 2,000+ teams”). When adapting any template or Skill for your own product, keep only claims and customer numbers you can substantiate, and delete placeholder social proof for your store preview cuts.
In ChatCut, the Free plan includes the core editor—manual timeline editing, uploads, transcription, and standard caption editing never use credits, and exporting video (MP4/WebM), audio (MP3), subtitles, or XML does not use credits either (Free and Pro; Credits policy). When you control ChatCut through the Claude Code or Codex plugin/MCP, the agent’s editing work—cutting takes, reordering beats, placing B-roll, and writing motion graphics from the host agent—is covered by your existing Claude or ChatGPT subscription rather than ChatCut credits. ChatCut credits are used only when you message the built-in ChatCut Agent, generate motion graphics in the built-in Agent, or call a ChatCut-hosted generation service (AI video, image, music, sound effects, or voiceover).
To assemble your recorded takes and logo into a 30-second website promo without inventing UI screens, paste this prompt into the Agent:
Once the 30-second marketing timeline looks right, ask the Agent to create a second timeline stripped down for store review:
Cut separate Apple and Google store previews
Never upload your website marketing file straight to both app stores without checking their technical and content rules. Apple and Google use completely different delivery mechanisms, aspect-ratio rules, and CTA restrictions.
Follow Apple App Store Connect preview rules
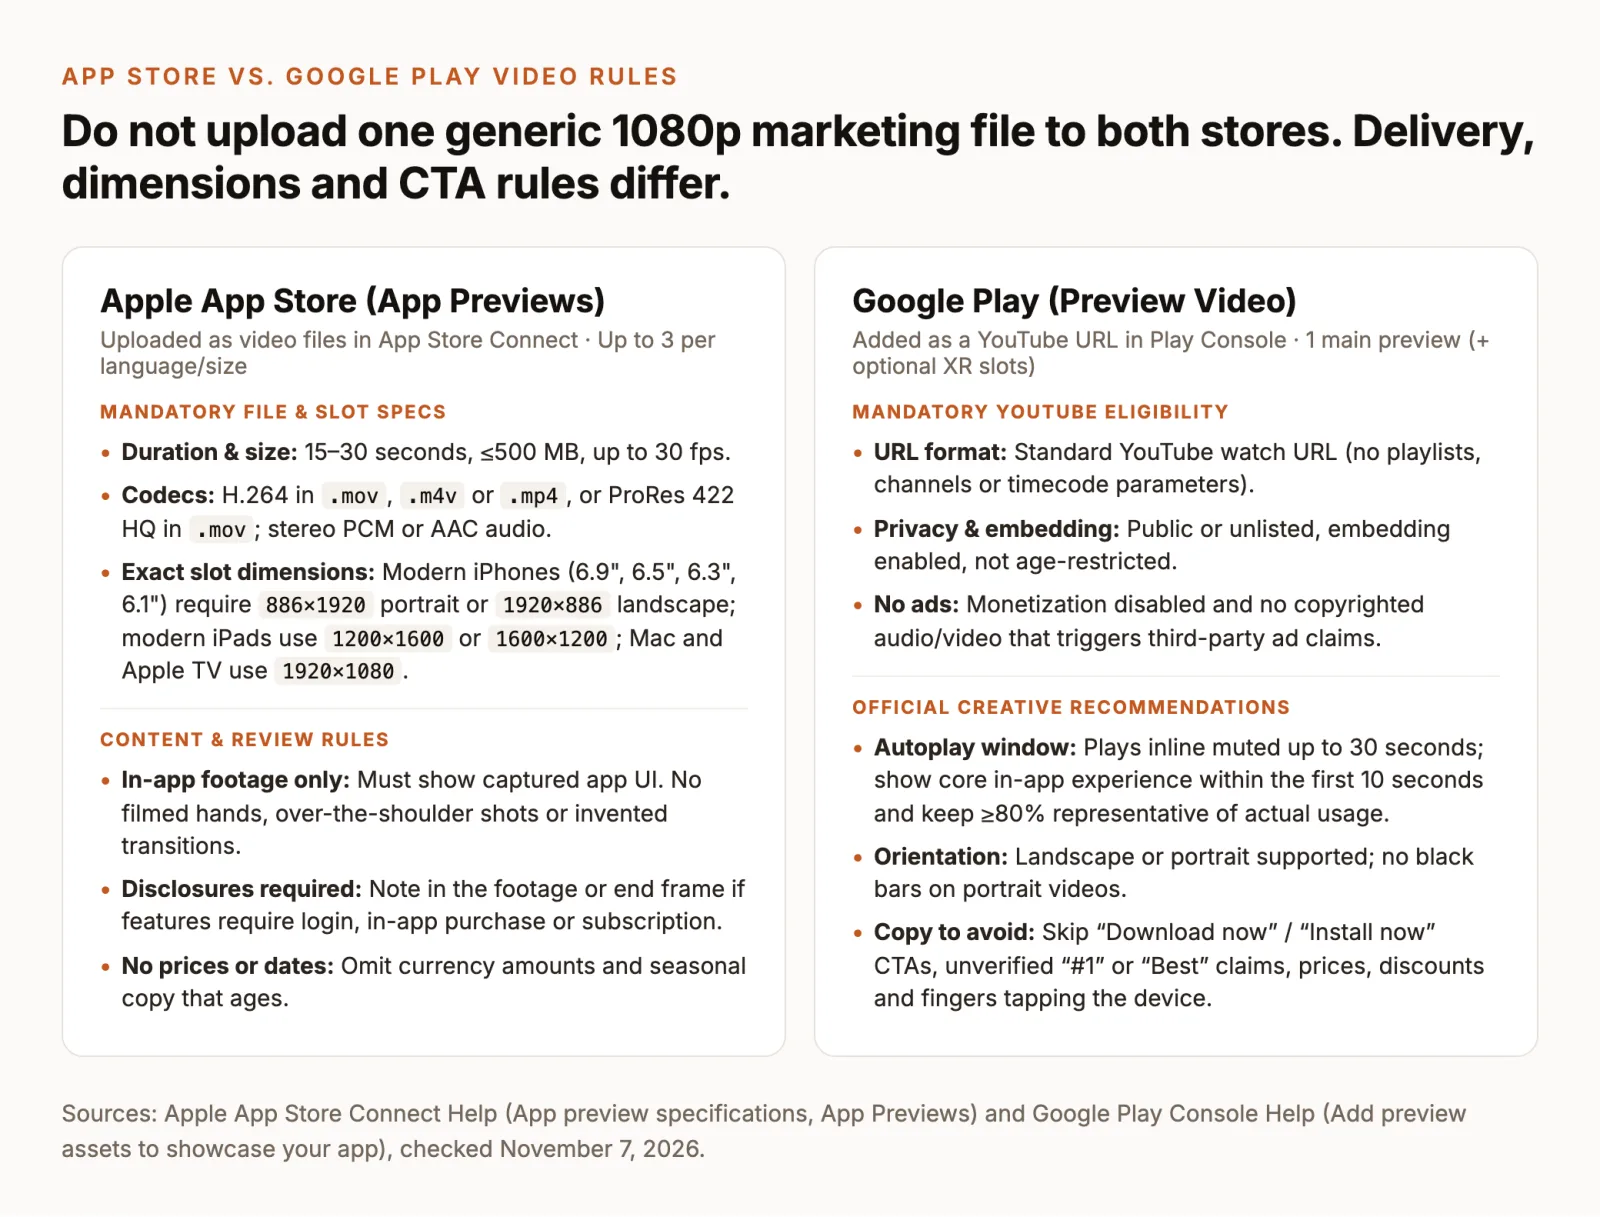
Apple treats app previews as device-specific product demonstrations uploaded directly as video files inside App Store Connect. Every preview goes through App Store review alongside your build (App Store Review Guidelines, Section 2.3.4). Based on Apple’s official App preview specifications and App Previews creative guidance, check both the file container and the visual content:
- Length, file size, and frame rate: Every preview must run between 15 and 30 seconds, be 500 MB or smaller, and use a frame rate of up to 30 fps. You can upload up to three app previews per supported display size and localization.
- Accepted codecs and containers: Apple accepts H.264 in
.mov,.m4v, or.mp4containers (High Profile Level 4.0 recommended, 10 to 12 Mbps target bit rate) or ProRes 422 HQ in.mov, paired with stereo uncompressed PCM or 256 kbps AAC audio at 44.1 kHz or 48 kHz. An audio track is required even if silent. - Exact device-slot dimensions (not generic 1080p): Do not assume a standard
1080 × 1920social export will upload into every iPhone slot. Apple requires exact pixel dimensions for each display class:- iPhone 6.9”, 6.5”, 6.3”, and 6.1” displays:
886 × 1920(portrait) or1920 × 886(landscape). - iPhone 5.5” and 4” display slots:
1080 × 1920(portrait) or1920 × 1080(landscape). - iPhone 4.7” display slot:
750 × 1334(portrait) or1334 × 750(landscape). - iPad 13”, 12.9”, 11”, and 10.5” displays:
1200 × 1600(portrait) or1600 × 1200(landscape); legacy 12.9”/9.7” slots accept900 × 1200or1200 × 900. - Mac and Apple TV:
1920 × 1080(landscape only; Mac runs 16:9 or 16:10 slots per App Store Connect).
- iPhone 6.9”, 6.5”, 6.3”, and 6.1” displays:
- In-app captured footage only: Apple states that app previews must show content captured within the app itself. Do not include live-action footage of people holding a phone, over-the-shoulder shots, or fingers tapping the glass. You may use straightforward transitions (dissolves and fades), graphic touch hotspots, and legible copy overlays to add context for muted playback, provided transitions never imply functionality the app lacks.
- Mandatory disclosures and timeless copy: If your preview shows features that require an in-app purchase, a paid subscription, or an account login, you must disclose that requirement within the footage or in the end frame. Omit specific currency prices (which vary by storefront territory) and time-sensitive phrases like “New for spring” or year numbers.
Set up a Google Play YouTube preview
Google Play does not accept a direct MP4 upload for your main store listing preview. Instead, you paste a YouTube URL into the Preview video field under Grow users → Store presence → Main store listing in Play Console (Google Play Console Help). Separate Google’s hard technical eligibility rules from its creative recommendations:
- Mandatory YouTube settings: You can add one standard preview video (plus up to two optional Android XR videos for spatial or headset listings). The link must be a standard YouTube video URL—not a playlist or channel URL, and with no extra URL parameters such as timecodes. The YouTube video must be public or unlisted (never private), allow embedding, have no age restriction, and have ads and monetization disabled. If your video uses copyrighted music or footage that triggers a Content ID monetization claim, turning off monetization on your own channel may not stop third-party ads from appearing; use fully cleared audio so Google Play does not suppress the preview. Encode the YouTube upload as a standard H.264 MP4 with AAC audio at the native frame rate (YouTube upload encoding settings).
- Autoplay and orientation behavior: Google Play displays your preview before your screenshots, overlays a play button on your feature graphic, and may autoplay inline with muted audio for up to 30 seconds depending on the user’s device, settings, network connection, and store surface. Both landscape and portrait orientations are supported, provided a portrait video has no black pillarbox bars on either side.
- Google’s creative recommendations: Google strongly recommends showing the actual in-app or in-game experience within the first 10 seconds, keeping at least 80% of the video representative of the real user experience, and limiting title screens, logos, or pre-rendered promotional cutscenes. Like Apple, Google advises against showing fingers tapping the device unless core usage happens off-device.
- Copy and CTA restrictions on Google Play: In on-screen copy, Google advises against calls to action such as “Download now,” “Install now,” “Play now,” or “Try now,” as well as unverified store-performance or ranking claims (“Best,” “#1,” “Top,” “Million Downloads”), user testimonials, or transient price/discount tags (“Sale,” “Discount”). Official awards granted by Google Play (such as “Best Of”) are permitted.
Export, watch muted and verify each file
Export from ChatCut and check slot dimensions
When your marketing and store timelines are ready, open Export → Video in the ChatCut header (export guide). Choose H.264/MP4 (or VP8/WebM for web-only embeds), select your resolution and frame rate, and export either the full Timeline or a marked Zone.
In the web editor, cloud exports render up to 1080p (480p, 720p, and 1080p presets), and Free accounts share a cumulative 60-minute cloud export quota. In ChatCut Desktop (available for macOS 13+ on Apple silicon or Intel and Windows 10+ x64; Linux and ChromeOS are not supported), local video rendering runs on your computer and supports resolution presets up to 4K (a 2160-pixel short side) without using credits (desktop local export; product facts).
Check one important boundary before uploading to Apple’s App Store Connect: ChatCut’s standard resolution selector exports standard aspect-ratio presets (480p, 720p, 1080p, and 4K), not Apple’s device-specific 886 × 1920 or 1200 × 1600 slot dimensions. For your website hero, YouTube upload (which powers your Google Play preview), and 1080 × 1920 social feeds, the direct H.264 MP4 export fits as-is. For Apple’s 6.9”/6.5” iPhone (886 × 1920) or iPad (1200 × 1600) slots, either capture at native device resolution and scale the exported H.264 master to the exact slot dimensions in a post-export transcode pass, or verify the file dimensions in Finder (Get Info) before dragging it into App Store Connect.
If you embed the marketing cut on your own landing page, include the autoplay, muted, loop, and playsinline attributes on the HTML <video> tag so Chrome and iOS Safari allow inline playback without requiring a tap (Chrome autoplay policy; WebKit iOS policy).
Run a pre-upload checklist before publishing
Open every exported file in a standard media player—and on an actual phone screen—before you publish or submit to review:
- UI truth and disclosures: Every feature shown works in the shipping build, no proof interaction is faked with a transition, and login, subscription, or in-app purchase requirements are disclosed on screen for the store cut.
- Muted comprehension: Turn the volume to zero and watch from 0:00 to 0:30. The benefit cards, callouts, and UI actions make complete sense without voiceover, and every text overlay stays clear of the button being clicked.
- First frame and poster frame: Frame one (and the 5-second mark) shows a clean, recognizable app screen rather than a half-faded transition or blank background.
- Audio rights and ad-claim safety: Your background music and UI sound effects are cleared for commercial and paid-ad use, with no Content ID claims that could force ads onto your Google Play YouTube link.
- Exact dimensions, codec, and file size: The Apple file is H.264 or ProRes 422 HQ under 500 MB at ≤30 fps in the exact pixel dimensions of the target App Store Connect slot; the Google Play YouTube video is public or unlisted, embeddable, unmonetized, and free of black bars.
- Destination-appropriate ending: The website and social cuts end on one specific URL or trial action; the Google Play cut omits “Download now” / “Install now” text; the Apple cut omits prices and dated seasonal copy.