No, Google Translate can’t translate a video file. As of November 2026, its website accepts text, speech from your microphone and documents (.docx, .pdf, .pptx and .xlsx up to 10 MB), not MP4s or YouTube links. Google does have other tools that translate what a video says while you watch it: Live Translate in Chrome, Auto-translate captions on YouTube, and YouTube’s automatic dubbing for eligible channels. None of them gives you a translated video you can download and publish. This guide covers what each Google tool does, how to use it to understand a foreign-language video, and what to use when you need translated subtitles or a dubbed copy of your own video. Every claim was checked against Google’s help pages on November 5, 2026.
Key Takeaways
- To understand a video, use Chrome’s Live Translate (any audio playing in Chrome) or YouTube’s Auto-translate captions. Both are free and show translated captions on screen only.
- Google Translate itself translates text, speech and documents. You can paste a transcript into it, but you then have to rebuild the subtitle timing yourself.
- YouTube automatic dubbing adds translated audio tracks to eligible uploads, but the dubs can’t be edited and stay on YouTube.
- To publish a translated video, you need a subtitle file or a dubbed copy made from the video file, then a human check. Our video translation guide walks through that.
Can Google Translate a video directly?
Not in the sense most people mean. Google Translate’s document translation accepts four file types, .docx, .pdf, .pptx and .xlsx, up to 10 MB, and PDFs up to 300 pages. There is no video or audio upload, and no field for a YouTube link. The same page notes that text inside images isn’t translated, so even a PDF of screenshots comes back partly untranslated.
What Google Translate can do is translate speech it hears through a microphone. On a computer, Translate by speech works in Chrome, with limited support in Safari and Edge, and it doesn’t detect the spoken language automatically. On Android, the app’s Transcribe mode (Speak → Transcribe) translates continuous speech, such as a lecture, and lets you save the transcript. If you play a video aloud next to your phone, Transcribe will pick it up, but that’s a workaround: background music, overlapping speakers and room noise all reach the microphone too.
The useful Google tools for video sit elsewhere. Chrome, YouTube and the Translate app each handle a different part of the job.
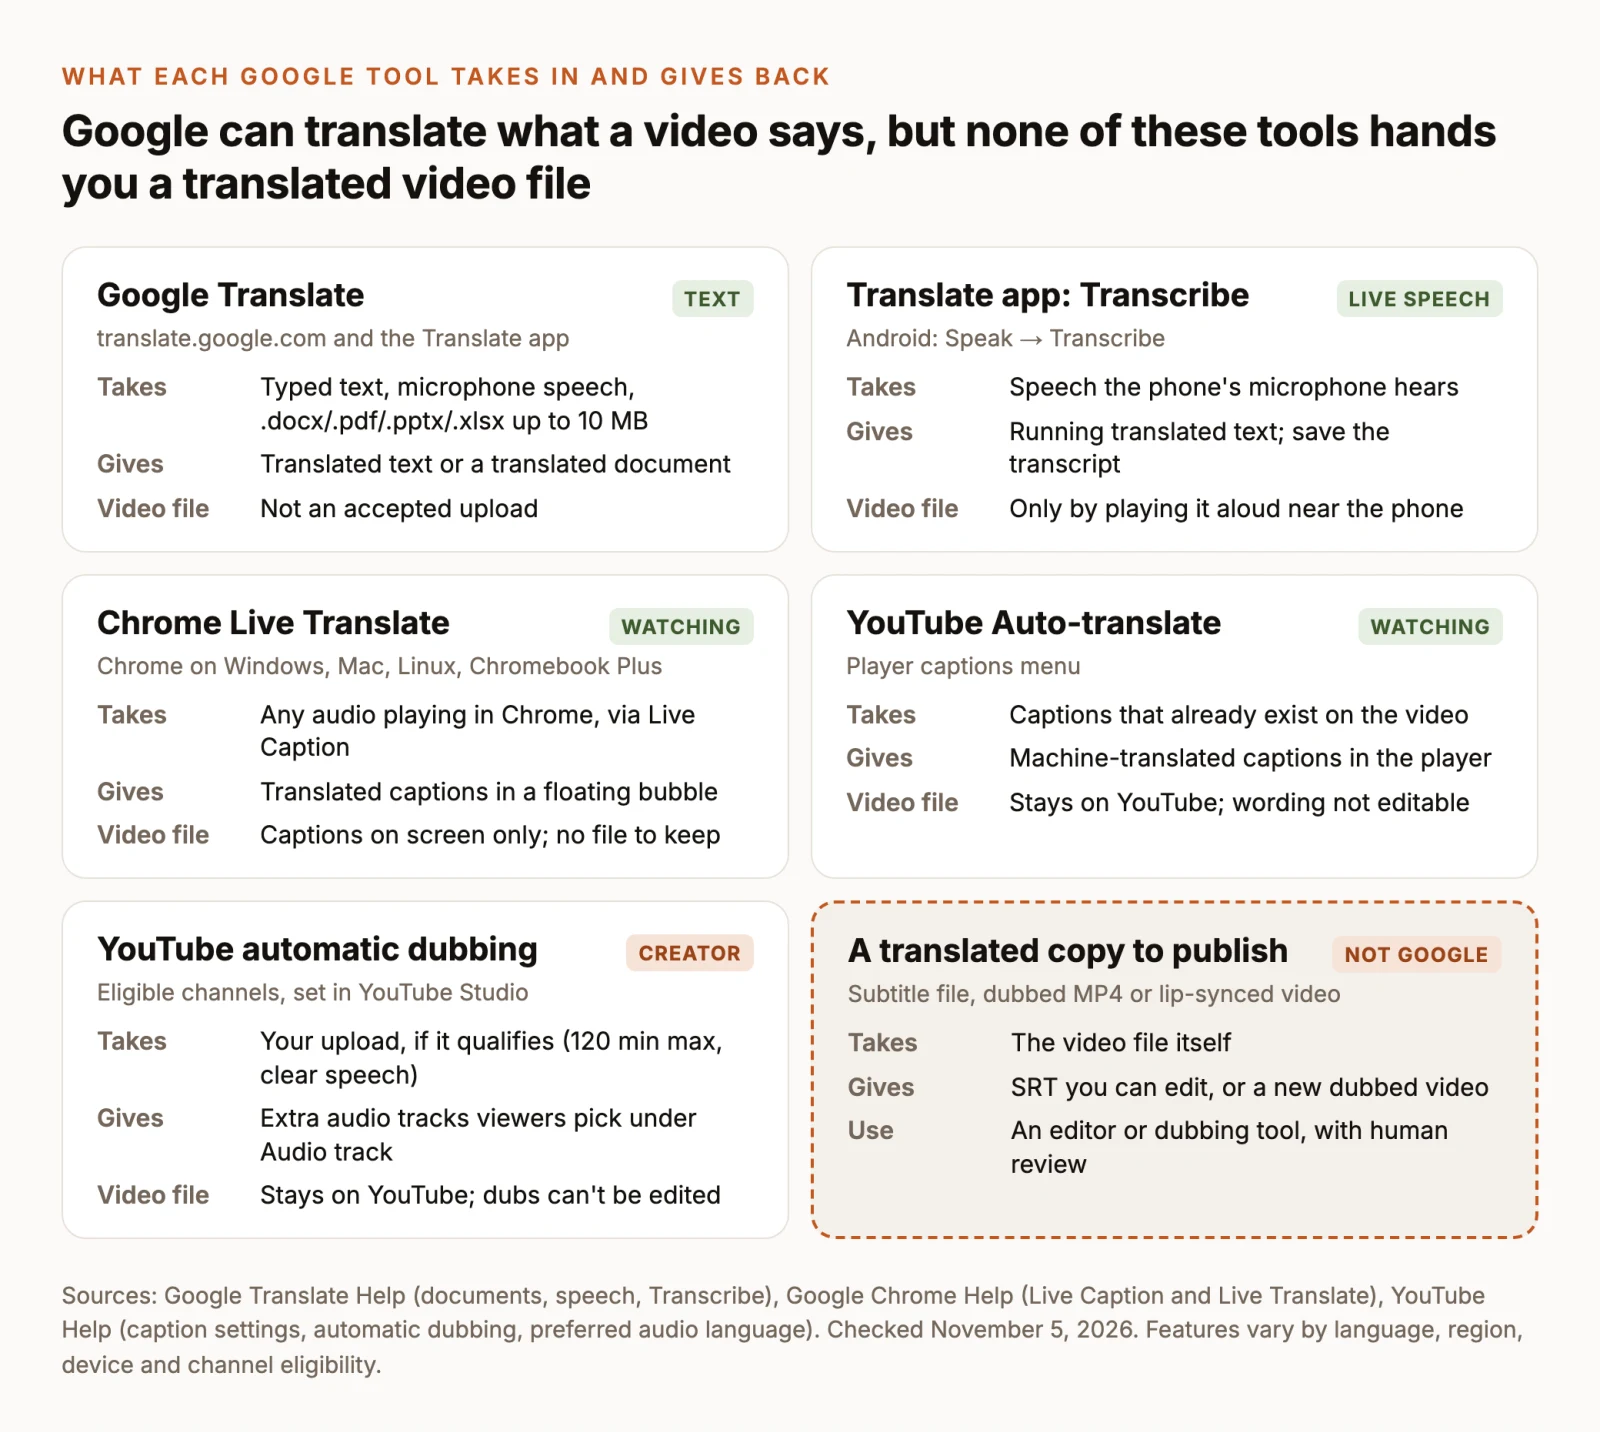
Two questions decide which tool you need: whether you’re watching someone else’s video or publishing your own, and whether you need text (captions you read) or speech (audio in another language). Watching with text is free and instant in Chrome and YouTube. Publishing, or getting speech, takes more work.
Translate a video while you watch it
Use Live Translate in Chrome for any video
Chrome’s Live Caption and Live Translate caption audio playing in the browser, then send those captions to Google to translate. It works on video sites other than YouTube, on podcasts, and on video calls, which makes it the closest thing to “Google Translate for video”.
- Open Chrome on Windows or Mac, then go to More (⋮) → Settings → Accessibility. On Linux, select Captions first.
- Turn on Live Caption. If the video isn’t in English, select Add languages next to “Manage languages” so Chrome downloads that language pack, and set the Preferred caption language.
- Turn on Live Translate, then choose the language you want next to Translate to.
- Play the video. Translated captions appear in a bubble you can drag. If they don’t, turn the video’s volume up: Google notes captions for autoplaying videos need the sound on.
Live Caption processes audio on your computer, but Live Translate sends the captions to Google for translation. The captions live in the bubble only. Google’s help page documents no way to save or export them, so this route is for understanding a video, not for making subtitles. On a Chromebook Plus the settings are under Accessibility → Audio and captions, and the page lists the languages it can translate from.
Turn on Auto-translate captions on YouTube
YouTube can machine-translate a video’s existing captions into your language. Google’s caption settings help describes the steps for the phone apps:
- Start the video and tap the player to show the controls.
- Tap More at the top right of the player, then Captions, and look for your language.
- If it isn’t listed, tap Auto-translate, then choose a language.
On a computer, turn captions on with the CC button, then open Settings → Subtitles/CC; Google’s help names Auto-translate as the option to pick when your language isn’t listed. Google’s current computer help page documents only the on/off and style controls, so the exact menu can differ from what you see.
Auto-translate needs captions to translate. If the creator uploaded subtitles, YouTube translates those. If not, it translates YouTube’s automatic captions, which are speech recognition and can be wrong on names, accents and fast speech. When the CC button is missing, there are no captions, and there’s nothing to auto-translate.
Switch to a dubbed audio track
Some YouTube videos also carry translated speech. A creator can upload their own dubbed tracks with multi-language audio, or YouTube can generate them with automatic dubbing; videos with generated dubs are marked “auto-dubbed” in the description. To change what you hear, open the player’s Settings → Audio track and pick a language. To make dubs the default, set your preferred languages under your profile picture → Settings → Languages → Preferred languages (YouTube help).
If a video has no Audio track option, it has no extra languages, and nothing on your side adds one. Captions are then the only route.
Why Auto-translate is missing or wrong
Most problems trace back to the source captions, not the translation step.
- The video has no captions. No CC button means no Auto-translate. Automatic captions may not be ready yet on a new upload; Google says processing time depends on how complex the audio is.
- The language isn’t supported for automatic captions. YouTube publishes the list of languages it can caption automatically. Speech in another language produces no automatic captions, so there’s nothing to translate.
- Speech recognition failed. Google lists poor sound quality, a long silence at the start, overlapping speakers and mixed languages as reasons automatic captions don’t appear.
- The video has several audio tracks. Automatic captions are created in the default language only, so they may not match the dub you’re listening to.
- The creator turned captions off or uploaded only some languages. Auto-translate can’t work around that.
When the captions exist but the translation reads badly, look at the original captions first. Switch Auto-translate off, read a few lines in the source language, and see whether a misheard word started the error. A wrong source line produces a wrong translation every time. Machine translation also struggles with names, idioms and jargon; YouTube’s dubbing page says the same about its own dub quality.
Translate a transcript with Google Translate
If you want to read or keep a translation rather than watch along, copy the transcript and translate the text. For your own video, the caption track is in YouTube Studio under Subtitles, where Google suggests reviewing automatic captions before you use them. For someone else’s video, YouTube’s transcript panel shows the caption text when the video has captions.
- Paste the transcript into Google Translate and set the source and target languages.
- Translate long transcripts in sections. Smaller chunks keep paragraph breaks and make errors easier to spot.
- Read the result against the video. Fix names, product terms and numbers, which machine translation gets wrong most often.
This gives you text, not subtitles. A transcript has no timing, so to publish the translation as captions you still need to time it to the video. YouTube’s Add subtitles page offers Auto-sync for a pasted transcript, but Google notes the transcript must be in the same language that’s spoken in the video. A pasted translation won’t sync to speech in another language. For timed translated subtitles, start from a caption file such as SRT, which YouTube accepts as an upload, and translate it line by line in a subtitle tool so the timings stay put.
When you need a translated video to publish
Viewer tools stop at your screen. If you’re the creator, the outcome you need is a file: a subtitle track in the new language, or a new version of the video with translated speech. YouTube’s own creator tools cover part of this, but only on YouTube. Automatic dubbing is on by default for eligible creators, skips videos longer than 120 minutes or with very fast speech, and produces dubs you can preview, publish or delete in YouTube Studio but can’t edit. If a dub is mistranslated because the video’s language was set wrong, correcting the language makes YouTube generate it again.
For anywhere else (TikTok, Instagram, a course platform, a client delivery), you need a translated copy you control. There are three outputs to choose between, and the choice depends on how your audience watches:
- Translated subtitles keep the original voice and put the new language on screen. They’re the cheapest, and the right choice for interviews where the speaker’s own voice matters.
- Dubbing replaces the speech with translated speech. Use it for tutorials and explainers people watch without reading along.
- Lip sync goes further and re-renders the speaker’s mouth to match the new words. It’s for talking-head videos where the speaker fills the frame.
Our guide to translating a video covers each of these step by step, including preparing the source and checking the result. The summary below shows how the same jobs work in ChatCut.
Translated subtitles with the original voice
In ChatCut, subtitles come from the transcript. Turn captions on, open the Captions control and choose Translate captions, then pick the target language (Transcript and Captions docs). The result is a separate “Translation” caption source you can edit, style and export on its own through Export → Subtitles as SRT or plain text. That file is what you upload to YouTube Studio or any other platform. If you need to decide between a sidecar file and captions burned into the picture, our subtitles guide explains the trade-off.
Dubbing, with optional lip sync
Video translation in ChatCut creates a new localized video from one in your project. It can keep the original speaker’s voice, add translated captions and, if you ask, synchronize the speaker’s mouth to the new words. The source file is never replaced.
Need a dubbed version of your own video? Check out the Video Translation Skill: add the video, choose the target language and review the script before anything is generated.
The steps, from the video translation docs:
- Import the complete video into My Assets, open the AI panel and keep the composer in Agent mode.
- Mention the video with
@and say the target language, whether you want lip sync, whether to add captions, and whether the duration must stay identical. - Review and correct the detected transcript, then confirm it. The confirmed text drives the translation.
- Check the paid confirmation, which shows the treatment, source duration and credit estimate, then allow generation.
- Review the new asset for wording, pronunciation, speaker changes and, if used, mouth movement, then drag it to the timeline.
Here is a prompt for the most common case, a dub that leaves the picture alone. It’s adapted from the docs’ own examples and wasn’t run for this article; change @source-video to your clip’s name and the language to yours.
For a presenter on camera, ask for lip sync instead:
Three limits are worth knowing before you start. Translation is billed on the full source duration, so trim and export the part you need as its own asset first if you only want a section translated. Lip sync re-renders the picture, so codec, bitrate, HDR and frame rate may not match the original; choose audio-only when the picture must stay identical. And generation uses credits, which the confirmation shows before anything runs (generation credits). Subtitle translation in the Captions panel is a separate, lighter route.
What to check before you publish a translation
Whatever produced the translation, Google, YouTube or an editor, a person who reads the target language should check it once before it goes out. Machine output fails in predictable places:
- Names, brands and numbers. Prices, dates and product names are where a single wrong word does the most damage.
- Terms of art. A word with a specific meaning in your field may come back as its everyday sense.
- Timing. Translated text often runs longer than the original. Read each subtitle at playback speed; dubbed speech may need a slightly longer duration to sound natural.
- Burned-in text. None of these tools translates text that’s part of the picture, such as titles or slides. Plan to replace those separately.
- Rights. Translate and republish only video you own or have permission to adapt, including the voices in it.
ChatCut Desktop runs on macOS 13 or later (Apple silicon or Intel) and Windows 10 or later (x64); there’s also a web app. Local exports go up to 4K and cloud exports up to 1080p.