To learn how to use Nano Banana in Photoshop, open an image in the current mainline Photoshop desktop app, select the area or whole canvas, click Generative Fill in the Contextual Task Bar, and switch the model picker from Adobe Firefly to Gemini 3 (with Nano Banana Pro) or Gemini 3.1 (with Nano Banana 2). You need an updated Photoshop desktop installation (version 27.6 or later; the older Gemini 2.5 option was removed in v27.11) and an Adobe plan with premium generative credits (10 to 40 credits per run). This guide covers the native Photoshop steps, model and credit rules, missing-model fixes, and how to bring your finished still into a ChatCut video timeline.
Before you start: version, model and credits
Using Google’s Nano Banana models inside Photoshop requires the current mainline desktop release of Photoshop, a Creative Cloud plan that includes access to premium generative AI features, and enough monthly Adobe generative credits to cover 10 to 40 credits per generation. You do not need a separate Google account, a Gemini subscription, or an API key for the native Photoshop workflow.
We verified the menu paths, version boundaries, and credit tables below against Adobe’s and ChatCut’s official documentation on November 7, 2026. We did not run live Photoshop or ChatCut test generations for this article; treat the example prompts as untested starting briefs and inspect every generated layer at 100% zoom before publishing.
Check which Nano Banana option appears
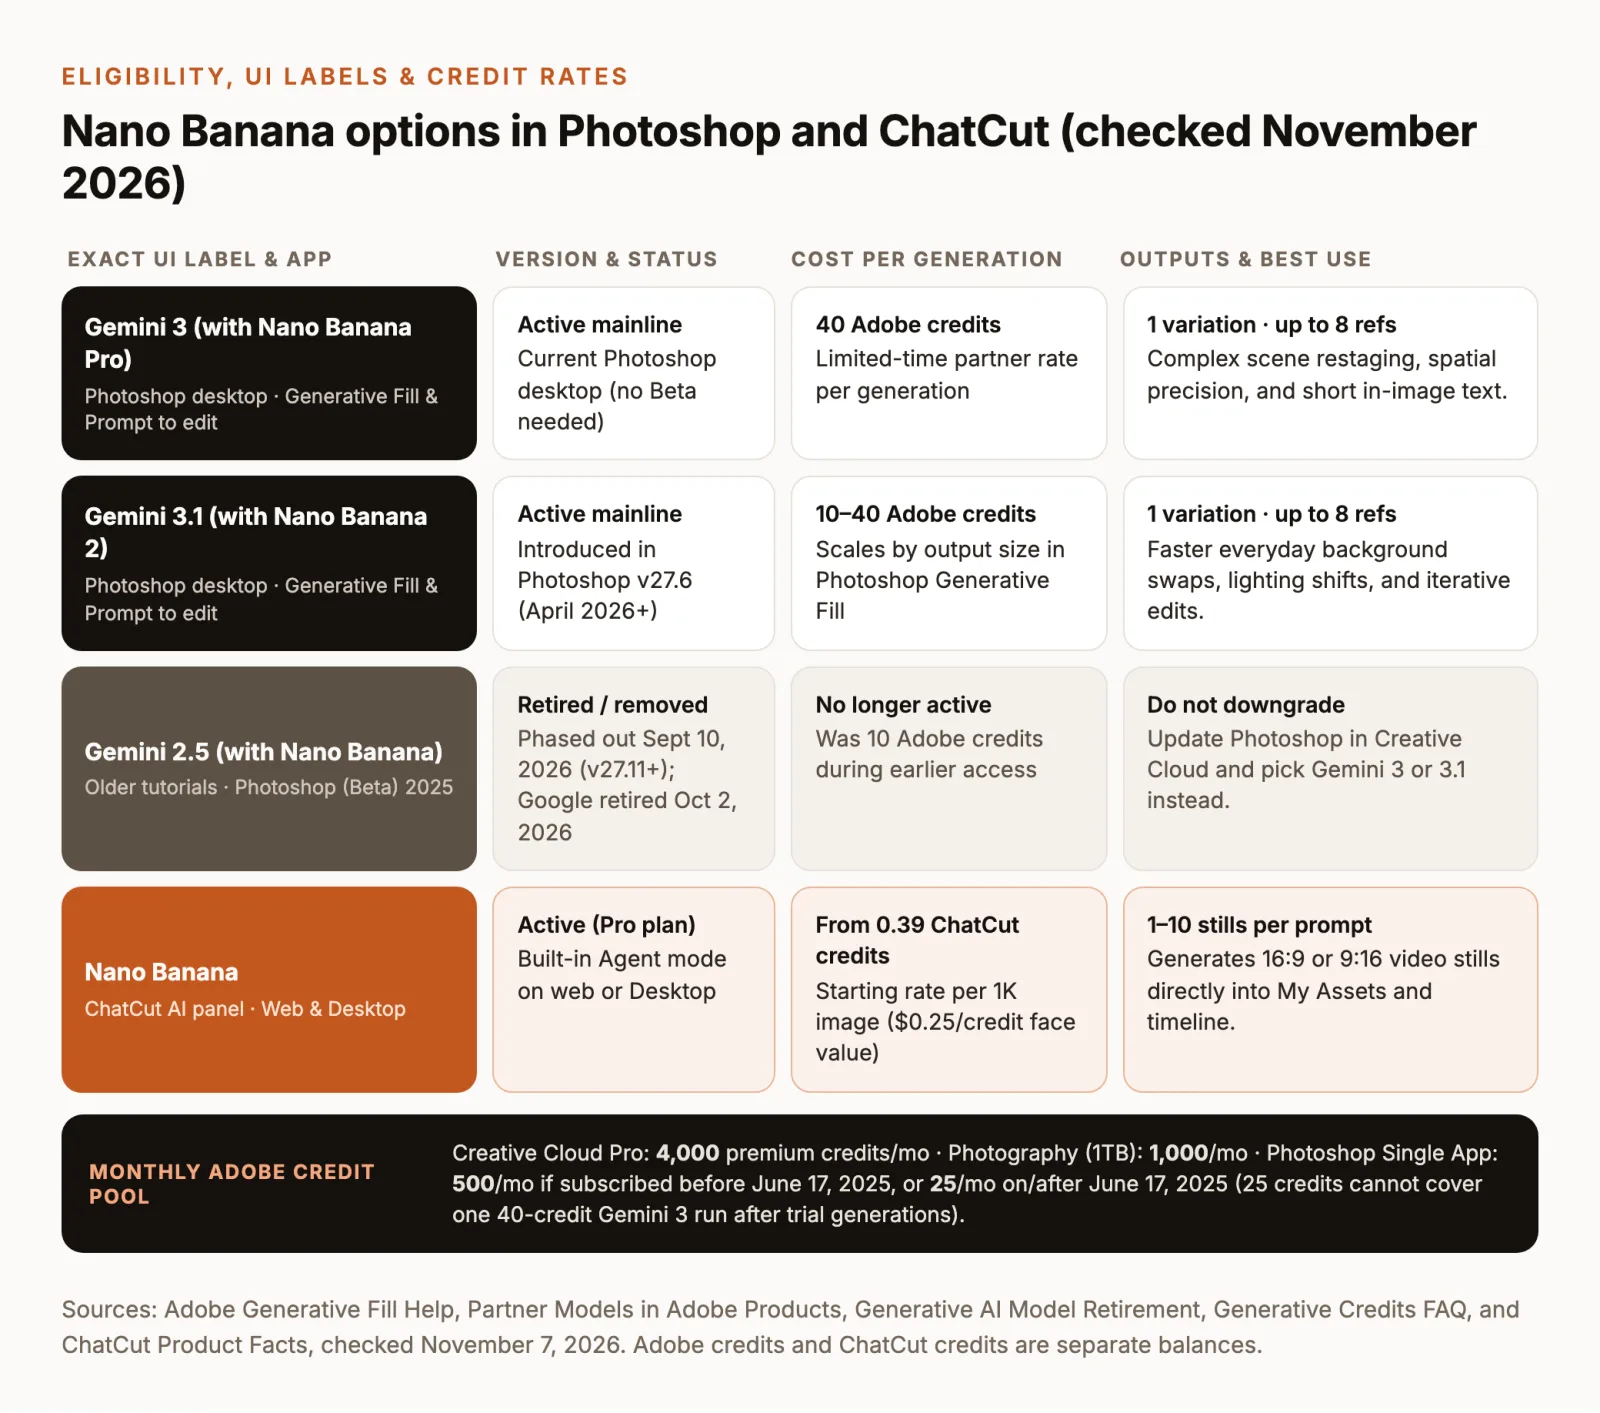
When you open the model picker inside Photoshop’s Generative Fill bar or Prompt to edit dialog, Adobe lists Google’s image models by their Gemini version alongside their Nano Banana name. According to Adobe’s Generative Fill documentation and partner models guide, the desktop picker currently offers two active Google partner models alongside Black Forest Labs’ FLUX.2 pro and FLUX Kontext pro:
Gemini 3 (with Nano Banana Pro): Google’s reasoning-driven image generation and editing model (Google’s Nano Banana Pro overview), listed by Adobe for high-precision scene edits, complex spatial instructions, and functional design.Gemini 3.1 (with Nano Banana 2): Introduced in Photoshop desktop’s April 2026 release cycle (v27.6) alongside multi-reference support (Photoshop desktop What’s New), tuned for faster, everyday image creation and instructional editing.
Many video tutorials from late 2025 tell you to install Photoshop (Beta) and choose Gemini 2.5 (with Nano Banana) or Gemini 2.5 Flash Image (Nano Banana). That label is now retired. Per Adobe’s generative AI model retirement notice, Google scheduled Gemini 2.5 for retirement starting October 2, 2026, and Photoshop began removing the model on September 10, 2026 and in the September 2026 build (v27.11) and later. Do not downgrade Photoshop or hunt for an old Beta build to bring Gemini 2.5 back; update your mainline Photoshop app in the Creative Cloud desktop app and pick Gemini 3 (with Nano Banana Pro) or Gemini 3.1 (with Nano Banana 2) instead.
Check what each generation costs
Adobe splits generative AI tools into standard and premium features in its Generative credits FAQ. Standard Generative Fill using Adobe Firefly models (Firefly Fill & Expand, Firefly Image 5, Firefly Image 1) costs 1 credit per generation and is unmetered on Creative Cloud Pro and Firefly plans. Partner models from Google, Black Forest Labs, and OpenAI are categorized as premium features and always deduct from your monthly credit balance:
| Partner model in Photoshop | Credits per generation | Output behavior |
|---|---|---|
Gemini 3 (with Nano Banana Pro) | 40 Adobe credits (limited-time rate) | 1 variation per run |
Gemini 3.1 (with Nano Banana 2) | 10–40 Adobe credits by output size | 1 variation per run |
Gemini 2.5 (with Nano Banana) | Retired (was 10 credits) | Removed in Photoshop v27.11+ |
Keep three billing boundaries in mind before iterating on a prompt:
- Photoshop Generative Fill vs. standalone Firefly rates: In Adobe Firefly, Express, and Firefly Boards, Adobe’s partner models table lists
Gemini 3.1 (with Nano Banana 2)at 20 credits for 1K/2K and 30 credits for 4K. Inside Photoshop Generative Fill, Adobe specifically charges 10 to 40 credits depending on the output size of your selection. - One variation per click: Standard Firefly fills generate three variations per click. Partner models in Photoshop generate one variation per run, so clicking Generate three times to compare options spends 30 to 120 credits.
- Monthly plan allowances vary sharply by signup date: According to Adobe’s Generative credits FAQ, Creative Cloud Pro (formerly All Apps) includes 4,000 monthly premium credits, and Photography (1TB) includes 1,000. However, Photoshop Single App includes 500 monthly credits only if you subscribed before June 17, 2025, and drops to 25 monthly credits if you subscribed on or after June 17, 2025 (Creative Cloud Standard also includes 25). Once any complimentary trial generations are used, a 25-credit monthly allowance cannot cover a single 40-credit
Gemini 3 (with Nano Banana Pro)generation without upgrading or adding a Firefly credit plan. Credits reset monthly on your billing date and do not roll over.
How to use Nano Banana in Photoshop
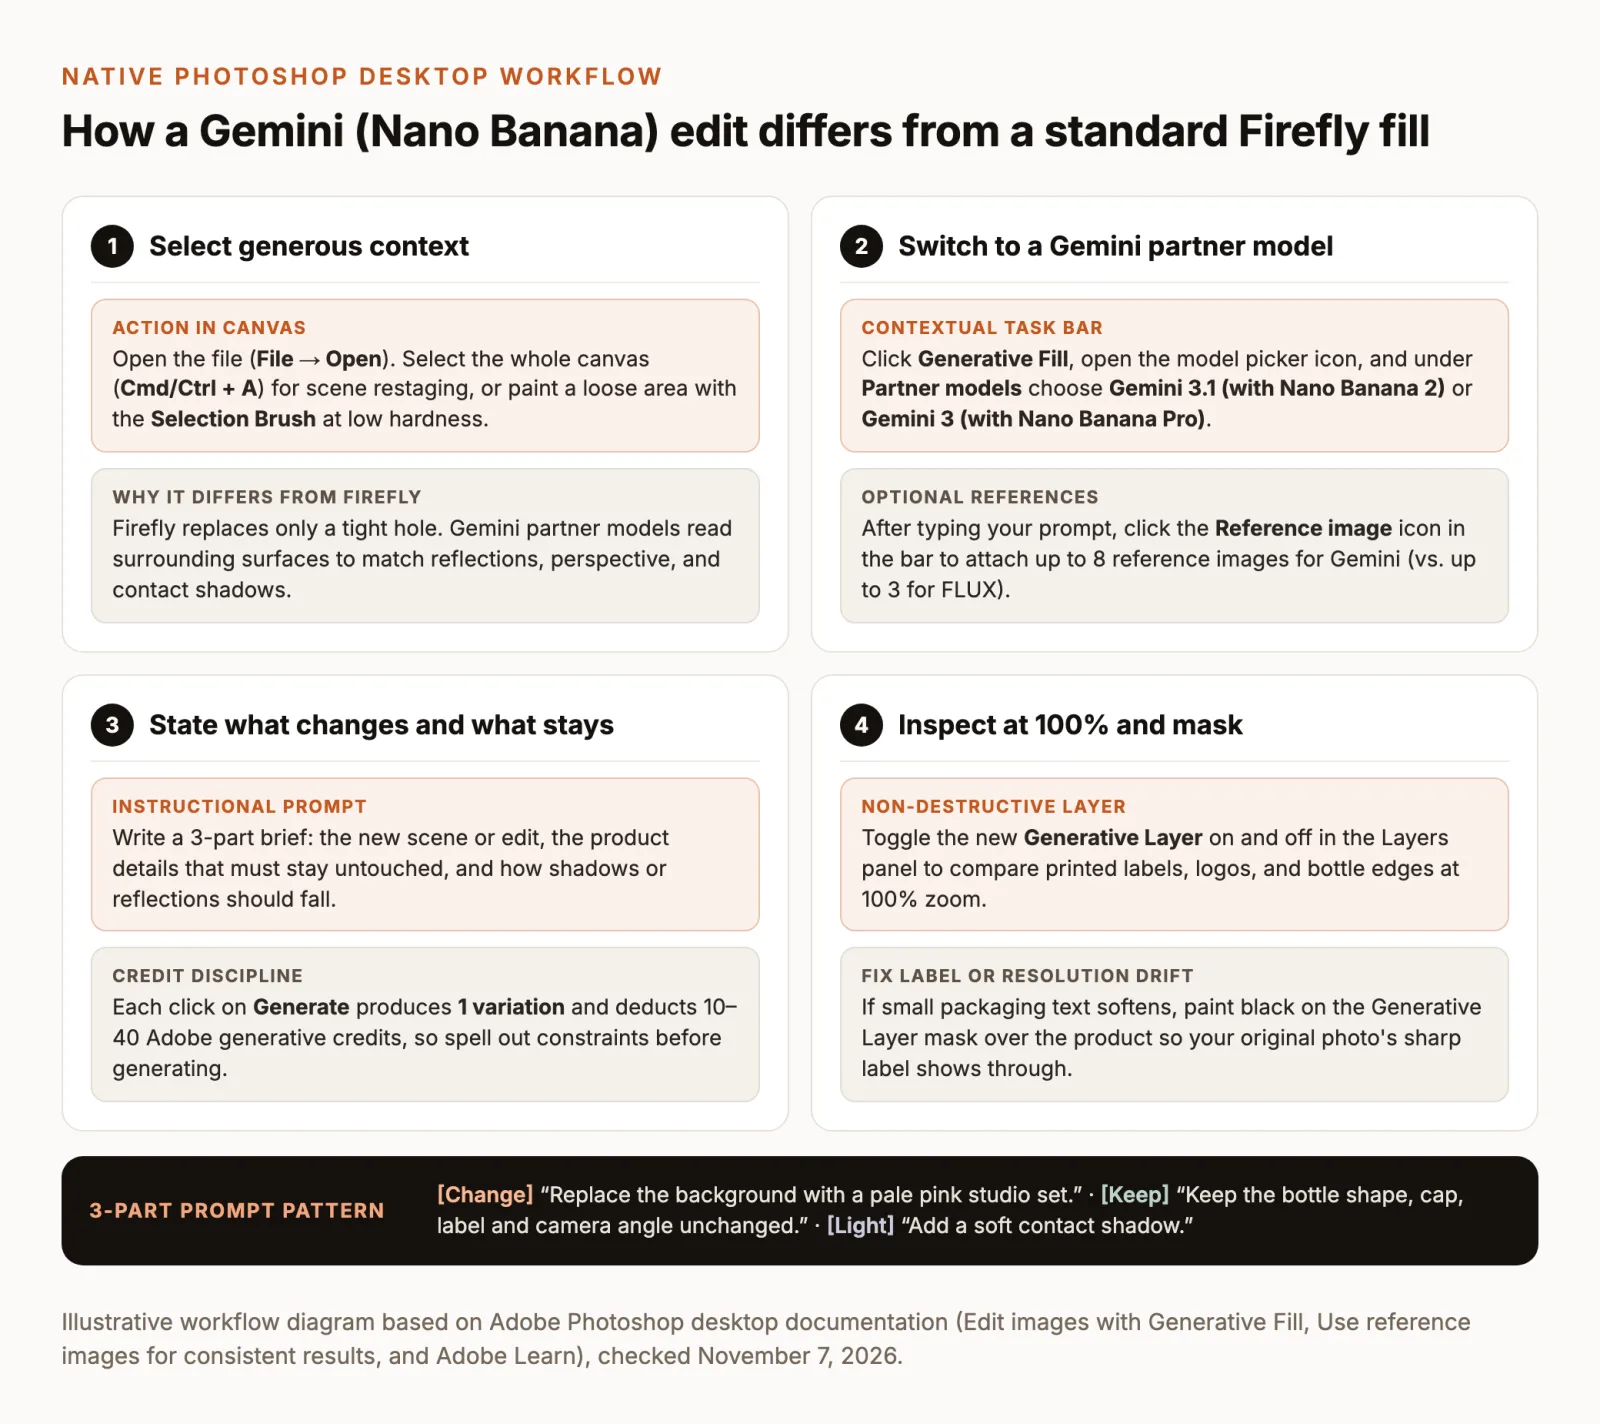
The native workflow runs through the Contextual Task Bar in Photoshop on desktop (Edit images with Generative Fill). The steps below follow one continuous product-photo example: taking a plain photo of a glass bottle and placing it onto a pale pink studio set for a product video while keeping the bottle shape, cap, and printed label intact.
Open your image and select enough context
- In Photoshop on desktop, choose File → Open and open your source photograph.
- Make sure the Contextual Task Bar is visible on canvas. If you do not see it after making a selection, enable it under Window → Contextual Task Bar (Contextual Task Bar guide).
- Choose a selection strategy that matches how Google’s Gemini models read an image (Selection tools overview):
- Whole-canvas selection (
Ctrl + Aon Windows /Cmd + Aon macOS): Best when restaging an entire background, shifting scene lighting, or adding shadows and reflections that must interact with your product. - Loose, soft-edged area selection: Best when changing one prop, garment, or surface. Use the Selection Brush with lowered Hardness (or a feathered Lasso) and include a margin of surrounding pixels around the object.
- Whole-canvas selection (
Why not trace a tight border around the empty background the way you would for Firefly? Adobe’s Gemini 2.5 (Nano Banana) tutorial on Adobe Learn demonstrates that Google’s models interpret instructional prompts across the selected region: giving the selection generous context lets the model match surface perspective, cast a realistic contact shadow under the bottle, and blend edges smoothly. (Treat that Adobe Learn page as selection-technique evidence only, since the Gemini 2.5 model shown in its interface has been retired.)
If you want to edit an entire pixel or generative layer without drawing a selection first, Photoshop also offers a shortcut: select the layer in the Layers panel and click Prompt to edit in the Contextual Task Bar, or choose Edit → Prompt to Edit from the top menu (Edit images with Prompt to edit).
Choose the Gemini partner model
- With your selection active, click Generative Fill in the Contextual Task Bar.
- Click the model picker dropdown in the Contextual Task Bar (next to the prompt field).
- Under Partner models, select
Gemini 3.1 (with Nano Banana 2)for a faster 10–40 credit scene edit, orGemini 3 (with Nano Banana Pro)for a 40-credit edit when spatial arrangement or short in-image text is the priority (Edit images with Generative Fill). - If this is your first time using a non-Adobe model, review and accept the partner creative models confirmation modal that Photoshop displays (Partner models in Adobe products).
Describe what changes and what stays
Standard Firefly Generative Fill prompts usually describe only the new pixels (“pale pink studio plinth”). Because Gemini in Photoshop Generative Fill acts as an instructional editor over your selected context, write the prompt in three short parts: what to replace, what must stay unchanged, and how light or shadows should behave. Google’s AI Studio image-generation guide and Google Cloud’s Gemini image best practices recommend full sentences and camera or lighting terms rather than comma-separated keyword tags.
For our product-bottle example with the whole canvas selected, paste this untested brief into the Generative Fill prompt field:
If you want the new set to match a specific brand color swatch, prop, or moodboard photo, you can combine your text prompt with reference images. According to Adobe’s reference images guide, after selecting Partner models and typing your prompt in Generative Fill, click the Reference image icon in the Contextual Task Bar to upload up to 8 reference images for Gemini (compared with up to 3 for FLUX).
If you are editing a single detail or replacing short printed text on a sign or card inside the scene, select that area with a soft brush and put the exact replacement words in quotation marks:
For 15 additional structured briefs covering YouTube thumbnails, multi-angle product shots, consistent characters, and 3-frame storyboards, see our Nano Banana prompts collection.
Generate, inspect and refine the layer
- Click Generate in the Contextual Task Bar. Photoshop sends the prompt and selected pixels to the partner model and places the result on a new, non-destructive Generative Layer above your photo, complete with a layer mask and entry in the Properties panel (Edit images with Generative Fill).
- Zoom to 100% and toggle the visibility eye icon on the new Generative Layer to compare it against your original product layer underneath:
- Check the label and logo letter by letter. Even when your prompt says “keep the label unchanged,” a full-canvas generation redraws the selected pixels and can subtly alter fine typography, barcodes, or cap knurling.
- Check native resolution vs. generated softness. Partner-model generations can look softer than a 24 MP or 45 MP raw studio photo when viewed at 100%.
- Restore the real product with the layer mask: If the generated studio set and contact shadow look right but the bottle’s printed label softened or shifted, you do not need to spend another 10–40 credits regenerating. Select the Generative Layer mask, grab a standard Brush Tool (B) set to black, and paint over the bottle’s body and label so your sharp original product layer shows through from underneath while the generated pink studio set and shadow remain around it.
- If the entire composite needs higher pixel dimensions for print or a 4K zoom-in, use Photoshop’s Generative Upscale (Partner models in Adobe products).
Fix missing models and imperfect edits
When a reader searches for Photoshop Nano Banana troubleshooting, the problem is almost always either a missing option in the model picker or an edit that altered part of the subject they wanted to keep.
Restore a missing or retired model
If neither Gemini 3 (with Nano Banana Pro) nor Gemini 3.1 (with Nano Banana 2) appears in your Contextual Task Bar, check these five boundaries in order before reinstalling anything:
- You are looking for the retired
Gemini 2.5 (with Nano Banana)name: Adobe began removing Gemini 2.5 on September 10, 2026 and removed it from Photoshop v27.11 onward ahead of Google’s October 2, 2026 retirement (Generative AI model retirement). Look forGemini 3 (with Nano Banana Pro)orGemini 3.1 (with Nano Banana 2)instead. - Your Photoshop desktop app is outdated: Gemini 3.1 (with Nano Banana 2) was added in the April 2026 desktop release cycle (v27.6; see What’s new in Adobe Photoshop on desktop). Open the Creative Cloud desktop app, go to Apps → Updates, and update the mainline Photoshop release. You do not need Photoshop (Beta).
- Your company or school admin disabled partner models: On Creative Cloud for enterprise plans, IT administrators control access to non-Adobe partner models through the Adobe Admin Console, and partner models are not included with Adobe Express for Education plans (Partner models in Adobe products). If you are signed into a work or university seat, ask your administrator whether non-Adobe generative AI models are enabled for your profile.
- Your region or credit balance blocks the run: Adobe notes that partner-model availability varies by country or region, and running a partner model requires an eligible plan with enough remaining generative credits (Partner models in Adobe products; Generative credits FAQ). Check your credit counter in your Adobe account menu.
- Document color mode or bit depth: If Generative Fill or the model picker is grayed out on a 16-bit or 32-bit file, test on an 8-bit RGB copy (Image → Mode → 8 Bits/Channel).
Fix drifted edges, text or product details
No generative model guarantees strict identity or packaging preservation when the subject sits inside the active selection. When an edit drifts, change the selection or split the instruction rather than repeating the same prompt:
- The bottle shape, cap, or label text changes: Instead of selecting the whole canvas (
Cmd/Ctrl + A), choose Select Subject, then invert the selection (Select → Inverse, orCmd/Ctrl + Shift + I) and expand the selection border by a few pixels so only the background and immediate rim are regenerated. Or keep the whole-canvas edit for the lighting and mask your original product back in on the layer mask. - A harsh seam or halo appears around the selection border: Hard marquee boxes leave visible texture jumps. Re-select using the Selection Brush with lowered hardness so the mask feathers gradually into the surrounding pixels, or use Enhance Edge (introduced in Photoshop v27.11; What’s new in Adobe Photoshop on desktop) to clean up background color spill along the edge.
- Several instructions fail at once: If a single prompt asks to swap the studio background, relight the bottle, add a hand, and render a headline, break it into staged Generative Layers—background first, then prop or shadow in a second targeted selection.
- Dense text or small typography warps: Put exact words in quotes and keep them to two or three words, or set the typography with Photoshop’s native Type Tool (T) on an editable text layer. For a benchmark comparison of how Nano Banana Pro and OpenAI’s GPT Image 2 handle small text, realism, and spatial layout, see GPT Image 2 vs Nano Banana Pro.
Use the still in a ChatCut video project
Once your product still is clean in Photoshop, it can serve as an opening hero shot, a cutaway insert, or a starting frame in a video edit. ChatCut supports both importing your finished Photoshop file and generating matching Nano Banana stills directly next to your timeline.
Import your finished Photoshop image
- In Photoshop, export your finished composite as a PNG or JPEG (File → Export → Export As…).
- Open your video project in the ChatCut web app (
app.chatcut.io) or ChatCut Desktop (supported on macOS 13+ on Apple silicon or Intel, and Windows 10+ x64; Linux and ChromeOS are not supported). - Choose My Assets → Import → Files…, select your exported Photoshop image, and drag it from My Assets onto a video track (AI Image Generation guide).
- Select the clip on the timeline to set its duration, scale, crop, or keyframed camera push in the Inspector, and layer editable titles on top so your copy stays sharp.
Which steps cost nothing in ChatCut: The Free plan includes the core editor, so importing your Photoshop stills, manual timeline editing, transcription, and standard caption editing never use ChatCut credits (Credits policy). Exporting MP4/WebM video, MP3 audio, subtitles, and XML also uses no credits—on Free, web and cloud exports share a cumulative 60-minute account quota, while ChatCut Desktop renders video locally on your computer at up to 4K (Web vs Desktop Export). If you drive your timeline edits through Claude Code or Codex (via the plugin or local MCP), the agent’s editing work is covered by your existing Claude or ChatGPT subscription rather than ChatCut credits; ChatCut credits are used only when the workflow calls a ChatCut-hosted generation service.
Create another Nano Banana still in ChatCut
If you are already assembling your cut in ChatCut and need an extra 16:9 or 9:16 B-roll angle without round-tripping back to Photoshop, you can generate a new still inside ChatCut’s AI panel on an active paid Pro plan. In ChatCut’s model list, call the model Nano Banana (ChatCut Product Facts). Nano Banana starts at 0.39 ChatCut credits per image at 1K (1 ChatCut credit has a $0.25 face value; review the confirmation card’s credit estimate before clicking Allow, and keep in mind that ChatCut credits are completely separate from Adobe Creative Cloud credits).
To generate with Nano Banana directly in the AI composer (in Agent mode):
- Click + to attach your clean product photo from disk, or turn on Selection Mode and use
@to reference an existing asset in My Assets (Generation References). - Paste this untested prompt to request a 16:9 video still with space reserved for an on-timeline title:
- Review the confirmation card and credit estimate when shown, click Allow, and drag the finished image from My Assets onto your video track (AI Image Generation guide).
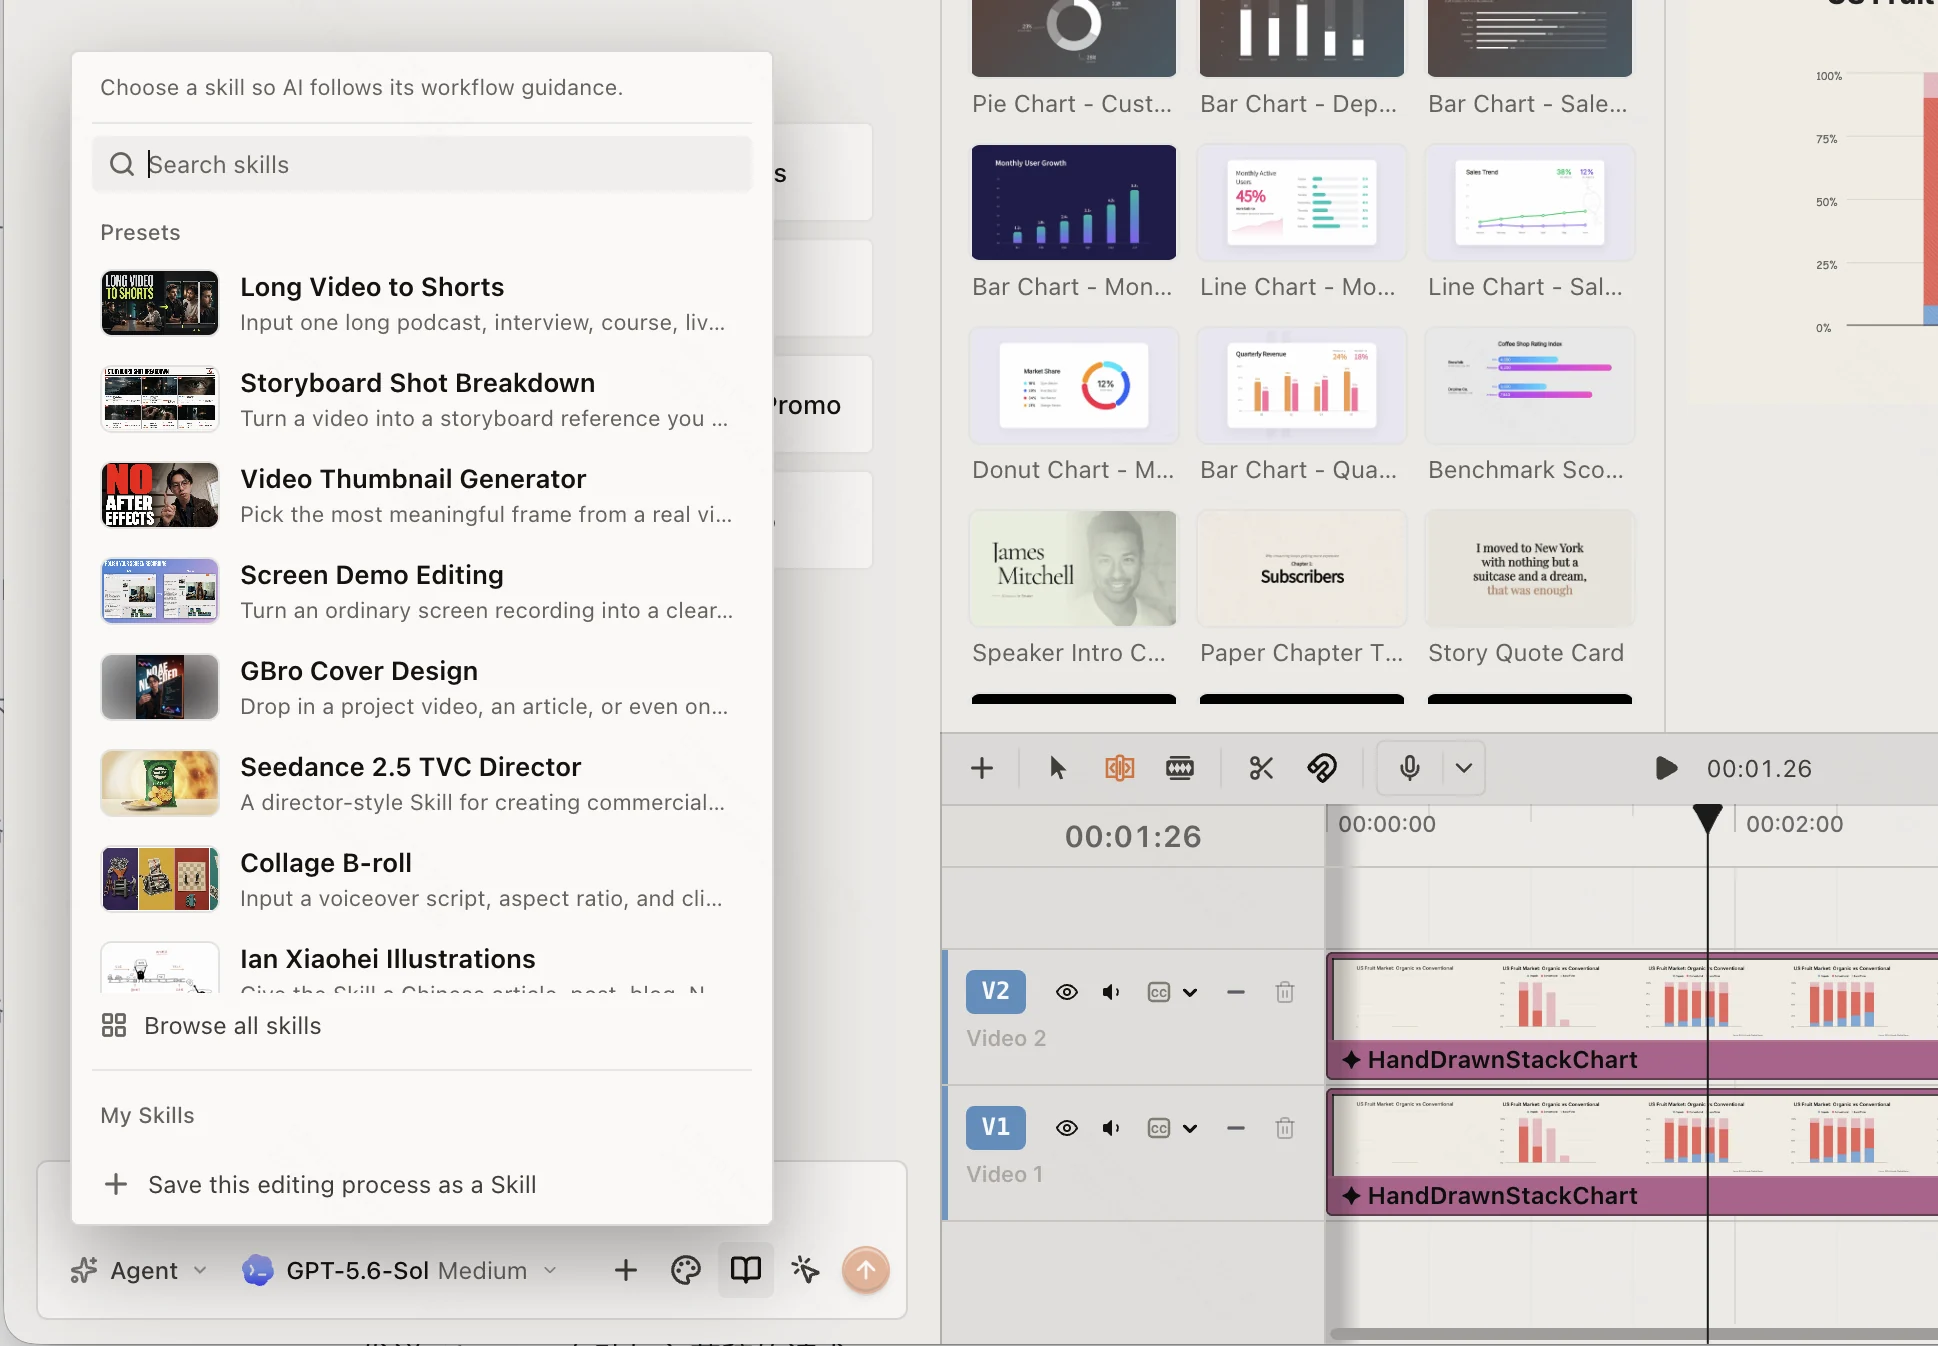
If you prefer a guided scene setup over writing a full lighting brief from scratch, click the Skills book icon below the message field in the AI composer, select Browse all skills, and pick the Studio sets Skill (such as its Pink Granule Spill workflow) or another scene from Product Photos (Skills overview). A Skill gives the agent reusable workflow guidance rather than a pre-made media file: you attach your product photo, confirm the prompt, and approve the generation estimate before any paid generation runs.