To learn how to add subtitles on a YouTube video you own or manage, sign in to YouTube Studio on a computer, open Subtitles in the left menu, choose your video, add or select a language, and click Add (or Edit on an automatic track). From there you can correct YouTube’s automatic captions, upload a timed .srt file, auto-sync a transcript, or type cues manually, then click Save or Publish.
This guide covers all four YouTube Studio subtitle methods per Google’s documentation, preparing a plain UTF-8 .srt in ChatCut, and fixing missing tracks. Authoring captions requires channel access; viewers only toggle existing tracks with CC.
Choose the right YouTube subtitle method
Match your method in YouTube Studio to the material you already have. All four routes live under the Subtitles menu and work on new or existing uploads, but each expects a different input and finishes with a specific publish action.
| Studio method | Starting material | Best when |
|---|---|---|
| Duplicate and edit | Automatic track on YouTube | YouTube already transcribed your speech and you need to fix names, punctuation, or timing. |
| Upload file (With timing) | Timed .srt, .sbv, or .vtt | You exported a time-coded subtitle file from your video editor or a captioning vendor. |
| Auto-sync | Untimed script or .txt file | You have a written transcript in the exact spoken language and the video is under one hour. |
| Type manually | Video only (no file or script) | The clip is short, audio is noisy, or the spoken language is not supported by auto-captions. |
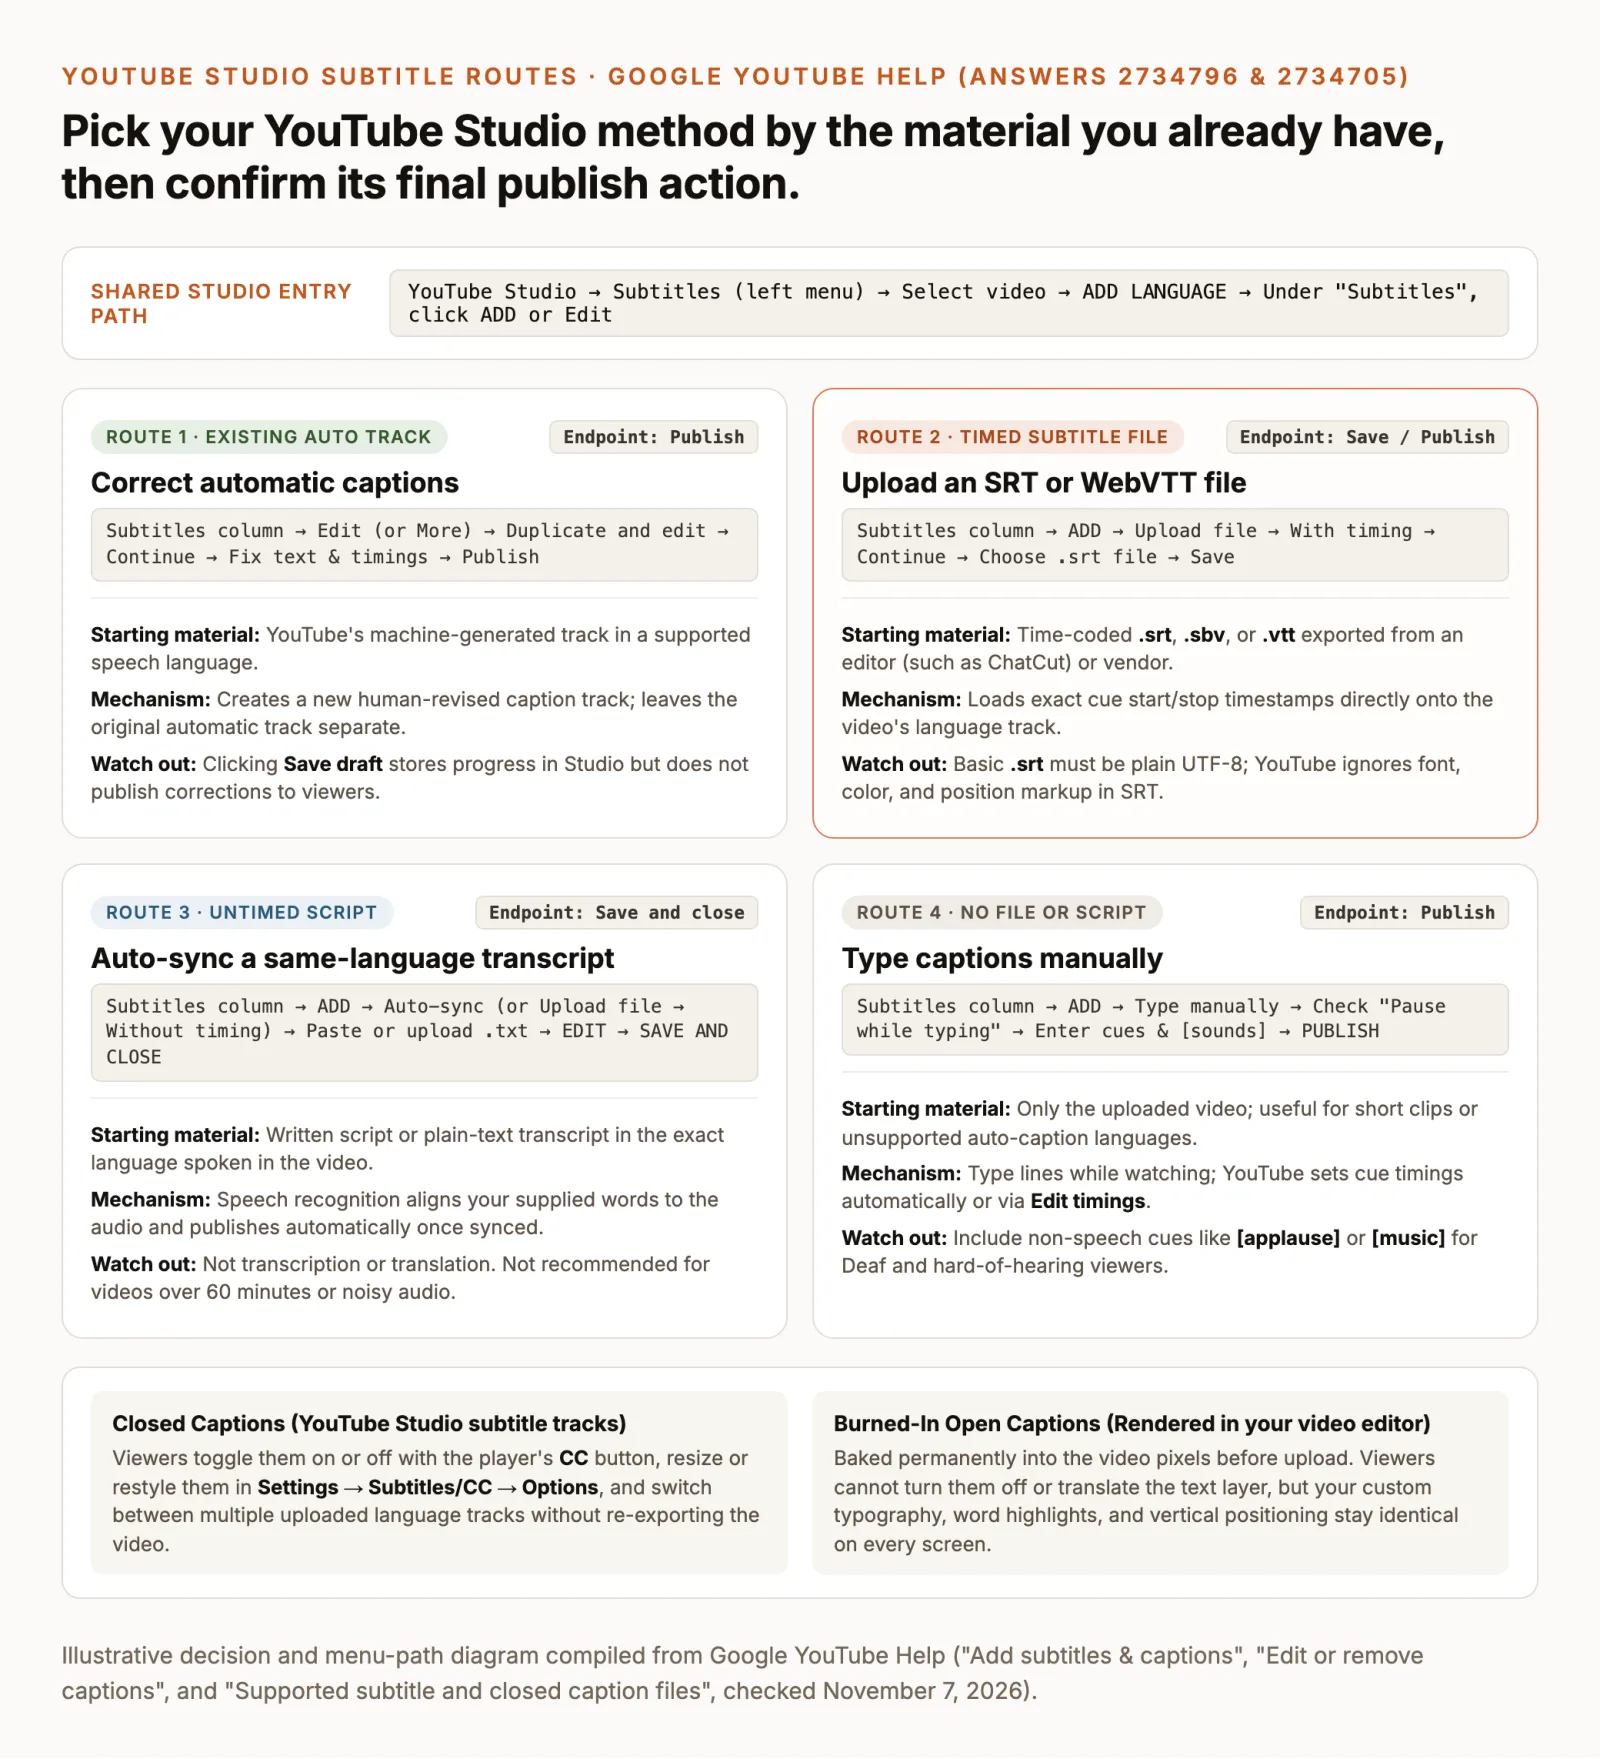
Adding captions in YouTube Studio creates closed captions (CC): a separate text track that viewers can toggle with the player’s CC button, resize in player caption settings, or switch between languages. Burned-in subtitles (open captions) are rendered into the video frames before you export from your editor. Burned-in text preserves custom fonts and animations on Shorts or social feeds, whereas an uploaded .srt lets you fix typos later without re-uploading the video. For open versus closed formats across other editors, see how to add subtitles to a video.
In accessibility standards such as the W3C Web Accessibility Initiative (WAI) captions guide, captions include speaker names and non-speech audio (such as [music] or [laughter]) for Deaf and hard-of-hearing viewers, while subtitles cover dialogue only. YouTube Studio groups both under Subtitles.
How to add subtitles on a YouTube video
Whether you want to add captions to a YouTube video that is already public or attach an .srt while uploading a new cut, you manage tracks at studio.youtube.com. Google’s Add subtitles & captions documentation defines two entry paths for channel owners and authorized editors:
Open subtitles on an existing video
- Sign in to YouTube Studio in a desktop browser.
- Select Subtitles in the left menu to open your Channel subtitles list.
- Click the video you want to caption. If prompted on first use, choose the video language from the Set language drop-down and click Confirm.
- Click Add language in the upper right, select the language you want to add, and find its new row in the table.
- Click Add under the Subtitles column for that language row (or click Edit / More next to an existing track).
Add subtitles during the initial upload flow
If you already prepared a timed .srt or transcript, you can attach it during upload. Per Google’s upload documentation, click Create → Upload videos in YouTube Studio, choose your video file, set the Video language under Details → Show more, and click Next to reach Video elements. Click Add next to Add subtitles to upload a file, auto-sync, or type captions before advancing to Checks and Visibility.
Lock your video cut before creating a timed subtitle file; trimming even two seconds from the opening shifts every later timestamp out of sync. If you are still cutting the video, follow how to edit a YouTube video first.
Caption a video on another creator’s channel
You cannot submit subtitles on someone else’s video from the public watch page; YouTube retired Community Contributions. To caption a client’s or colleague’s video, the channel owner or manager must invite your Google Account under YouTube Studio → Settings → Permissions → Invite with the Subtitle editor (or Editor / Manager) role (Google’s Subtitle Editor permissions guide).
Two documented rules apply to the Subtitle editor role:
- The owner must set a video language first. Subtitle Editors can only work on videos that have a Video language assigned under Content → Edit → Video language (or globally under Settings → Upload defaults → Advanced settings).
- Brand Accounts are not supported directly. Per Google’s channel permissions overview, the Subtitle Editor role requires migrating from a Brand Account to Studio channel permissions.
Add captions with the material you have
After clicking Add or Edit in the Subtitles column, follow the route below that matches your starting material. Steps reflect Google’s official YouTube Help procedures (checked November 7, 2026); verify that your finished track shows Published in the Subtitles column.
Correct automatic captions
When you upload a video in a language supported by YouTube’s automatic captioning, YouTube uses speech recognition to publish an automatic track in the video’s default language. Because accents, jargon, overlapping speech, and background noise cause errors, always review and edit the automatic track.
- In YouTube Studio → Subtitles, click your video and locate the automatic track row (such as
English (Automatic)). - In the Subtitles column, click Duplicate and edit (or click Edit / More next to the track and choose Duplicate and edit). Click Continue if prompted to overwrite an existing draft (Edit or remove captions).
- Fix text in Edit as text view. Correct misspelled names, technical terms, and numbers, and add punctuation.
- Check cues in Edit timings view. Click any cue to adjust its two timestamp boxes or drag cue edges along the waveform below the player.
- Save or publish. Click Save draft if you pause mid-review. When finished, click Publish in the top right.
Duplicating an automatic track creates a separate, human-revised track alongside the machine track. Never assume a track labeled with the video language is accurate from its label alone; open it to confirm it was reviewed and published.
Upload an SRT file with timing
Uploading a time-coded file is the most direct route when you already exported subtitles from a video editor or captioning vendor.
- In YouTube Studio → Subtitles, click the video, find the target language row, and click Add under Subtitles.
- Select Upload file (Add subtitles & captions).
- Choose With timing and click Continue.
- Select your
.srt(or other supported file) from your computer. - Spot-check the opening, middle, and final cues in the preview player, then click Save (or Publish in the upper right) and confirm the status reads Published.
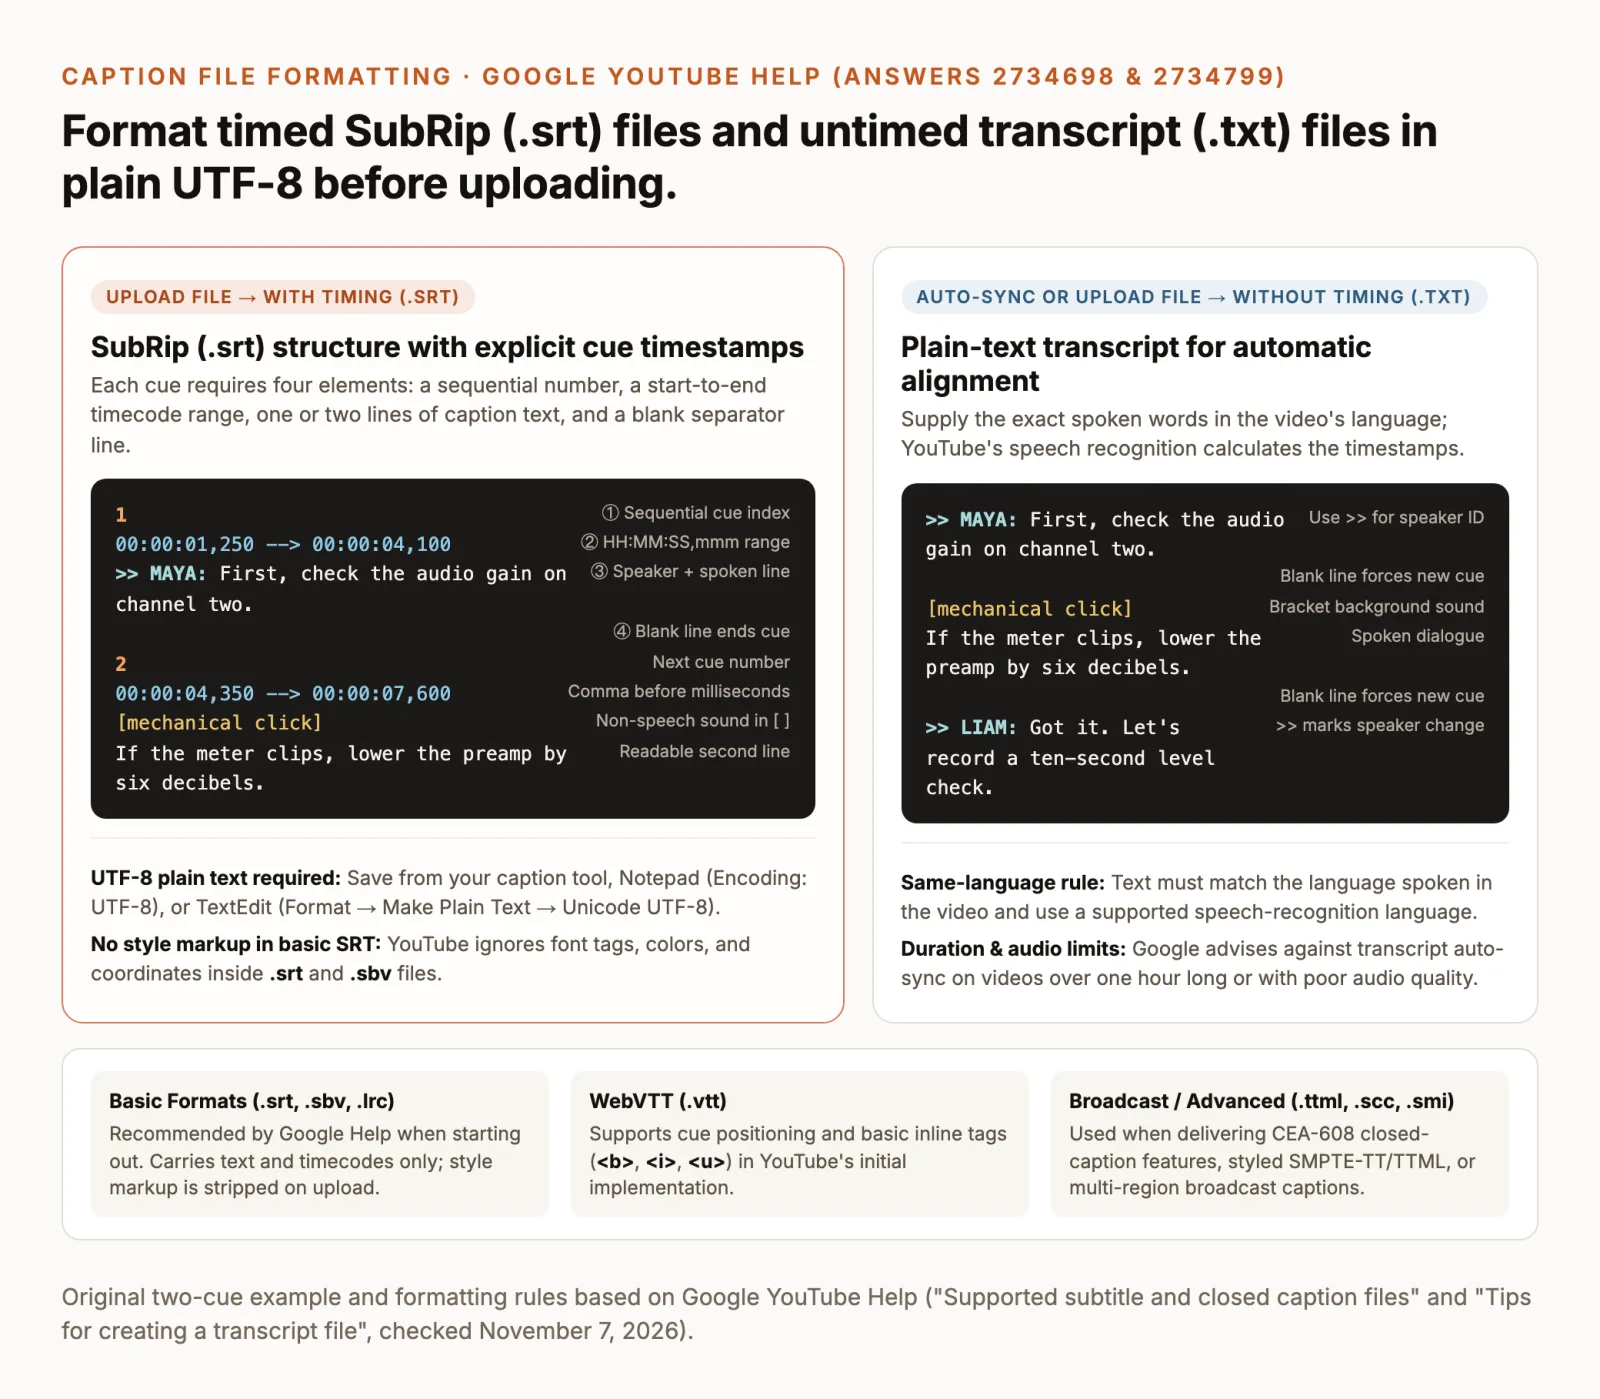
Google’s Supported subtitle and closed caption files page recommends SubRip (.srt) or SubViewer (.sbv) for standard uploads. Each .srt cue has four lines: a sequential number, a HH:MM:SS,mmm --> HH:MM:SS,mmm timecode range (using a comma before milliseconds), the caption text, and a blank line:
1
00:00:01,250 --> 00:00:04,100
>> MAYA: First, check the audio gain on channel two.

2
00:00:04,350 --> 00:00:07,600
[mechanical click]
If the meter clips, lower the preamp by six decibels.
Follow two file rules when you upload an SRT to YouTube:
- Save as plain UTF-8 text. Non-UTF-8 encodings or rich-text files (
.rtf,.docx) can fail to upload or garble accented letters and non-Latin characters. - Basic SRT styling is ignored. YouTube strips HTML font, color, and position tags from
.srtand.sbvfiles. If an uploaded closed-caption file must carry cue positioning or inline bold/italic/underline tags (<b>,<i>,<u>), use WebVTT (.vtt) or broadcast formats like TTML (.ttml), SAMI (.smi), or Scenarist (.scc) (supported files page).
Auto-sync a same-language transcript
When you have a written script or verbatim transcript without timestamps, Auto-sync aligns your text to the spoken audio automatically.
- In YouTube Studio → Subtitles, select your video and click Add under Subtitles for the video’s spoken language.
- Select Auto-sync (or Upload file → Without timing → Continue to upload a plain
.txtfile). - Paste the spoken words into the editor or upload your
.txtfile. - Click Edit, then click Save and close (or Assign timings). YouTube aligns the text in the background and publishes the track automatically once synchronization completes (Add subtitles & captions).
Keep three Auto-sync boundaries in mind:
- Alignment only, not transcription or translation. You must supply the text in the exact same language spoken in the video, and that language must be supported by YouTube’s speech recognition.
- Under one hour with clean audio. Google’s Tips for creating a transcript file advises against using transcript auto-sync on videos over an hour long or recordings with poor audio quality.
- Plain UTF-8 formatting cues. Save
.txtfiles as UTF-8 (in Windows Notepad via File → Save as → UTF-8, or macOS TextEdit via Format → Make Plain Text, then File → Save → Unicode (UTF-8)). Use a blank line to force a new caption cue,>>to mark a speaker change, and square brackets like[music]or[laughter]for background sounds.
Type captions manually
For short videos, clips with heavy background noise, or languages unsupported by automatic captions, type cues directly in YouTube Studio.
- In YouTube Studio → Subtitles, click your video, select Add under Subtitles, and choose Type manually (Add subtitles & captions).
- Check Pause while typing below the player, and adjust playback speed in the player’s Settings gear if needed.
- Play the video and type each spoken line, including bracketed sounds like
[applause]or[thunder]when relevant (DCMP Captioning Key). - Use Studio’s keyboard shortcuts (
Ctrl/Cmd + Spaceto pause or play,Ctrl/Cmd + Left/Right Arrowto seek 1 second,Ctrl/Cmd + Enterto add a line,Ctrl/Cmd + Up/Down Arrowto switch cues). - Check the timestamps beside each line and click Publish.
Prepare an SRT in ChatCut, if needed
If you need to transcribe your final cut and export a timed .srt before opening YouTube Studio, you can prepare the subtitle track in ChatCut. ChatCut runs on macOS 13+ (Apple silicon and Intel), Windows 10+ (x64), and in the browser as a web app; Linux and ChromeOS desktop builds are not offered (ChatCut Product Facts).
Follow the workflow in ChatCut’s Transcript and Captions guide and Export Video, Audio, and Subtitles documentation:
- Choose the source track and turn captions on. Open Transcript (
Workspace → Transcript), pick the intended dialogue track with theV1/V2orA1/A2selector when several speech tracks exist, click the left side of the split Captions control below the Viewer, and wait for transcription to finish. - Correct words without cutting footage. Use the caption track’s Content panel (Web and Desktop 0.2.25+) to search and replace terms or split and merge cards, or select words in Transcript and choose Edit text. Do not press
BackspaceorDeletein the Transcript panel to fix a typo: deleting words there cuts that time range from the Timeline. - Optional: Translate captions to an independent track. Click the right chevron of the split Captions control, choose Translate captions, and select a target language. On Web and Desktop 0.6.7+, you can edit or repaginate the resulting Translation (language) source without altering your original-language captions.
- Export the SubRip (
.srt) file. Select Export → Subtitles in the header and choose SubRip (.srt) (or plain text (.txt) for an untimed script). The export follows whichever original or translated caption track is active and remains disabled until transcription finishes.
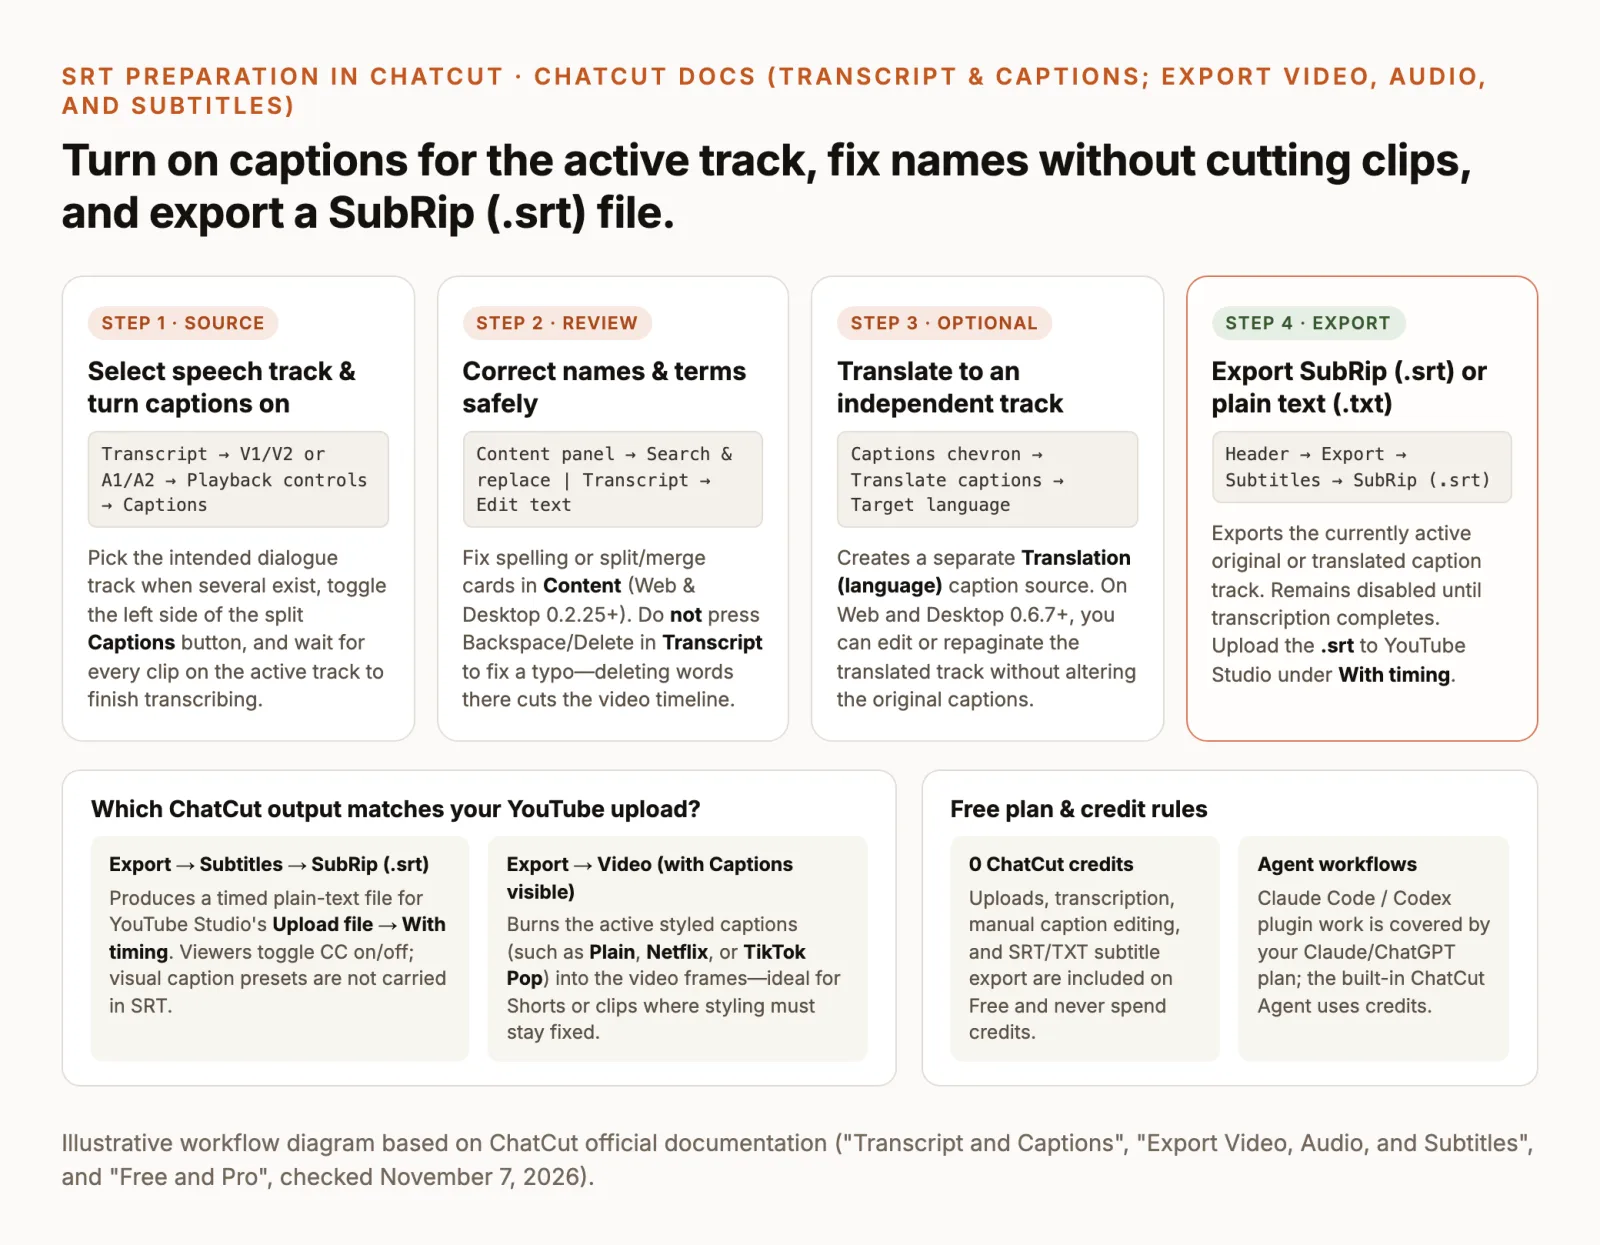
ChatCut’s Free plan includes the core editor: manual timeline editing, uploads, transcription, standard caption editing, and exporting .srt or .txt subtitles never use ChatCut credits (on Free, web and cloud video exports share a cumulative 60-minute account quota, while ChatCut Desktop renders video locally on your computer). With Claude Code or Codex (plugin or local MCP), the agent’s editing and caption work is covered by your existing Claude or ChatGPT subscription rather than ChatCut credits; installation inside the ChatGPT or Claude websites is not supported. Messages to the built-in ChatCut Agent use credits.
To set up captions with the Agent, attach the Add captions Skill or use a prompt modeled on our video editing prompts guide. Both prompts below are proposed, untested examples; verify flagged words against the audio before exporting:
After checking the flagged names, you can ask the Agent to fix specific spellings in the caption cards and export the .srt:
If you also export a vertical Short with styled captions burned into the picture (Export → Video with captions visible), you can preview presets such as Plain, Netflix, TikTok Pop, or Orange Shadow from the Caption style menu. The demo below shows visual caption styling in ChatCut, not YouTube Studio upload; YouTube ignores visual styling in uploaded .srt files:
Publish, check playback, and fix missing subtitles
Saving a draft in YouTube Studio does not make subtitles visible on your video. Uploading a file uses Save, Auto-sync uses Save and close (and publishes automatically once synced), and Duplicate and edit or Type manually requires clicking Publish (Add subtitles & captions; Edit or remove captions).
Four checks on the watch page after publishing
Once the track shows Published in YouTube Studio → Subtitles, open the public watch page and check:
- Player track selection: Click CC in the player, then open Settings (gear) → Subtitles/CC to confirm your published track appears and turns on (Manage caption settings).
- Names and numbers: Spot-check proper nouns, prices, dates, and technical terms against the audio.
- Speakers and non-speech audio: Confirm
>> SPEAKER:labels and bracketed cues ([laughter],[music]) appear where needed for comprehension (W3C WAI; DCMP Captioning Key). - Full-video sync: Play the first sentence, a middle cut, and the final 15 seconds to verify timing has not drifted.
Troubleshoot missing or rejected YouTube subtitles
If automatic captions are missing, an .srt file fails, or edits do not appear on the watch page, check the causes documented in YouTube Help:
| Symptom | Documented cause | How to fix it |
|---|---|---|
| No automatic captions appear | Audio is still processing, speech language is unsupported, the video is too long, starts with long silence, or has poor/overlapping audio (auto-caption help). | Wait if the upload is new; otherwise export a timed .srt from your editor and upload it under With timing. |
| Edited captions don’t show on video | You clicked Save draft instead of Publish when editing an automatic or manual track (edit captions help). | Open YouTube Studio → Subtitles, click Edit on the draft row, and click Publish in the top right. |
| SRT upload fails or garbles characters | File was saved in non-UTF-8 encoding, saved as rich text (.rtf/.docx), or has broken HH:MM:SS,mmm timecodes (supported files help). | Re-save the file as plain UTF-8 .srt in your caption tool, Notepad, or TextEdit and strip HTML style tags. |
| Auto-sync hangs or drifts out of sync | Video is over an hour long, audio is noisy, or the pasted transcript language differs from the spoken audio (Add subtitles help). | Generate a timed .srt in an editor instead of using untimed Auto-sync, then upload With timing. |
| Subtitle Editor cannot add captions | No Video language is set on the video, or the channel uses a Brand Account (Subtitle Editor help). | Ask the channel owner to set Content → Edit → Video language and switch from Brand Account to channel permissions. |
Translated subtitle tracks vs. viewer auto-translation
Separate creator-authored translations from viewer playback settings:
- Creator-published translations (in YouTube Studio): Under YouTube Studio → Subtitles, click Add language, pick a language, and click Add under Subtitles to upload a translated
.srt(or run Studio’s Auto-translate after publishing an original-language track, then review and publish). Clicking Add under Title and description in the same row localizes your title and description for search (Translate your own video titles & descriptions; YouTube tools to translate your content). - Viewer auto-translate (on the watch page): Viewers can click Settings → Subtitles/CC → Auto-translate on the watch page to machine-translate an existing caption track during playback, which does not save or publish a track on your channel.