Knowing how to start a faceless YouTube channel is mostly an operational decision made before you open an editor: pick one audience and a visual format you can verify from real sources, validate ten episode questions before paying for software, and ship three pilot videos to measure your actual hours per episode. You need a Google Account, a computer capable of screen capture or timeline editing, a microphone or licensed voice workflow, and verifiable source material. This guide covers channel-level strategy, niche selection, pre-launch validation, tool-stack mapping, first-month testing, and YouTube Partner Program (YPP) rules checked on November 7, 2026.
How to start a faceless YouTube channel
- Define one audience and one channel promise. Pair a subject you can verify with a visual format you can finish inside your weekly hour budget.
- Compare niches by source access and policy risk. Score candidate topics by how you will prove claims on screen and clear rights, not by guessed ad rates.
- Validate ten episode ideas before buying tools. Audit recent uploads across small and established channels, write ten sourced questions, and select three distinct pilots.
- Create the channel and lock its identity. Configure your Brand Account or personal channel, handle, banner, phone verification, and a repeatable thumbnail layout.
- Build a stage-by-stage production stack. Separate source research, script outlining, narration, visual capture or generation, timeline editing, and human review.
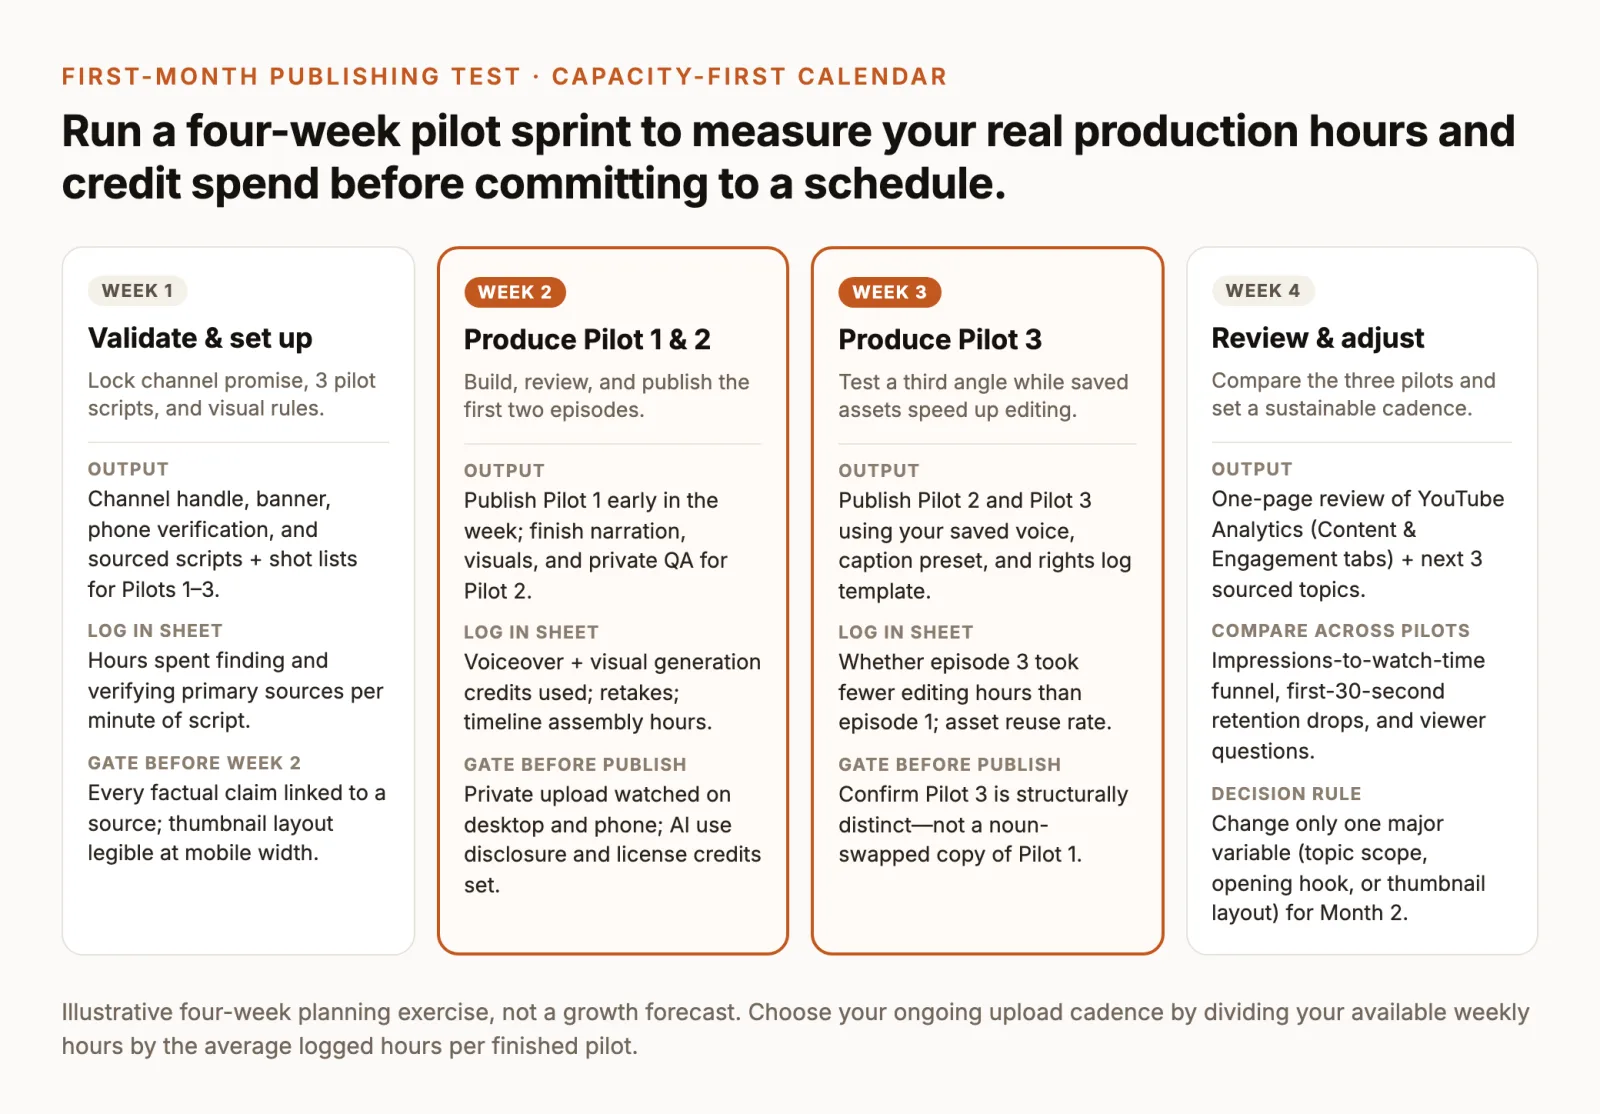
- Run a four-week pilot publishing test. Track actual hours and generation credits across three pilots before choosing a permanent upload cadence.
- Check monetization rules and iterate one variable. Align every episode with YouTube’s originality and AI disclosure policies, then adjust one packaging or structural variable at a time.
Single-episode execution—writing a four-beat script, recording narration, laying visuals to audio, and running a pre-upload check—lives in our companion tutorial on how to make a faceless YouTube video. Use this guide to design the channel system that sits around those individual videos so you do not burn out at episode four or build a catalog that fails monetization review.
Choose one audience and channel promise
Most abandoned faceless channels start with a format (“I want to make AI Shorts”) or an unverified earnings rumour (“finance pays high RPMs”) rather than a viewer problem. Without a defined viewer and a specific promise, every upload competes from scratch, and YouTube’s recommendation system has no consistent audience signal to test your next video against.
To make the strategy concrete, this guide follows one running example from niche selection through month-one review: short history explanations for curious beginners, focused on how historical structures, tools, and urban systems worked in practice. Before committing to any niche, test your idea against three constraints.
Match expertise to source access
A faceless channel removes the camera, not the need for authority. You do not need a university degree to explain a subject well, but you do need a repeatable way to know whether your script is true.
Separate personal fluency from documented source access:
- Personal fluency works best for software walkthroughs, language instruction, coding, cooking, and tabletop repairs. Your own screen recording or workbench footage proves the claim on camera.
- Documented source access works for history, science mechanisms, geography, and design breakdowns. Here, your credibility comes from primary archives, museum technical drawings, public-domain collections, and peer-reviewed papers that you can read, cross-check, and cite in the video description.
Avoid topics where your only source would be summarizing other YouTube videos, Wikipedia intros, or unverified AI chat outputs. Furthermore, YouTube’s channel monetization policies explicitly bar monetization for channels that use AI-generated personas presenting as human experts on sensitive health, legal, financial, or political topics.
Check audience demand vs. supply
Demand on YouTube is visible in whether viewers watch recent uploads on a topic from channels that do not already have millions of subscribers. Supply pressure shows up when dozens of channels upload near-identical videos with the same stock footage and recycled scripts.
Look for scoped questions inside a broad category rather than the category label itself:
- Too broad (saturated and vague): “Ancient history documentaries” or “Learn Excel.”
- Too narrow (runs out of topics in two weeks): “17th-century London bakeries on Pudding Lane.”
- Viable channel promise: “Five-minute illustrated explainers answering one practical engineering or daily-life question from pre-industrial history, backed by primary records.”
Write your channel promise in one sentence: For [specific viewer], this channel explains/demonstrates [specific problem or question] using [visual format] in [typical runtime range]. If that sentence could describe five hundred existing channels word for word, narrow the audience or the visual evidence you bring to the screen.
Size the format to your weekly capacity
Every faceless visual style carries a fixed floor of work per finished minute. A ten-minute documentary essay built from archival maps and custom animations takes far longer to fact-check and assemble than a four-minute screen tutorial recorded in one rehearsed pass.
Before choosing a niche, write down the honest number of hours you can spend every week for the next twelve weeks without missing work or sleep. A solo beginner with 6 to 8 hours per week can realistically ship one researched 4-to-6-minute explainer every ten to fourteen days, or one focused screen walkthrough per week. Designing a channel around daily uploads when you have six weekly hours forces you into generic templates—the exact pattern YouTube’s reviewers flag under inauthentic content rules.
Compare top faceless YouTube niches by fit
Search results for top faceless YouTube niches frequently rank categories by claimed ad rates (RPM). In practice, an advertiser rate means nothing if the niche requires copyright clearances you cannot obtain, expertise you cannot fake, or twenty hours of animation per episode.
Compare candidate niches across five operational dimensions instead: the expertise required, where primary sources come from, the copyright and policy burden, the typical time per episode, and how many distinct ideas the niche supports without repeating a template.
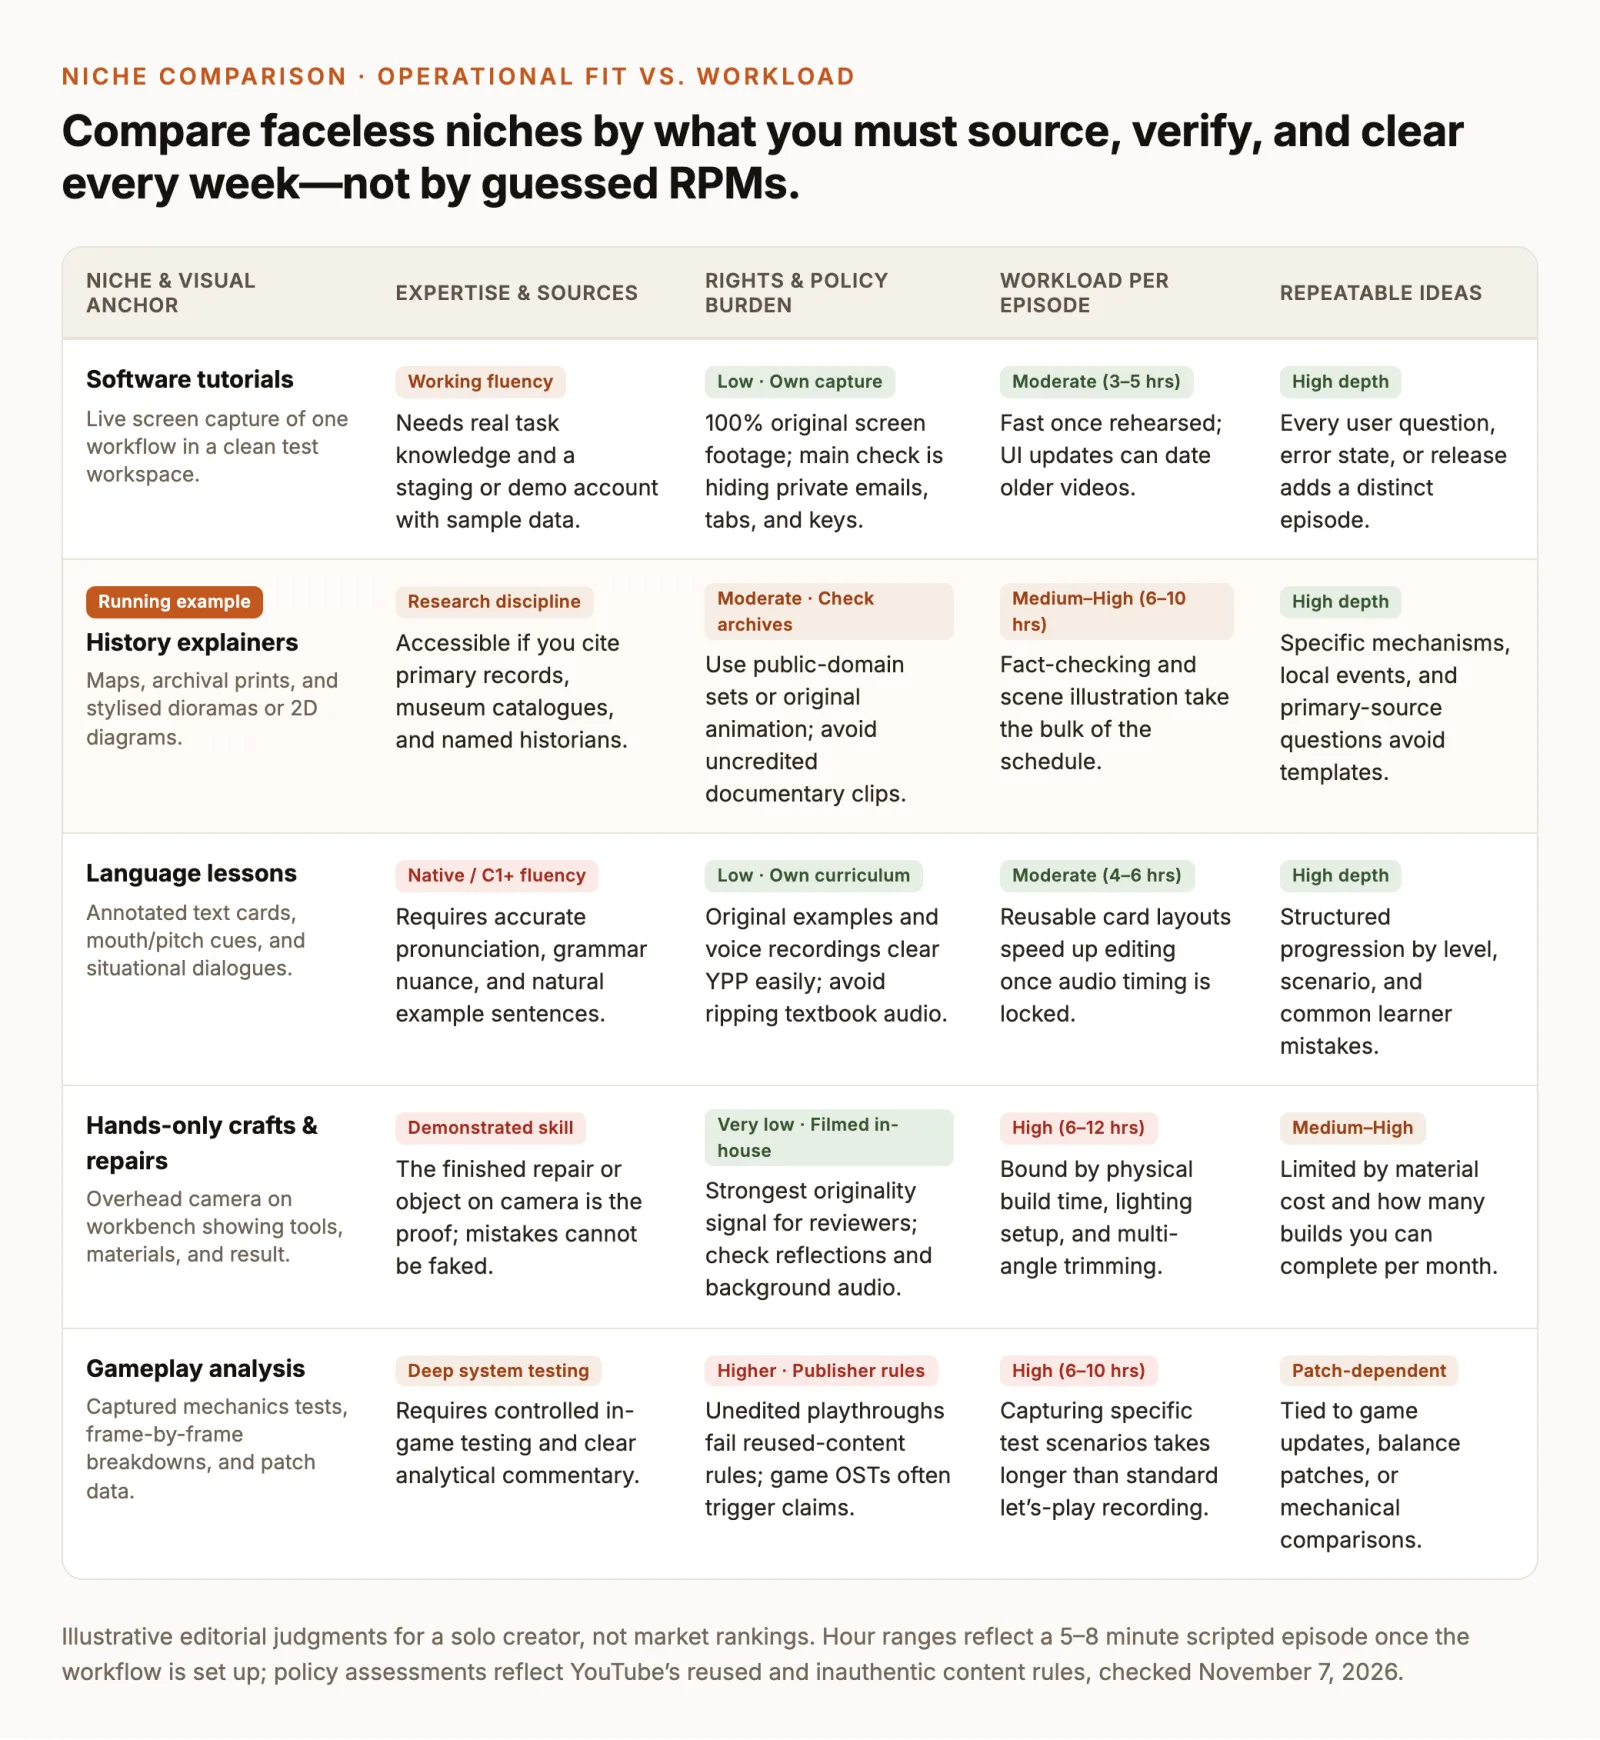
Software tutorials
Screen-recorded walkthroughs are one of the lowest-risk ways to start a faceless channel because the visual proof is native to your computer. When you show how to filter a dataset, configure an automation, or debug a formula inside a prepared test workspace, every click and resulting screen state is 100% original work.
- What you need: working fluency in the software, a clean demo or staging account populated with synthetic sample data, and a microphone or clear narration setup.
- Primary risk: leaking private email addresses, customer records, API keys, or browser bookmarks on screen, and older videos becoming outdated when a vendor redesigns its interface.
- Where to go next: if you are comparing capture tools for macOS or Windows before you record, read our comparison of screen recording software. Free open-source tools such as OBS Studio (supported on Windows 10 and 11, macOS 13.0+ on Apple Silicon and Intel, and Linux) handle full-display or window capture without watermarks.
History explainers
Short history, mechanism, and “how it worked” explainers suit creators who enjoy reading primary sources and translating complex processes into clear visual sequences. Because you cannot film the 17th century, the visual burden shifts to archival prints, maps, and consistent illustration or animation.
- What you need: research discipline to verify dates, dimensions, and causes across at least two reliable sources, plus a repeatable visual style so every episode looks like part of the same series.
- Clearing visual rights: start with public-domain archives such as the Library of Congress Free to Use and Reuse sets (which curate rights-free historical photographs, maps, prints, and posters) or files from Wikimedia Commons. When reusing media from Commons, check each file’s individual description page: as documented in Wikimedia Commons’ reuse guidelines, open-content licenses often require attributing the creator, naming or linking the specific license, and licensing derivative edits under compatible terms, and the Wikimedia Foundation makes no warranty regarding copyright status.
- Repeatable visual format: for scenes no archive captured—such as how a timber frame carried fire across a narrow street—stylised animation bridges the gap. In ChatCut, the Paper Diorama Skill turns a researched topic or script into an editable, narrated paper-craft animation.
If you prefer building 2D motion graphics or whiteboard sequences without keyframing by hand, see our guide on how to make an explainer video without After Effects.
Language lessons
Language and pronunciation channels thrive without an on-camera host when the screen carries structured typography: sentence breakdowns, tone or pitch diagrams, minimal-pair listening drills, and situational dialogues.
- What you need: native or advanced (C1+) proficiency in the target language, careful audio recording, and a consistent card template so learners know where grammar notes, phonetic script, and translations appear on screen.
- Primary risk: relying purely on synthetic text-to-speech for pronunciation models without checking cadence, pitch accent, or regional naturalness by ear. Always verify spoken examples with a fluent speaker before publishing.
Hands-only crafts and repairs
Mounting a phone or camera overhead to show a workbench—soldering a circuit, restoring a hand tool, binding a notebook, or cooking—produces the strongest possible originality signal for both viewers and YouTube reviewers.
- What you need: a real physical skill, an overhead arm or tripod, consistent side lighting, and budget for materials.
- Primary risk: episode output is constrained by how long the physical build or repair takes, and an irreversible mistake mid-build can force you to buy a second part and reshoot.
Gameplay analysis
Standard unedited gameplay walkthroughs (“no-commentary playthroughs”) routinely fail YouTube’s reused-content review because they show copyrighted game assets without substantial original commentary or educational purpose. Analytical gaming channels succeed by testing game mechanics, comparing patch numbers, or explaining level-design decisions.
- What you need: capture hardware, a structured testing plan inside the game, and a script that uses captured clips as evidence for an argument.
- Primary risk: in-game background music (especially licensed radio tracks) frequently triggers Content ID claims; mute in-game music during capture so your voice and game sound effects stay clean.
Validate a niche before buying tools
Do not buy annual software subscriptions, studio microphones, or bulk generation credits on day one. Spend your first two afternoons validating whether your chosen niche has active viewer questions and whether you can write ten non-templated episodes from real sources.
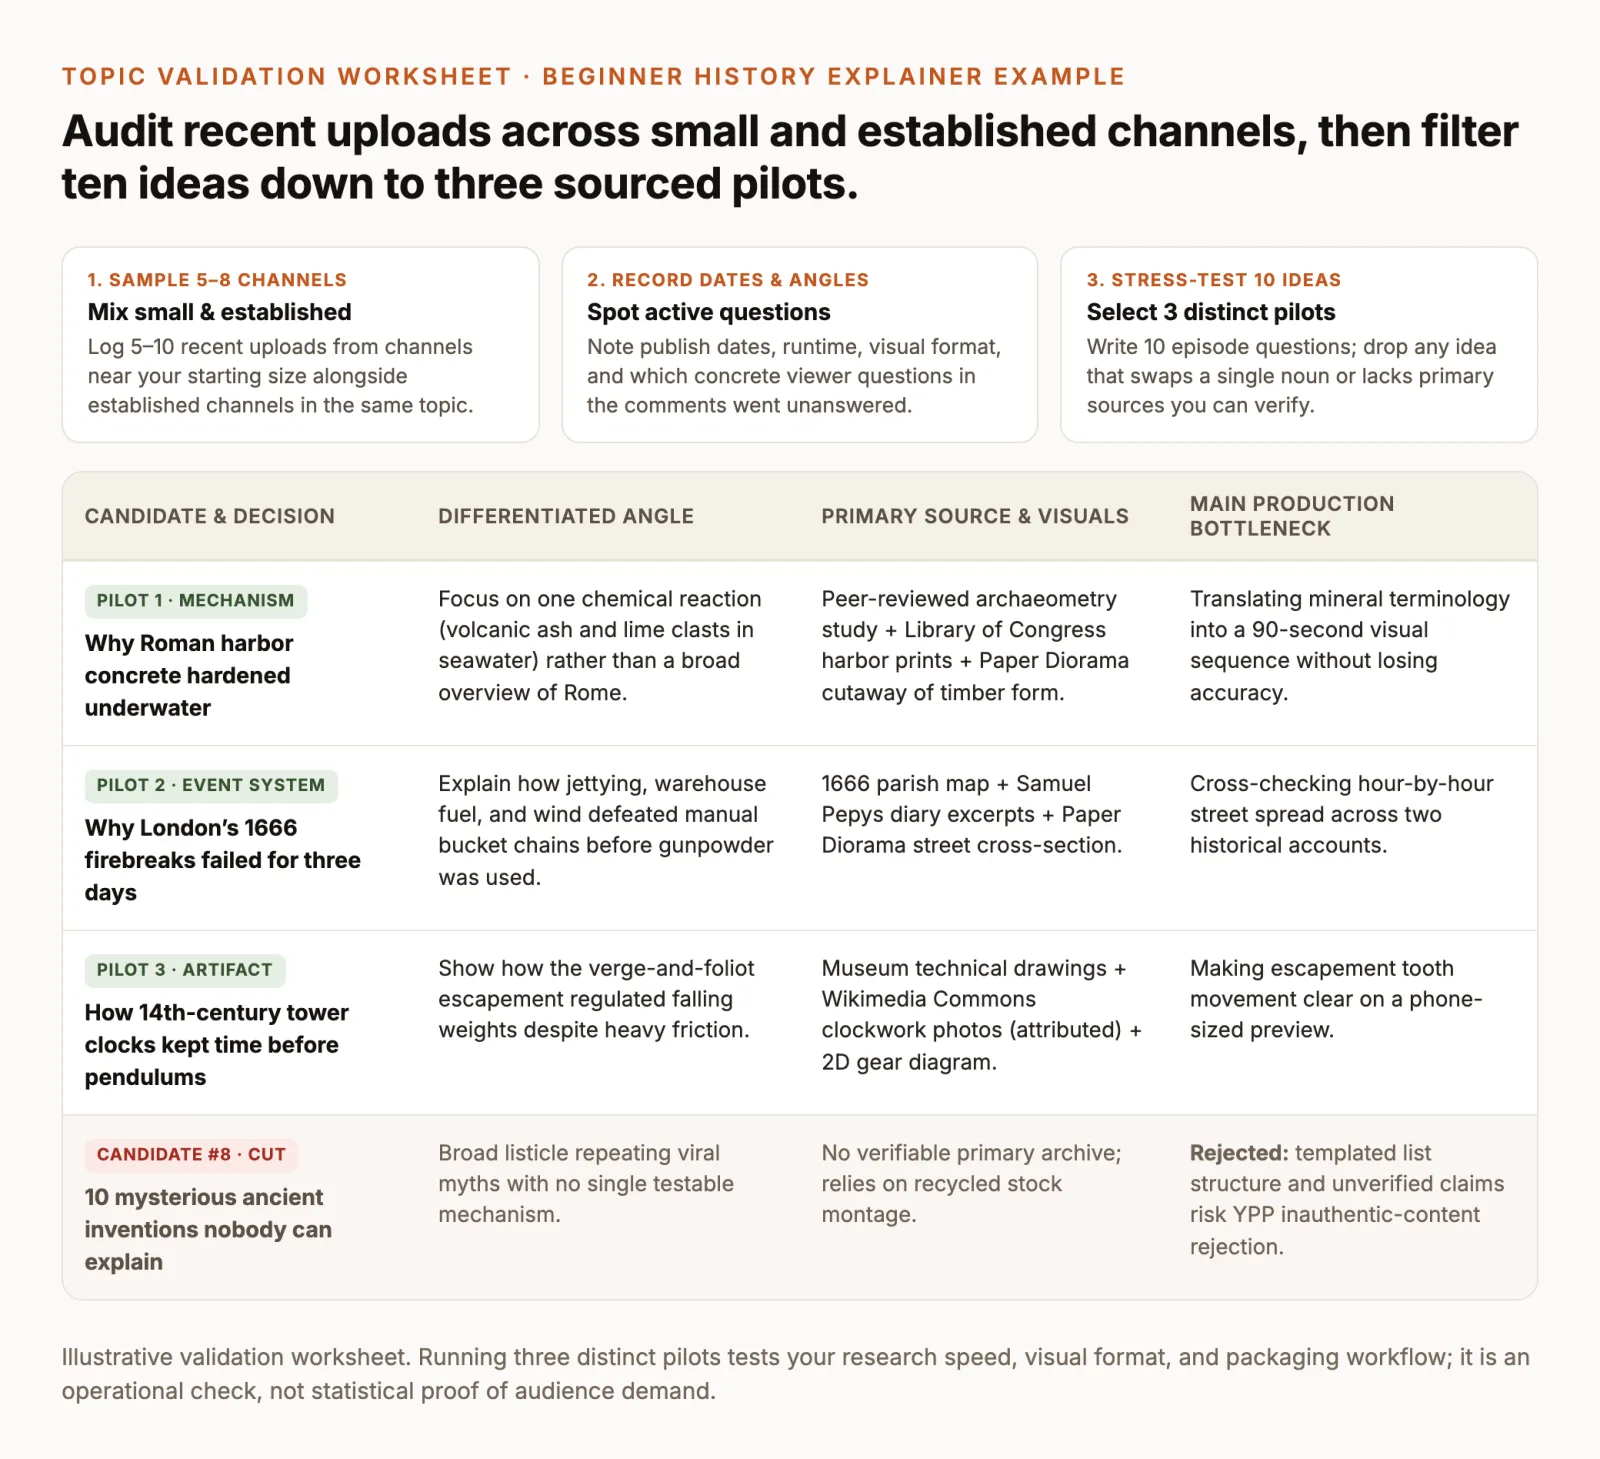
Audit recent uploads from small and established channels
Open YouTube in an incognito browser window (so your personal watch history does not skew the results) and find 5 to 8 active channels in your candidate niche. Include at least three smaller or newer channels alongside established ones; a giant channel can attract views on brand recognition alone, whereas a smaller channel’s recent uploads show what topics earn clicks right now.
For each channel, inspect 5 to 10 videos published in the last 90 days and log four items in a spreadsheet:
- Publish date and runtime: how often the channel actually posts and whether typical episodes run 4 minutes, 10 minutes, or 25 minutes.
- Core question and angle: what specific question the title and first 30 seconds promise to answer.
- Visual evidence used: how much of the screen time is archival media, custom diagrams, screen recording, or filmed demonstration.
- Unanswered viewer questions: read the top 20 comments on three recent videos and write down the follow-up questions viewers ask (“Wait, how did they pump the water up there?”, “Does this work on Windows 11 Home?”). Those follow-up questions are your cleanest episode seeds.
Write ten episode ideas, then select three pilots
Next, write ten specific episode ideas for your channel. Apply two strict filters to that list of ten:
- The noun-swap test: if episodes 1 through 10 share the exact same script skeleton and only swap out a city name, date, or noun (“10 facts about Rome,” “10 facts about Athens,” “10 facts about Sparta”), your format is a mass-production template. Rewrite them around distinct mechanisms or problems.
- The two-source test: for each candidate episode, locate at least two independent, citable sources (or one reproducible hands-on test) before approving the idea. If you cannot find the evidence in twenty minutes of searching, drop the topic.
From the candidates that pass both tests, select three distinct pilot episodes that test slightly different angles within your channel promise. In our beginner history explainer example, Pilot 1 tests a materials mechanism (Roman marine concrete), Pilot 2 tests an urban event system (London’s 1666 firebreaks), and Pilot 3 tests a mechanical artifact (a 14th-century tower clock escapement).
Once you have gathered your source documents, archival links, or technical notes, you can use an AI assistant or ChatCut’s Agent composer to stress-test your ten candidate angles without inventing unsupported claims:
What to check in the output: verify that every proposed episode points back to a passage or figure in the sources you attached, and immediately discard any angle where the model marked the evidence as missing until you find a primary source yourself.
Create a faceless YouTube channel and identity
Once your three pilot topics and sources are ready, set up the channel so every upload lands in a consistent, verified account.
Set up the channel, name and handle
According to YouTube’s official channel creation guide, you can create either a personal channel managed only by your Google Account or a channel connected to a Brand Account (which lets you use a channel name separate from your personal Google Account name and grant role-based access later).
To create the channel on a computer or mobile site:
- Sign in to YouTube, click your profile picture, and open Settings.
- Go to the Account section and select Add or manage channel(s) (or Create a channel if you do not have one yet).
- Click Create a channel (or Create a new channel), then enter your profile picture, Name, and Handle, and click Create channel.
If you plan to let an editor, researcher, or co-creator help manage uploads without sharing your password, use Channel permissions in YouTube Studio (Settings → Permissions), where you can invite collaborators as a Manager, Editor, Editor (Limited), Subtitle Editor, or Viewer (YouTube Help).
Pick a channel name and handle that tell a viewer what the channel is about in two or three words (for example, Mechanism History rather than Studio X-99). Keep YouTube’s official profile and handle guidelines in mind:
- Handle format: handles start with
@, must be 3 to 30 characters for Latin letters and numbers (1–10 characters for Han/Hangul; 2–20 for Hiragana/Katakana/Ethiopic), are not case-sensitive, and may include underscores (_), hyphens (-), periods (.), or Latin middle dots (·), though never at the very beginning or end. - Change limits: in YouTube Studio → Customization → Profile, you can change your channel name and your handle at most twice within a 14-day period, and changing a channel name removes any existing verification badge (YouTube Help).
Configure profile, banner and feature eligibility
Before uploading Pilot 1, finish three one-time setup tasks in YouTube Studio so your channel is not blocked from using custom thumbnails or longer runtimes:
- Upload your profile picture (
Customization → Profile). Per YouTube’s channel branding specifications, upload a static JPG, GIF, BMP, or PNG up to 15 MB that stays legible at 98 × 98 pixels. A clean two-letter monogram or simple emblem reads far better on phones than a detailed scene. - Add a channel banner (
Customization → Profile). Upload a 16:9 image of at least 2048 × 1152 pixels (YouTube recommends 2560 × 1440 pixels, 6 MB or smaller). Keep your channel promise text and logo inside the central 1235 × 338 pixel safe area so mobile and desktop crops never slice off words (YouTube Help). - Set country and audience defaults (
Settings → Channel). Under Basic info, choose your Country of residence (which determines YPP availability). Under Advanced settings, set your channel’s Audience (“made for kids” status) so you do not face upload restrictions on every video (YouTube Help). - Unlock Intermediate and Advanced features (
Settings → Channel → Feature eligibility). New channels start with Standard features only. Completing phone verification under Intermediate features unlocks custom thumbnails and videos longer than 15 minutes (YouTube Help). Advanced features—including higher daily upload limits, pinned comments, external description links, and YPP application eligibility—require phone verification plus either sufficient channel history or identity verification via a valid ID or short video check.
Be realistic about privacy at this step: a faceless public brand is not an anonymous account. While viewers only see your channel name, handle, and artwork, Google and YouTube require real phone verification, identity verification for advanced features, and real tax and banking identity in AdSense for YouTube before paying out earnings.
Design a repeatable thumbnail and title system
Because your face is not on the thumbnail to provide instant recognition across a home feed, your visual composition and typography have to carry that job.
Design one thumbnail layout before you produce Pilot 1 and reuse its grid across all three pilots:
- One focal object or diagram: show the mechanism, comparison, or screen result at large scale (for example, a cross-section of a Roman harbor block underwater, or a before/after table count).
- Two to four high-contrast words: add a short label that complements—rather than repeats—the video title, set in a single bold typeface with a consistent two-color palette.
- Mobile legibility check: shrink your draft thumbnail to 160 pixels wide on your monitor. If you cannot read the label or tell what the focal object is in one second, remove background clutter and enlarge the focal element.
- Technical specifications: YouTube’s custom thumbnail guide recommends a 16:9 image up to 3840 × 2160 pixels (minimum width 640 pixels) for standard videos, or 9:16 (recommended 2160 × 3840 pixels) for custom Shorts thumbnails added in Studio on a computer, saved as JPG or PNG under 50 MB on desktop (or 2 MB on mobile).
Choose AI tools for a repeatable workflow
Searches for AI tools for a faceless YouTube channel often turn up promises of “one-click autonomous channels.” Treat those claims with skepticism: an end-to-end auto-generated video that pulls a generic script, attaches stock clips by keyword, and publishes without human fact-checking or timing adjustments is the exact workflow targeted by YouTube’s inauthentic content policy.
Instead, map your production system into six distinct stages and use AI only where it saves mechanical work while keeping source verification and editorial judgment in your hands:
- Source research (human-led): collect primary archives, academic papers, or your own screen/workbench captures.
- Source-checked outline and script: organize your verified notes into a hook, step-by-step explanation, visual proof column, and takeaway.
- Narration: record your own voice or generate a consistent voiceover from the locked script.
- Owned, licensed, or stylised visuals: capture screens/hands, pull cleared public-domain or licensed assets, and generate stylised illustrations for unseen mechanisms.
- Timeline assembly and captions: cut the narration track first, align visuals to the exact spoken words, duck background music, and proofread captions.
- Human review and rights check: watch the private export on desktop and phone, log asset licenses, and set YouTube’s AI disclosure field.
Standalone free tools vs. an integrated AI editor
You can build this six-stage pipeline in two ways depending on your budget and how you prefer to work:
- Modular standalone stack: write scripts alongside your source PDFs, capture screen footage with OBS Studio, record and clean your own microphone track in Audacity (available for Windows, macOS, and Linux), pull cleared background music from the YouTube Audio Library in YouTube Studio, and assemble the timeline in a desktop editor.
- Integrated timeline and agent workflow in ChatCut: keep your script, voiceover, reusable workflow Skills, transcript-based cutting, and local 4K export inside one project in the ChatCut web app or ChatCut Desktop (supported on macOS 13+ for Apple silicon and Intel, and Windows 10+ x64; Linux and ChromeOS are not supported for Desktop).
How to run a repeatable episode workflow in ChatCut
When you produce multiple episodes in the same format, ChatCut’s Skills, Voices, and past-project references keep your style consistent from Pilot 1 to Pilot 3 without rebuilding settings from scratch:
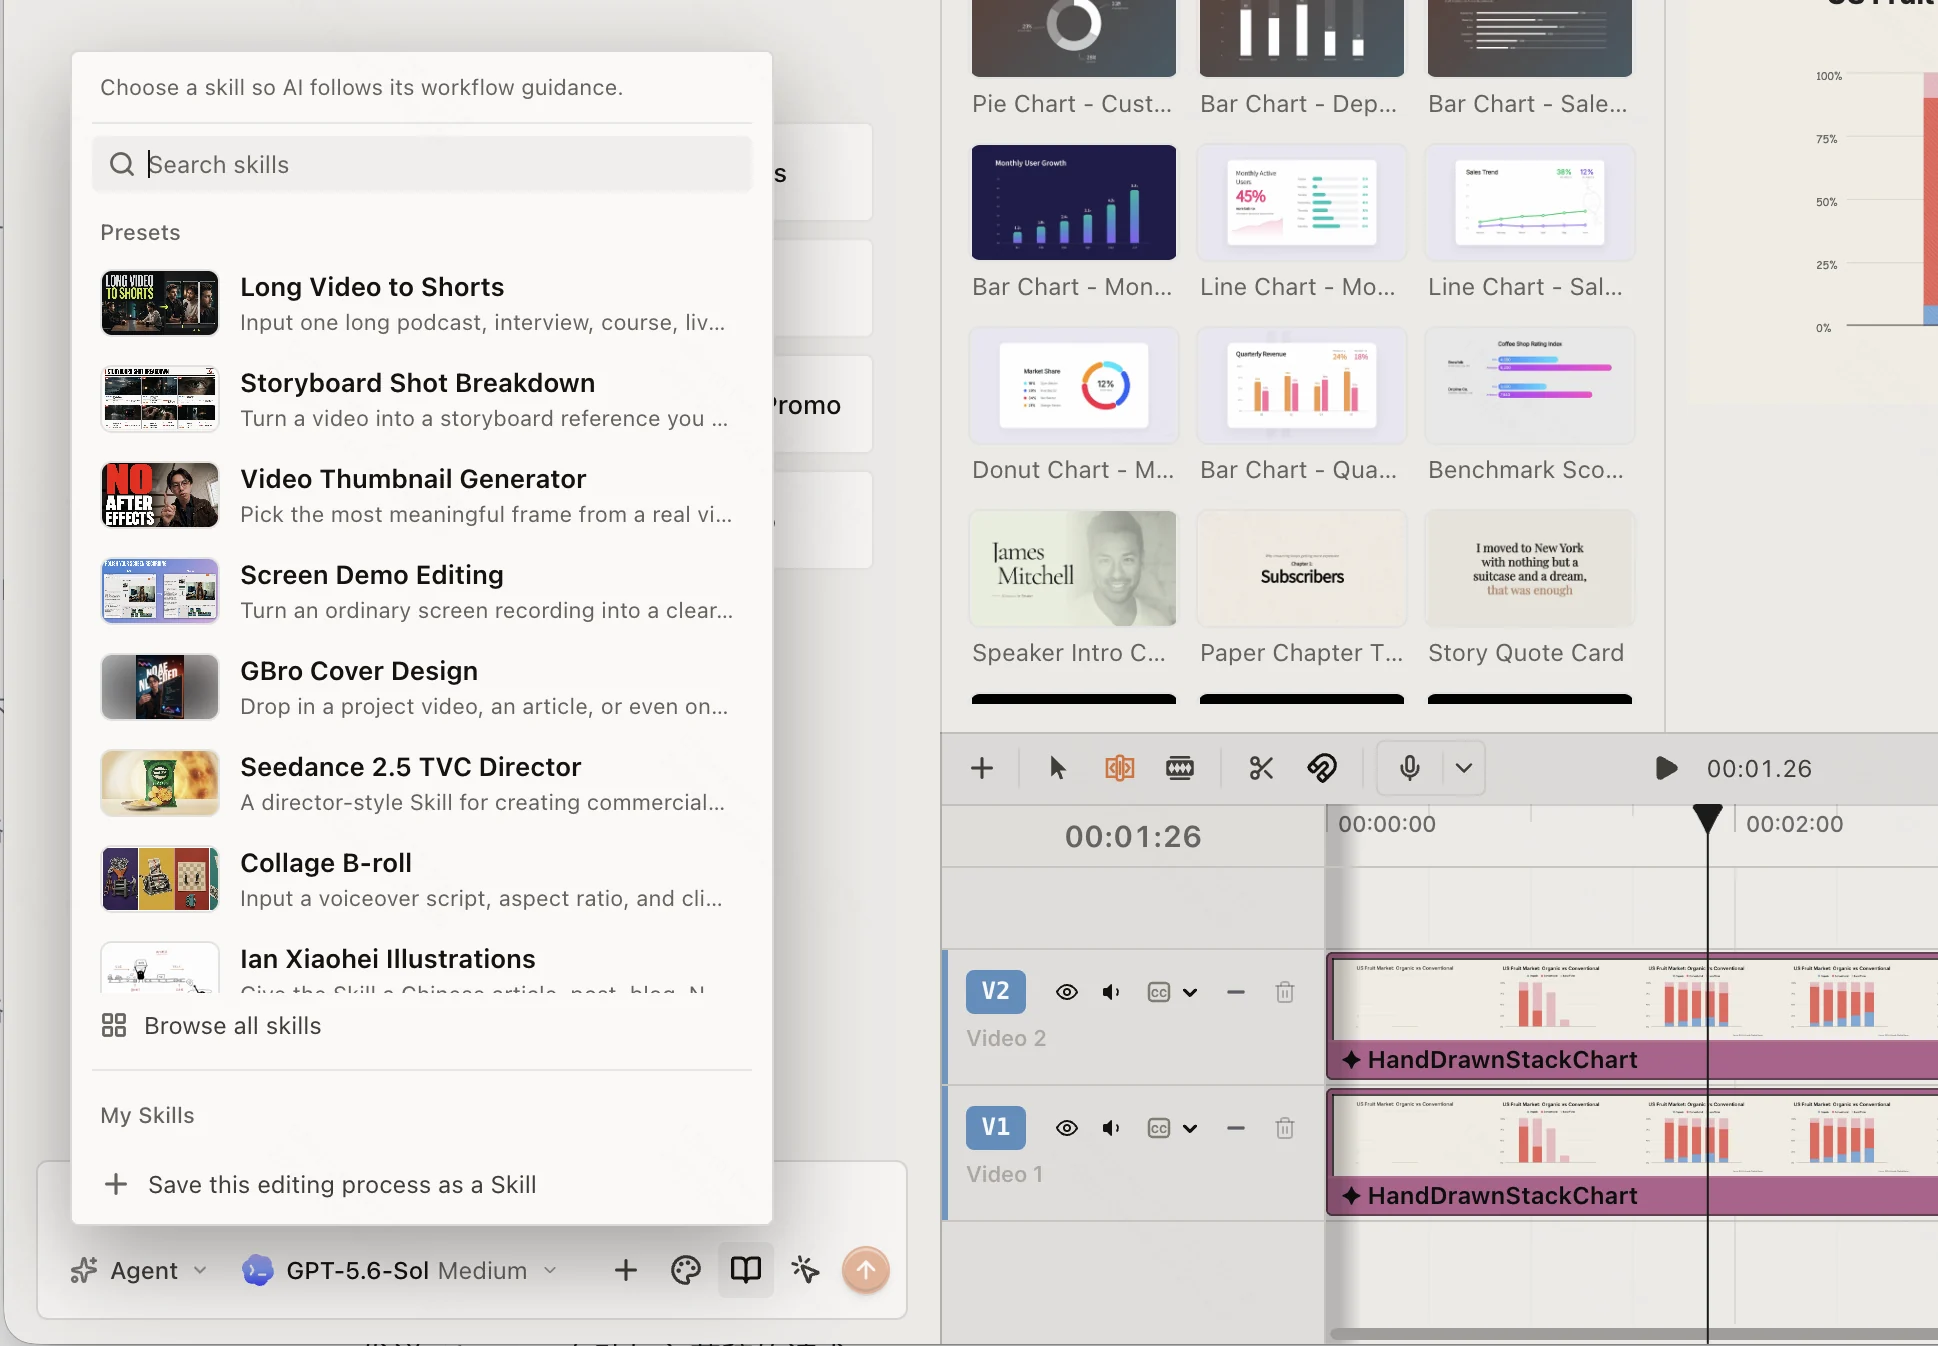
- Attach a reusable workflow Skill. Open your project, go to the AI composer, click the book icon labeled Skills below the message field, and browse Featured or My Skills—or click Browse all skills to open the Skill Marketplace (Skills overview). A Skill is reusable workflow guidance for the agent, not a pre-made video file: you attach the Skill, add your verified script or media references, and review any generation estimate before approving paid generation.
- Record or generate consistent narration. To record your own microphone at no credit cost, open the arrow beside the Record control above the timeline and choose Voiceover. To use a consistent AI narrator across episodes, select + → Voices below the AI composer, preview voices under Featured or My Voices, click Use to attach the voice to your draft, and send your final script with placement instructions (such as placing the audio on
A1starting at00:00, AI Voiceover guide). Generated audio appears in My Assets and can be dragged to an audio track if not placed automatically. - Lock your channel’s editing pattern. Once you finish editing Pilot 1—cutting pauses, setting caption styling, and ducking music under narration—open Skills in the AI composer and select Save this editing process as a Skill to store the workflow under My Skills for future projects. In ChatCut Desktop 0.7.7 or later, you can also type
@in the AI input box and select a previous episode under Past projects so the agent reads that project’s cut, pacing, and caption style and applies the same packaging to your new timeline (ChatCut Desktop docs). - Export video and SRT subtitles. Select Export → Video in the top header to render your MP4, and Export → Subtitles → SubRip (.srt) to export a clean subtitle file (Export guide). Cloud exports from the web app render up to 1080p, while ChatCut Desktop renders locally on your computer at up to 4K.
What costs nothing vs. what uses credits: the Free plan includes the core editor—manual timeline editing, uploads, transcription, and standard caption editing never use credits. Exporting MP4/WebM video, MP3 audio, subtitles, and XML also uses no credits; on Free, web/cloud exports share a cumulative 60-minute account quota, while ChatCut Desktop renders video locally on your computer.
If you connect Claude Code or Codex (via plugin or local MCP), the agent’s editing work—cutting, reordering, removing pauses and fillers, captions, B-roll placement, and motion graphics the agent writes—is covered by your existing Claude or ChatGPT subscription and costs no ChatCut credits. ChatCut credits are used only when you run the built-in ChatCut Agent’s messages, built-in Agent motion graphics, or ChatCut-hosted generation services (AI video, image, music, sound effects, and voiceover). Starting credit allowances vary by account (see Free and Pro), so check your balance in the avatar menu and the generation estimate before budgeting a multi-episode batch.
For the step-by-step single-episode build, follow how to make a faceless YouTube video. Once your narration or screen recording is on the timeline, you can also copy stage-by-stage editing instructions from our collection of 26 video editing prompts.
Run a sustainable first-month publishing test
Many new channels stall in month one because the creator announces a three-videos-per-week schedule, spends fourteen hours on Episode 1, rushes Episode 2 to hit an arbitrary deadline, and quits by week three.
Treat your first month as an operational calibration test across your three validated pilots. Your goal in month one is not viral reach; it is measuring how many hours and credits one finished episode actually costs you, and verifying that your packaging earns clicks and holds viewers past the first thirty seconds.
Track time and generation spend per episode
Keep a four-column log beside your three pilot projects:
- Research and script hours: how long it took to find sources, write the narration, and verify every factual claim.
- Visual and audio build hours: time spent capturing screens, filming overhead shots, pulling archival images, or generating and reviewing scenes.
- Timeline edit and QA hours: time spent cutting audio, aligning visuals, proofreading captions, and watching the private upload on desktop and mobile.
- Direct cost / credits consumed: exact voiceover characters, generated scenes, or stock licenses used for that episode.
By the end of Week 3, divide your available weekly hours by the average total hours of Pilot 2 and Pilot 3 (Pilot 1 always includes one-time setup overhead). If a polished 5-minute history explainer takes 7.5 hours and you have 7 hours per week, your sustainable cadence is one upload every week to ten days—not three per week.
Read early analytics without chasing universal CTR rules
In Week 4, open YouTube Studio → Analytics → Content (or the Reach and Engagement tabs at the individual video level). As documented in YouTube’s thumbnail impressions and watch time help guide, the “Impressions and how they led to watch time” funnel shows how often YouTube displayed your thumbnail, the resulting click-through rate (CTR), and the average view duration generated from those clicks.
Ignore blog posts that insist every channel needs a single magic CTR percentage. CTR shifts dramatically depending on where impressions appear (browse features vs. search results) and how small the initial sample size is. Instead, compare your three pilots against each other:
- Packaging check (Impressions → CTR): if Pilot 1 and Pilot 2 received a few hundred impressions in search or browse feeds, which thumbnail and title phrasing earned the higher click share? Does the first sentence of the video immediately address the words on that thumbnail?
- Opening retention check (0:00–0:30): inspect the audience retention curve for the first thirty seconds of each pilot. A steep drop in the first fifteen seconds usually means the opening repeated the title word for word, started with a slow channel bumper, or showed generic mood footage instead of the mechanism promised in the thumbnail.
- Mid-video drop-offs: note the exact timestamp of any sharp dip in the middle of a pilot, then play your timeline at that timestamp. Did the visual stay static for twenty seconds while the narration listed numbers, or did the script wander into a side tangent?
- Viewer comments and search terms: even five or ten comments on a new channel reveal whether the explanation was clear or left a key step out.
Understand faceless channel monetization rules
Faceless channels qualify for the YouTube Partner Program under the exact same rules and thresholds as on-camera creators. However, because faceless formats rely heavily on voiceovers, archival or stock media, and AI tools, reviewers scrutinize them closely for originality and authentic human input.
Compare Expanded YPP and ad revenue sharing
YouTube currently operates a two-tier entry structure for the Partner Program in eligible countries/regions. Meeting the numerical threshold does not turn monetization on automatically: once eligible, you apply in YouTube Studio → Earn, and human reviewers evaluate your channel against YouTube’s policies (YPP overview and eligibility).
| Requirement | Expanded YPP (early access) | Full YPP (ad revenue sharing) |
|---|---|---|
| Subscribers | 500 subscribers | 1,000 subscribers |
| Recent upload activity | 3 valid public uploads in the last 90 days | Required through watch-hour or Shorts thresholds |
| Long-form watch hours | 3,000 valid public watch hours in the last 12 months | 4,000 valid public watch hours in the last 12 months |
| OR Shorts views | 3 million valid public Shorts views in the last 90 days | 10 million valid public Shorts views in the last 90 days |
| Features unlocked | Fan funding (Super Thanks, Super Chat, memberships) and YouTube Shopping for your own products | Watch Page and Shorts Feed ad revenue sharing, YouTube Premium revenue, plus all early-access features |
Keep three operational details from YouTube’s official eligibility documentation in mind while planning your format:
- Shorts watch hours do not count toward the 3,000 or 4,000 long-form watch-hour thresholds. Public watch hours earned from the Shorts Feed only count via the 3 million or 10 million public Shorts views path.
- Account prerequisites: before you can apply in Studio → Earn, your channel must live in an eligible region, have no active Community Guidelines strikes, enable 2-Step Verification on the Google Account, have advanced features unlocked on YouTube, and link one active AdSense for YouTube account.
- Mid-roll ad breaks (the “8-minute rule”): once your channel is accepted for ad revenue sharing, monetized videos that run 8 minutes or longer can enable mid-roll ads during natural pauses or transitions (YouTube mid-roll ad guide). Never pad a 4-minute explanation with four minutes of repetition just to cross 8:00; collapsed viewer retention hurts both recommendations and actual ad impressions served.
- Upcoming terms notice: YouTube’s official YPP overview page currently flags updates to Partner Program terms taking effect on February 1, 2027, so recheck YouTube Studio → Earn and the official help page when your channel approaches application thresholds.
Beyond YouTube ad sharing, faceless channels in instructional or technical niches often diversify through software or tool affiliate links, direct sponsorships once view counts stabilize, or downloadable templates and study guides—provided external links follow YouTube’s external links policy and Advanced features are unlocked.
Pass originality, reused and inauthentic content checks
When your channel applies for YPP (and during periodic checks afterward), reviewers inspect your channel as a whole—checking your main theme, most viewed videos, newest videos, biggest share of watch time, video metadata, and the About section (YouTube channel monetization policies).
Two separate policies determine whether a faceless channel passes review:
- Inauthentic content (formerly called “repetitious content”). On July 15, 2025, YouTube updated the name of its repetitious content policy to inauthentic content to clarify that mass-produced, templated, or easily replicable videos built without meaningful human insight are ineligible to monetize. YouTube explicitly allows using the same intro and outro across episodes and using AI to assist with script editing or to generate background visuals for a well-researched narrative. It rejects image slideshows, scrolling text with minimal narrative, and AI-generated videos stamped out from generic templates.
- Reused content. Taking clips from other creators, television broadcasts, movies, or games—or reading out articles, Reddit threads, or websites you did not write—without adding significant original commentary, critique, or educational transformation fails reused-content review. Having a stock-footage license or another creator’s permission prevents a copyright strike, but permission alone does not satisfy YouTube’s reused-content rule.
Keep a simple folder for every episode containing your research citations, original script drafts, timeline project files, and asset licenses. That folder is your proof of original authorship if you ever record a video appeal for a monetization review.
Disclose realistic AI content accurately
Using AI tools during production does not disqualify a channel from monetization, provided the work is original and you follow YouTube’s altered or synthetic content disclosure rules.
During the upload flow in YouTube Studio, open the Attributes section and find the AI use setting:
- Choose Yes (disclosure required) when your video contains realistic synthetic or meaningfully altered content that a viewer could easily mistake for a real person, place, or event—such as making a real person appear to say or do something they did not, altering footage of a real event or place, generating a realistic-looking historical or news scene that never happened on camera, or using AI-generated music.
- Disclosure is not required for clearly unrealistic content (such as flat 2D diagrams or paper-diorama animations), using AI to brainstorm topics or draft/edit scripts, automatic captions, color correction, noise cleanup, or cloning your own voice for voiceovers.
YouTube notes that adding an AI disclosure label alone does not reduce a video’s audience reach or remove its eligibility to earn money, whereas repeatedly failing to disclose realistic synthetic media can lead to content removal or suspension from the YouTube Partner Program.
Decide what to repeat, revise or stop
After publishing Pilots 1, 2, and 3 and reviewing your Week 4 log, do not overhaul your channel name, niche, voice, and visual style all at once. Change one major variable for Episodes 4 through 6 based on what your log and analytics showed:
- If production took twice your weekly hour budget: keep the niche and audience, but simplify the visual density or shorten target episode length from 8 minutes to 4 minutes. Reuse saved project templates and caption styles so timeline assembly drops by a third.
- If impressions turned into clicks, but viewers left in the first 30 seconds: keep your topic selection and thumbnail style, and rewrite your opening script structure so the first frame shows the visual proof or mechanism promised in the title.
- If you ran out of verifiable sources by Episode 3: narrow or shift your angle toward a topic where public archives, technical documentation, or your own screen/workbench captures are plentiful before producing another batch.
Before you start building Episode 4, run your next script and shot list through a pre-production check so every claim, visual, and policy requirement is locked before you spend generation credits or editing hours:
Your immediate next action is straightforward: pick the strongest angle from your three pilots, gather two primary sources for Episode 4, and open your saved project template to build the next episode cleanly.